SPONSORED CONTENT
Pneumatic Tools for Woodworking: Beginner to Pro Guide
This article sponsored by Equipement Industriel Polar
Your workshop awaits transformation. The question isn’t whether pneumatic tools will improve your woodworking — it’s simply when you’ll make the leap.
When French ship builders in the early 1800s discovered the efficiency of pneumatic systems for their maritime workshops, they unknowingly laid the groundwork for one of woodworking’s most transformative technologies.
Today, pneumatic tools have evolved from simple air-powered hammers to sophisticated precision instruments that can make the difference between a weekend hobbyist and a professional craftsperson.
Whether you’re setting up your first workshop or upgrading from electric tools, understanding pneumatic systems will fundamentally change how you approach woodworking projects. This guide strips away the confusion surrounding air tools and compressors, giving you the practical knowledge to make informed decisions that will serve you for decades.
Understanding Pneumatic Power: More Than Just Compressed Air
Pneumatic tools operate on an elegantly simple principle: compressed air stored in a tank is released in controlled bursts to power various mechanisms. Unlike their electric counterparts, pneumatic tools contain fewer moving parts, making them lighter, more durable, and less prone to overheating during extended use.
The real advantage becomes apparent during long work sessions. While an electric nailer might require cooling breaks or battery swaps, a pneumatic tool maintains consistent power as long as your compressor keeps up. This reliability explains why professional cabinet makers and furniture builders consistently choose air tools for production work.
Pneumatic Nailer vs. Stapler: Choosing Your Primary Fastening Tool
The decision between a nailer and stapler isn’t about which tool is better — it’s about matching the tool to your specific application. Understanding these differences will prevent costly mistakes and ensure structural integrity in your projects.

When to Use a Pneumatic Nailer
Brad nailers excel at finish work where you need holding power without visible fastener heads. The 18-gauge nails they fire create minimal surface disruption, making them ideal for:
• Installing crown molding and baseboards
• Attaching cabinet face frames
• Securing decorative trim elements
• Assembling furniture where joints will be visible
Finish nailers, firing 15 or 16-gauge nails, provide more holding strength for structural applications like attaching stair treads, building deck railings, or constructing built-in cabinetry. The slightly larger nail diameter offers significantly more pull-out resistance.
Framing nailers represent the heavy artillery of pneumatic fastening. These tools fire 10 to 12-gauge nails up to 3-1/2 inches long, making them essential for:
• Deck framing and structural supports
• Workshop construction and renovation
• Building outdoor furniture that must withstand weather stress
• Any application where shear strength is critical
When to Use a Pneumatic Stapler
Staples distribute holding force across two points rather than one, making them superior for certain applications. The crown of the staple resists pull-through on thin materials that nails might tear through.
Narrow crown staplers (1/4 inch to 1/2 inch) work beautifully for:
• Attaching fabric to furniture frames
• Installing thin paneling without splitting
• Securing drawer bottoms in cabinet construction
• Fastening flexible materials that require distributed pressure
Wide crown staplers (1 inch or wider) provide industrial-strength holding for:
• Installing underlayment and subflooring
• Securing roofing materials on workshop structures
• Attaching rigid insulation panels
• Any application requiring maximum holding power across a broad surface
The overlap between tools exists in trim installation — both brad nailers and narrow crown staplers can handle most trim work. Many experienced woodworkers keep both on hand, choosing based on wood density and grain direction to minimize splitting.
Compressor Sizing: The Foundation of Your Pneumatic System
Choosing the wrong compressor ranks among the most common and expensive mistakes in workshop setup. Too small, and your tools will suffer from inconsistent power and constant waiting for pressure recovery. Too large, and you’ve wasted money on capacity you’ll never use while paying higher electricity bills.
Residential Workshop Requirements
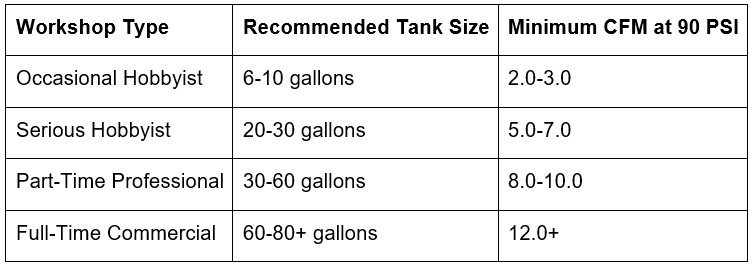
For a home woodworker running occasional projects, a 6 to 10-gallon pancake or hot dog style compressor typically provides adequate performance. These compact units offer:
• CFM ratings between 2.0 and 4.0 at 90 PSI
• Sufficient recovery time for intermittent use
• Portability for moving between work areas
• Lower initial investment (typically $150-$400 CAD)
This size handles most finish nailers, brad nailers, and small spray guns effectively. However, if you plan to run multiple tools simultaneously or use air-hungry equipment like sanders, you’ll need to step up.
A 20 to 30-gallon vertical or horizontal tank compressor suits serious hobbyists and part-time professionals. These units deliver:
• CFM ratings from 5.0 to 7.0 at 90 PSI
• Extended run time between cycling
• Capacity to power framing nailers and larger spray guns
• Better performance for sustained operations
Expect to invest $500-$1,200 CAD for a quality unit in this range. The pneumatic tools and compressors category includes several options that balance residential power needs with commercial durability.
Commercial Workshop Requirements
Professional woodworking operations demand compressors that can sustain continuous operation without thermal shutdown. A 60 to 80-gallon two-stage compressor represents the entry point for commercial use, offering:
• CFM ratings from 10.0 to 14.0 at 90 PSI
• Two-stage compression for cooler, drier air
• Cast iron construction for extended service life
• Capability to run multiple tools simultaneously
These units typically cost $1,800-$3,500 CAD but will serve a busy shop for 20+ years with proper maintenance.
For cabinet shops, millwork operations, or any facility running constant production, 80+ gallon three-phase electric compressors become necessary. These industrial systems provide:
• CFM ratings exceeding 20.0 at 90 PSI
• Integrated air drying and filtration systems
• Aftercoolers to reduce moisture in compressed air lines
• Rotary screw designs for truly continuous operation
Professional installations often include dedicated air piping with drops at each workstation, eliminating the need for long hoses that reduce pressure and create tripping hazards.
PSI and CFM Demystified: Reading the Numbers That Matter
The specifications on compressors and tools often read like a foreign language, but understanding just two measurements — PSI and CFM — will clarify 90% of purchasing decisions.
PSI: Pounds Per Square Inch
PSI measures the pressure of compressed air in your tank and lines. Think of it as the intensity of the air being delivered. Most pneumatic woodworking tools operate optimally between 70-120 PSI, with 90 PSI being the industry standard.
Higher PSI doesn’t necessarily mean better performance. Many finish nailers actually perform worse above 100 PSI, driving nails too deep and splitting delicate trim. Always check your tool’s optimal PSI range and use an inline regulator to dial in the perfect pressure for each application.
CFM: Cubic Feet Per Minute
CFM measures volume — how much air your compressor can deliver continuously. This specification determines whether your compressor can actually power your tools effectively.
Here’s where confusion enters: manufacturers often list “displacement CFM” (theoretical maximum) rather than “delivered CFM” (actual usable air). Always look for SCFM (standard cubic feet per minute) ratings, which account for real-world performance at specific PSI levels.
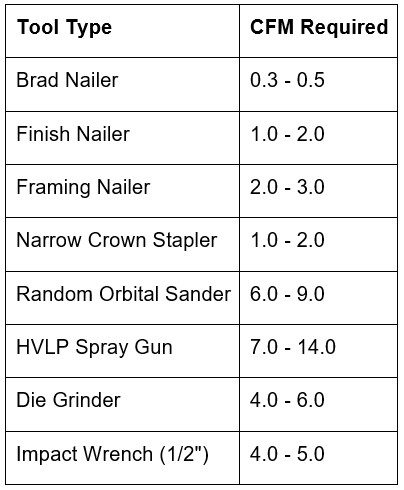
Quick Reference Chart: Tool CFM Requirements at 90 PSI
Compressor Sizing Chart

To calculate your needs, add up the CFM requirements of all tools you might run simultaneously and multiply by 1.5 to create a safety margin. For example, if you might run a finish nailer (2.0 CFM) and a spray gun (10.0 CFM) together, you need: (2.0 + 10.0) × 1.5 = 18.0 CFM at 90 PSI.
5 Costly Mistakes Woodworkers Make with Pneumatic Tools
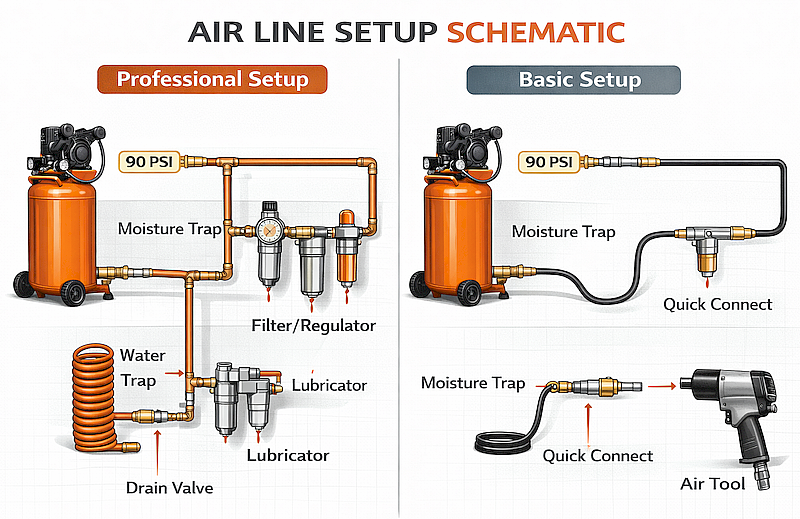
Mistake #1: Neglecting Air Line Size and Length
Running a 1/4-inch air hose 50 feet from your compressor to your tool creates a pressure drop that can exceed 20 PSI. This seemingly minor detail causes tools to underperform, nails to set improperly, and finish quality to suffer.
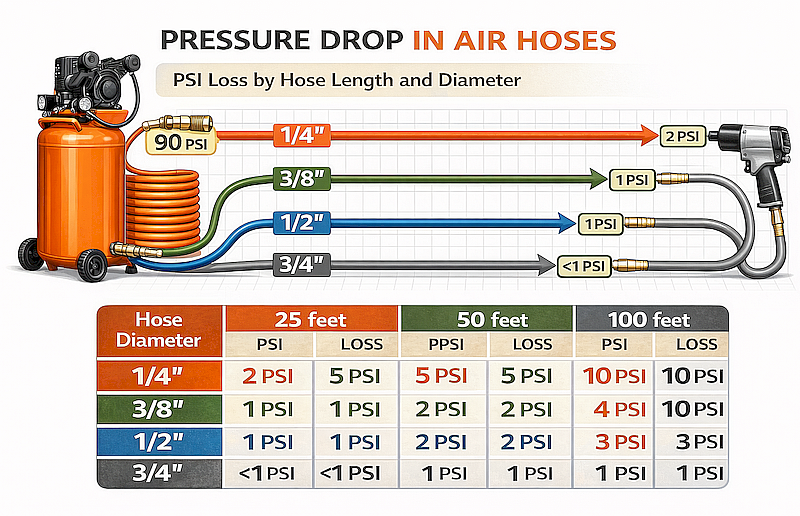
The Solution: Use 3/8-inch diameter hose as your main line, stepping down to 1/4-inch only for the final 6 feet to your tool. Keep hose runs under 25 feet when possible, and install a pressure gauge at your work area to monitor actual delivered pressure.
Mistake #2: Ignoring Moisture Management
Compressed air naturally creates condensation as it cools. Without proper moisture removal, water droplets travel through your air lines and into your tools, causing:
• Rust formation inside tool mechanisms
• Freezing in cold workshops (water expands and cracks internal components)
• Finish defects when spraying (fish-eyes and bubbles)
• Premature seal and O-ring failure
The Solution: Install a combination filter/regulator/lubricator (FRL) unit at each workstation. Drain your compressor tank daily by opening the petcock valve at the bottom. For spray finishing work, add a desiccant air dryer before your spray gun for truly moisture-free air.
Mistake #3: Over-Lubricating Pneumatic Tools
The irony of pneumatic tool maintenance is that too much oil causes more problems than too little. Excess lubricant:
• Attracts sawdust and creates sludge in tool mechanisms
• Can spray onto workpieces, causing finish adhesion problems
• Wastes expensive pneumatic oil
• Creates slippery conditions around your work area
The Solution: Add just 3-4 drops of pneumatic tool oil to your tool’s air inlet daily before use. If you have an inline lubricator, set it to its minimum flow rate. Many modern tools feature sealed mechanisms that require even less frequent lubrication—check your manual.
Mistake #4: Using the Wrong Fastener Length
A framing nailer can fire a 3-1/2 inch nail through 2×4 lumber with ease, but that doesn’t mean you should. The correct fastener length follows the one-third rule: the fastener should penetrate at least one-third the thickness of the material you’re fastening into.
For a 3/4-inch cabinet face frame attached to 3/4-inch plywood, you need a 1-1/4 inch brad nail (the 3/4-inch face frame plus 1/2 inch into the plywood backing). Using 2-inch nails here risks blow-through, splitting, and visible fastener heads on the opposite side.
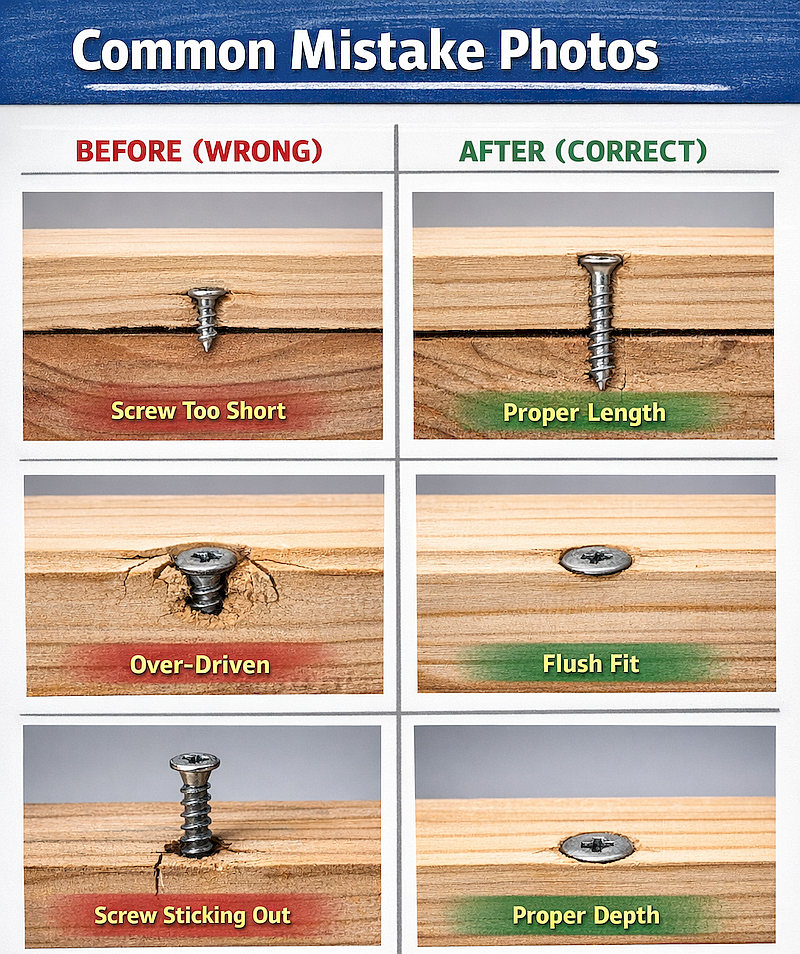
The Solution: Keep three lengths of fasteners on hand for each tool: short for thin materials, medium for standard applications, and long for maximum holding power when needed. A properly stocked workshop includes variety packs of common fastener sizes to match different project requirements.
Mistake #5: Skipping the Break-In Period
New pneumatic tools contain manufacturing residue and protective coatings that need to be worked out before precision work. Firing your brand-new finish nailer directly into expensive cherry trim is asking for trouble — depth settings won’t be consistent until the tool has cycled 200-300 times.
The Solution: When you unbox a new pneumatic tool, spend 15 minutes firing it into scrap wood. Adjust your pressure, test different depth settings, and let the tool settle into its operating rhythm. This break-in period also helps you identify any defects while you’re still within the return window.
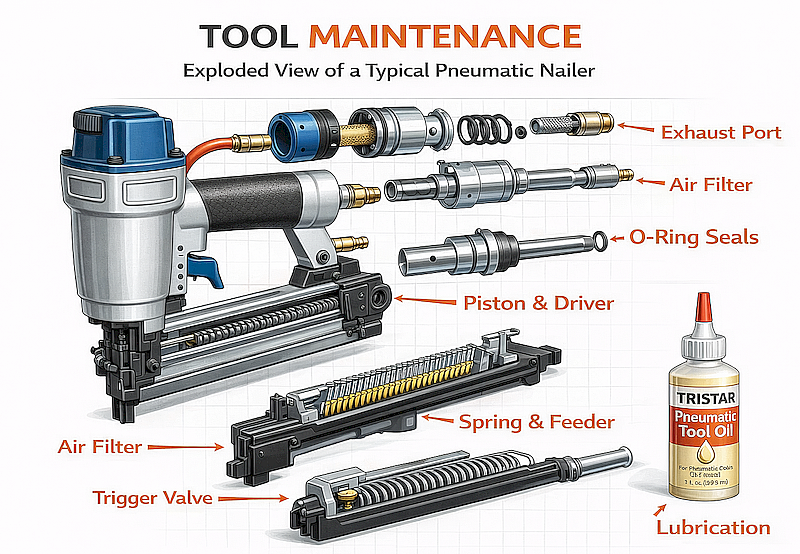
Preventive Maintenance: Extending Tool Life by 10+ Years
The difference between a pneumatic tool that lasts 5 years and one that serves you for 15+ years comes down to consistent maintenance. Unlike complex electric motors, air tools have simple mechanical systems that respond beautifully to basic care.
Daily Maintenance (2 minutes)
Before each work session:
• Add 3-4 drops of pneumatic tool oil to the air inlet
• Fire 4-5 shots into scrap to distribute oil
• Check for air leaks around connections
• Verify your pressure regulator setting
After each work session:
• Disconnect tool from air supply
• Clean exterior dust and debris with compressed air
• Drain compressor tank by opening petcock
• Store in a dry location
Weekly Maintenance (10 minutes)
Once per week or after 20 hours of use:
• Remove fastener magazine and clean with dry compressed air
• Inspect driver blade for wear or damage
• Check all connection points for tightness
• Clean or replace air filter if visibly dirty
• Verify depth-of-drive adjustment moves freely
Monthly Maintenance (30 minutes)
Every month or after 80 hours of use:
• Disassemble magazine and clean internal mechanisms
• Inspect O-rings and seals for wear
• Apply light oil to all moving pivot points
• Check trigger mechanism for smooth operation
• Test tool at various PSI settings to ensure consistent performance
• Replace air filter element
Annual Maintenance (2 hours)
Once yearly or after 500 hours of use:
• Complete disassembly and cleaning
• Replace all O-rings and seals (buy a seal kit)
• Inspect piston and cylinder for scoring
• Replace worn driver blade if needed
• Test firing pin spring tension
• Recalibrate depth adjustment mechanism
This schedule assumes moderate home use (5-10 hours weekly). Professional operations should compress this timeline proportionally. A tool seeing 40 hours weekly should receive monthly maintenance every week and annual maintenance quarterly.
Compressor Maintenance
Your air compressor requires attention too:
• Daily: Drain moisture from tank
• Weekly: Check oil level (if oil-lubricated model)
• Monthly: Clean intake filter, inspect belt tension
• Quarterly: Change oil, clean pressure switch contacts
• Annually: Inspect tank for rust, test pressure relief valve
Properly maintained, a quality compressor will outlive several generations of tools. The cast iron two-stage models common in professional shops routinely see 25+ years of service.
Making the Investment: Quality vs. Budget Considerations
The pneumatic tool market spans from $40 CAD impulse buys at big box stores to $600+ professional-grade tools. Understanding where to invest and where you can economize makes the difference between buyer’s remorse and long-term satisfaction.
For finish nailers and brad nailers — tools that determine the final appearance of your work—investing in professional-grade equipment pays dividends. Brands known for consistent depth settings, minimal misfires, and comfortable ergonomics justify their premium pricing through years of trouble-free service.
Framing nailers and heavy-duty staplers, while important, operate in less precision-critical applications. A mid-range tool often performs adequately for residential workshop use, with the understanding that it may require more frequent maintenance and earlier replacement.
The one area where budget-conscious choices consistently create regret is the air compressor itself. A quality two-stage compressor costs 2-3 times what a contractor-grade single-stage unit does, but will outlast four of the cheaper models while maintaining consistent pressure and requiring less maintenance. According to industry data, professional-grade compressors average 25+ years of service compared to 6-8 years for budget models.
Beyond Basic Fastening: Expanding Your Pneumatic Capabilities
Once your core nailer and compressor system is established, the versatility of pneumatic power opens remarkable possibilities. Random orbital sanders powered by air run cooler and smoother than electric versions, making them ideal for finish sanding where surface quality is critical.
HVLP (High Volume Low Pressure) spray systems produce furniture-quality finishes that brushes and rollers simply cannot match. While the initial investment seems substantial, the time savings on large projects and the professional results justify the expense for serious woodworkers.
Air-powered cut-off tools, die grinders, and ratchet wrenches all find regular use in well-equipped workshops, handling tasks from cutting metal hardware to assembling complex joinery. The common thread is reduced fatigue — pneumatic tools weigh significantly less than electric equivalents since they don’t carry heavy motors.
Conclusion: Building a System That Grows with Your Skills
The beauty of pneumatic tools lies not in any single component but in how the complete system elevates your woodworking capabilities. A properly sized compressor paired with quality tools and maintained with simple discipline will serve you for decades, growing alongside your skills and ambitions.
Start with the fundamentals — a reliable compressor and the one or two nailers your immediate projects demand. As you gain experience with pneumatic power, you’ll develop preferences for specific tool features and understand which upgrades deliver real value versus marketing hype.
The investment pays back not just in tool longevity but in the quality of your finished work. Consistent fastener depth, reduced splitting, and the confidence to tackle ambitious projects all flow from understanding these fundamental principles. Whether you’re installing your first piece of trim or running a production cabinet shop, the principles remain the same: match your tools to your needs, maintain them diligently, and respect the power of compressed air.
Your workshop awaits transformation. The question isn’t whether pneumatic tools will improve your woodworking — it’s simply when you’ll make the leap.