PROJECT
Woven wooden trivets

Stephen Gabe

Find more Gifts / Crafts projects
Although this cool little project can be fiddly to make, it shows off wood beautifully. Your friends and family will be stumped, wondering how you wove wood together!
Weaving pieces of wood together isn’t as easy as weaving yarn — it’s surprisingly fiddly to do — but this project is a lovely way to show off wood in an unusual way.
There’s a level of accuracy needed to create a nicely fitting trivet that looks clean and tidy. Don’t think you can breeze through this project without considering accuracy, as that will only cause problems during assembly.
Woven wooden trivets
How did you weave wood?
You can make trivets out of the same wood for all eight pieces or choose different types of woods to weave. Two contrasting woods make a lovely design, too. Maybe one day I’ll make one with eight different types of wood.
The trivets I made are 5-5/8″ square. You’ll need eight strips of wood, 5/8″ × 5/8″ and 5-5/8″ long. You could use a table saw to cut pieces 5/8″ × 5/8″ (about 4′ total length is needed). Another approach is to thickness plane a shorter piece of wood to 5/8″ thick that you can later cut into the eight 5-5/8″ long pieces. I’ve used both approaches but tended to settle on cutting 5/8″ × 5/8″ lengths on my table saw. We all have scraps of lovely wood we can use this way. I’ve used a dedicated push jig to keep the individual strips of wood down on the table saw’s surface and pressed into the fence during machining, which makes the operation safer and more accurate.
When planning the number of pieces you’ll need there’s no harm to make an extra one, just in case of an issue occurring later on.
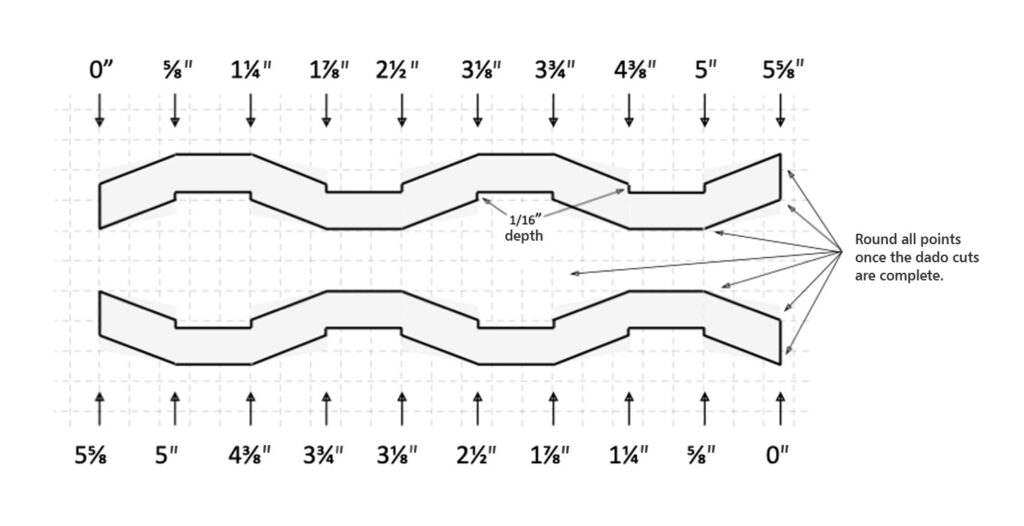
Accurate notches
Start by cutting the interlocking notches. The sloping bevels between the notches will follow. This works well on a table saw with a dado blade. Install a 5/8″ wide dado blade to be raised up 5/16″ above the tabletop. If the depth is below 5/16″ the pieces will be very difficult to assemble later. If your dado is a hair above 5/16″ that’s good…but just a hair!
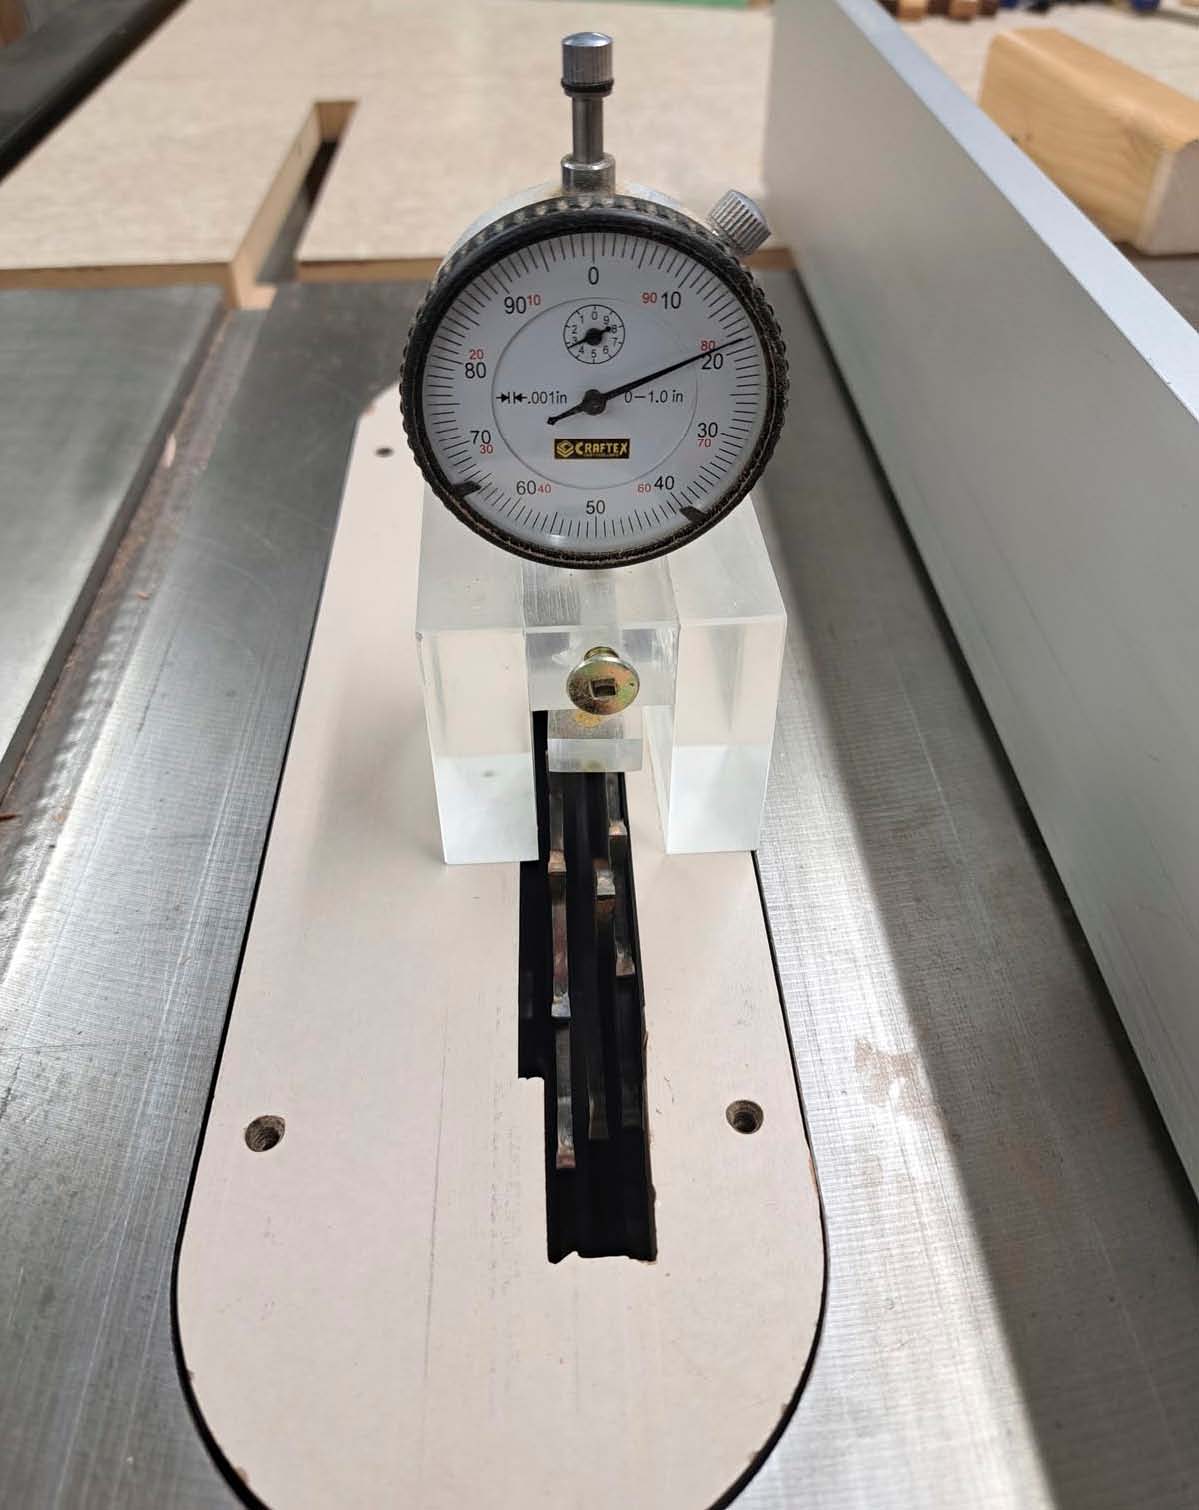
There is a very handy tool to accurately measure the height of a cut that my dad, Eric Gabe, described in the June/July 2009 issue of Canadian Woodworking Magazine & Home Improvement. Use it to set the dado a hair above 0.3125″ (5/16″).
You will now make four dado cuts that must alternate, side to side, when completed. Set the fence to be 5/8″ away from the closest edge of the dado stack. Make the cut for all the pieces at once. Using a push jig helps keep the pieces square and firmly against the tabletop and fence during the cut. Now, flip the pieces over lengthwise and repeat the cut, finishing with one notch towards one end of the first face and another notch towards the opposite edge of the second face.
Next, set the fence to 3-1/8″ to the dado’s edge and repeat the process to make two more alternating cuts, one on each side. Now you’ll have four alternating notches 5/8″ from each other.
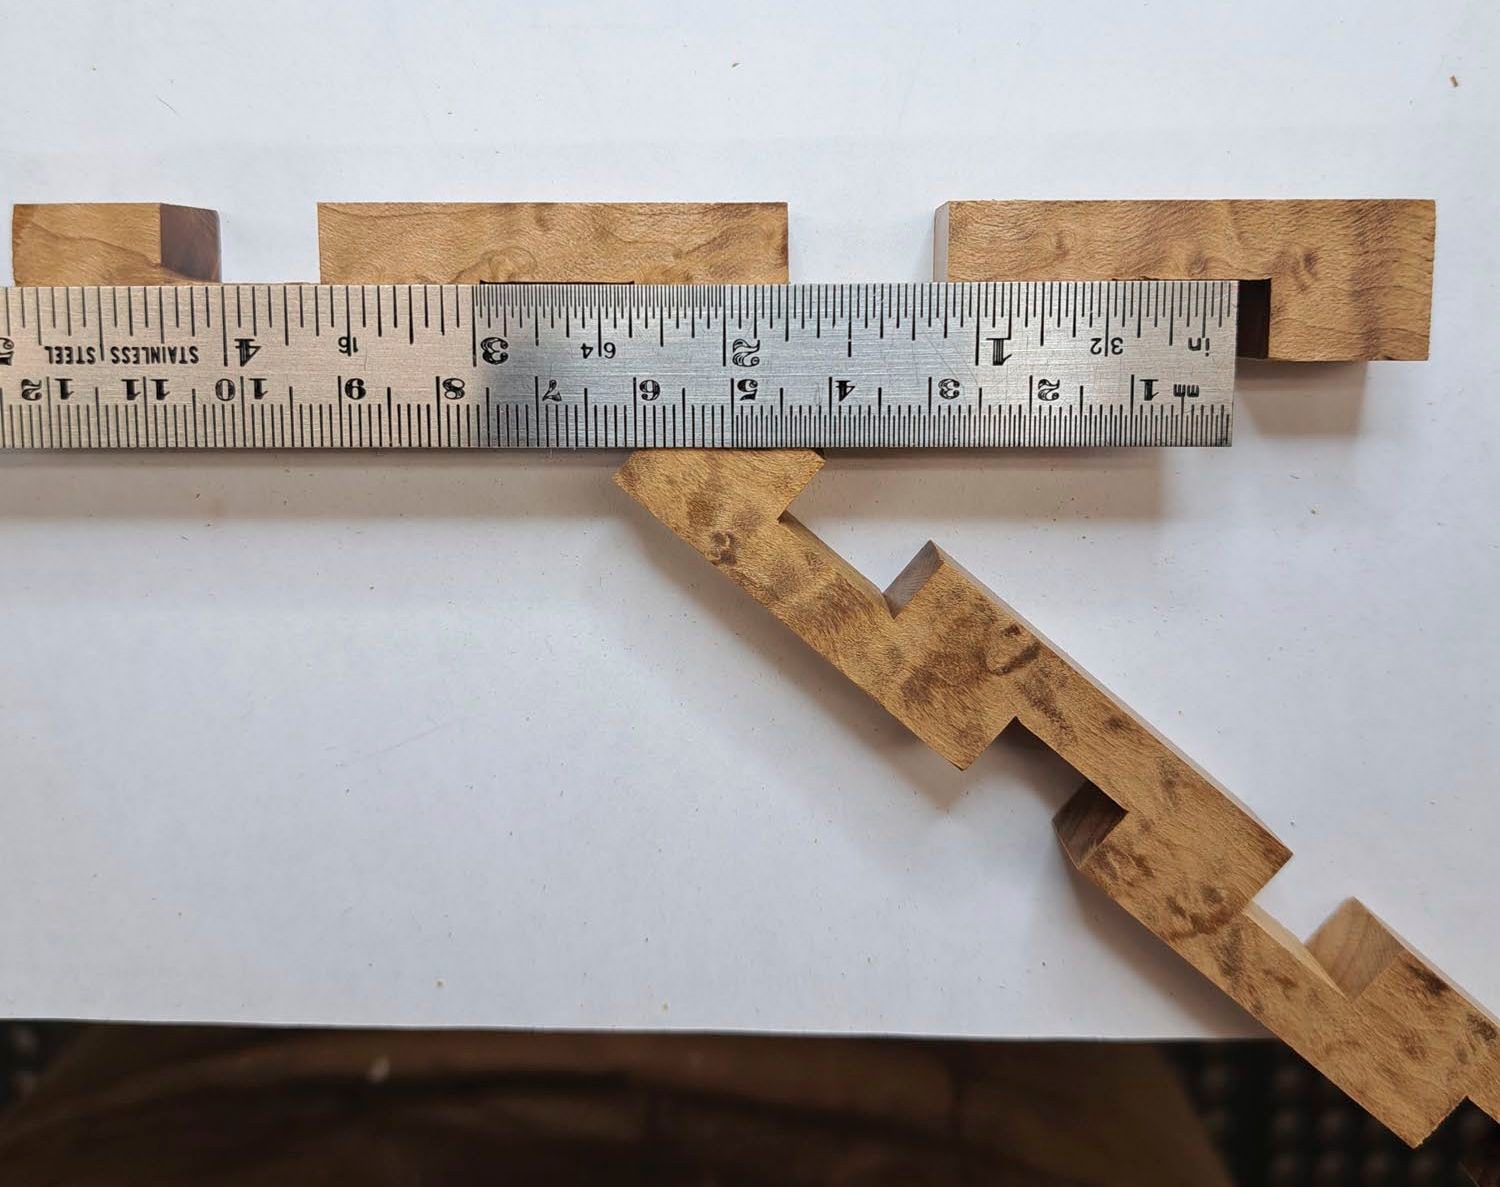
Double check that the bottom of the notches all align by laying a ruler across them. The two notches on one side should be just a hair deeper than the two on the other side. If the notch depths don’t overlap by a hair, then the dado needs to be adjusted, and the cutting process repeated. Notches that are not deep enough cause assembly grief later, as I quickly learned.
Add angled cuts
Increase the dado stack width to 3/4″ and set it at an angle of 21.8°, with the lowest point of the dado closest to the fence, aligning with the saw’s tabletop. I have a right-tilt table saw, which means I can keep the fence in its typical position, to the right of the blade. If you have a left-tilt table saw you’ll have to move the fence to the left side of the blade. This is the 0″ starting point for the fence settings, listed shortly. The top of the dado will reach slightly into the cut notches.
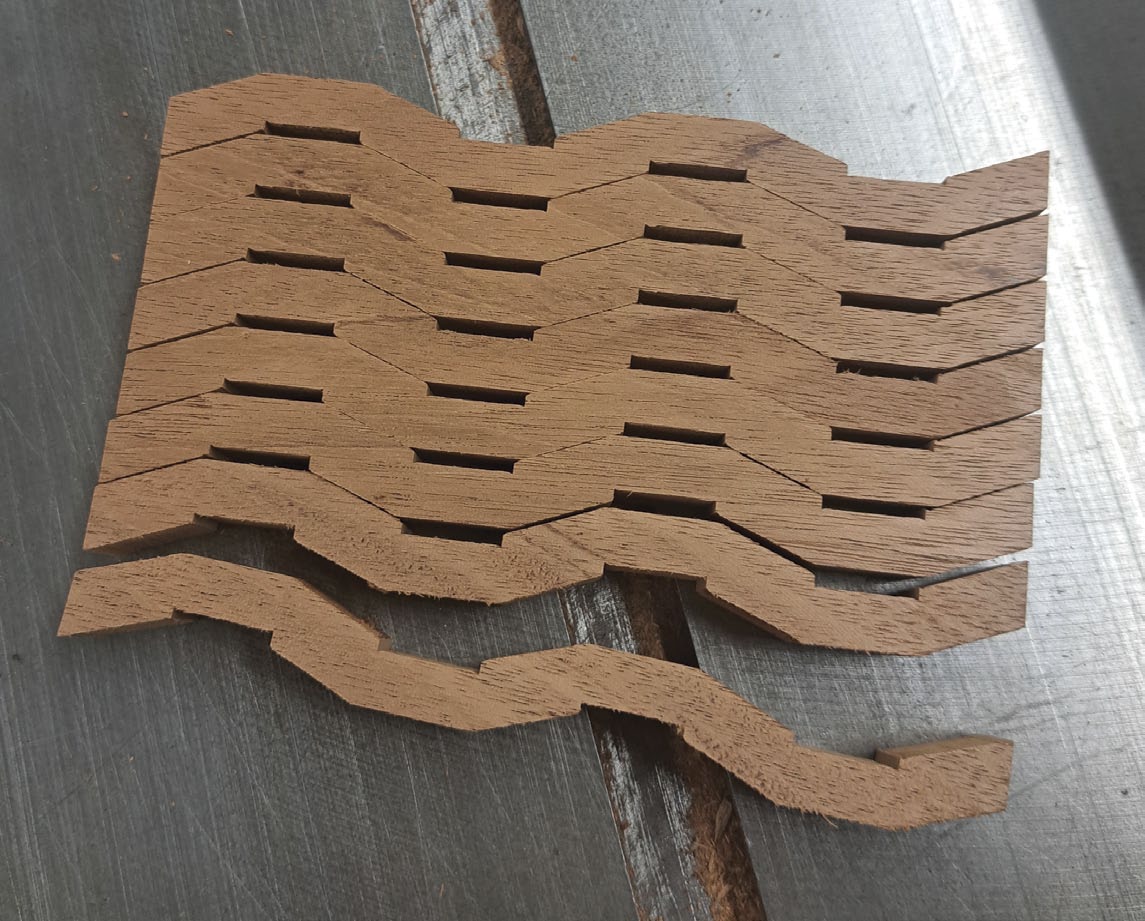
You will be completing 10 passes over the bevelled dado with the fence set at five different multiples of 1-1/4″ from the fence to the lowest point of the dado. The five required settings are 0″, 1-1/4″, 2-1/2″, 3-3/4″ and 5″. Do the 2-1/2″ setting first and then work your way outwards. You will do two passes per setting, flipping the pieces lengthways between each cut. Set the fence to one of its locations, align the pieces so the high point of the dado is cutting into the corner of a notch (or beyond the ends for the 5″ fence setting). Double check to ensure the cuts are happening the right way to make a piece that will be shaped into a gentle double “S” curve. The diagram is handy to refer to when setting up the cuts.
Once complete, the notches are about 1/16″ deep.
If you used a wider piece of wood, for the dado cuts, then now rip the 5/8″ pieces from the blank.
Rounded edges
Sand the points on the other side of each notch to round them into curves. Try not to reduce the tops of each curve in your sanding. Round the ends of each piece a little, too, so they have ~1/8″ radius curves on them. Just make sure to not sand the notches.
Once all pieces are shaped, use a 1/8″ round over router bit, mounted in a router table, to round all the edges of each piece. Again, ensure you don’t round over the notches, as they should remain square. Keep your pieces moving when routing them to avoid burn marks as much as possible. After all edges are rounded (except notches), sand them well to a finish-ready quality. This sanding takes time but it’s much easier to do this before assembly than after, though you still might need to do some sanding after.
Time for a break
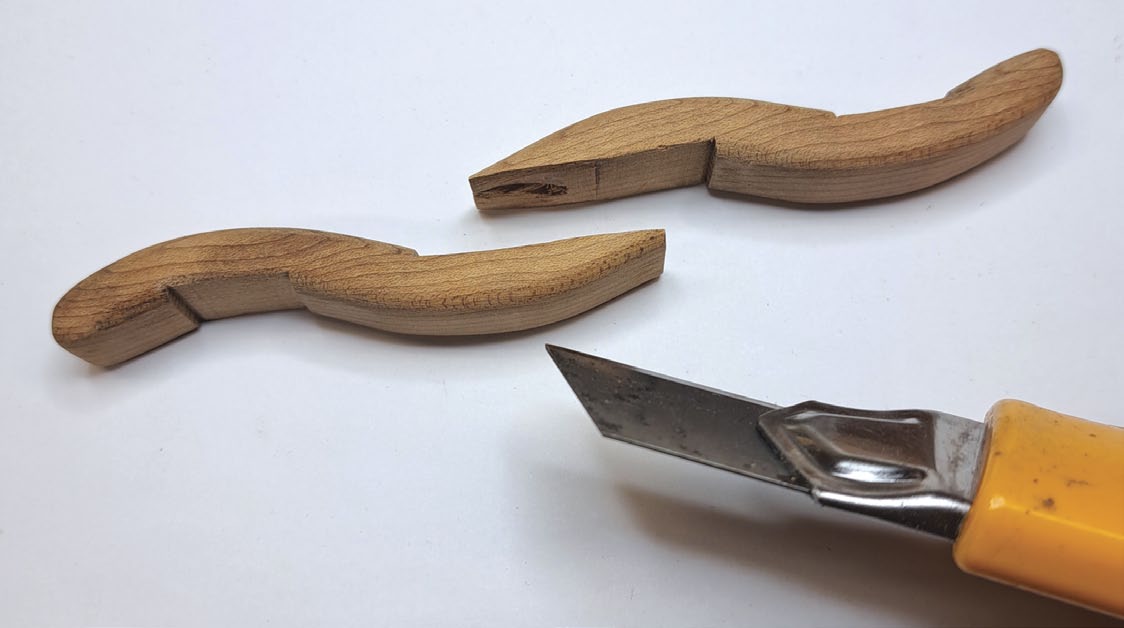
To assemble the trivet, you will first need to cut one of the pieces into two halves. This step is what allows this woven trivet to actually fit together. The piece should be separated in between the middle two notches. The cut will be re-glued, so you don’t want to saw it in two and lose some wood to a kerf. Use a snap-blade utility knife or utility razor blade and a small hammer to cut the wood in two from one notch to the other. It doesn’t matter if there is a little unevenness or small tear in the cut surfaces since they will be glued back together later.
Assembly – Phase 1
Dry assemble your trivet to ensure it all fits together snuggly and lies flat. A little pressure (not a lot) may be needed to get the notches to snap together. If notches aren’t quite wide enough, sand or file them a bit wider, but don’t overdo this or you’ll have gaps showing in your trivet. Also, ensure the two cut pieces assemble back together well in the trivet. If the trivet won’t assemble flat, then the notches may need to be deepened slightly. The surface of each notch should be snug against each other to ensure they will glue together well. You can also test assemble with clamps, if you wish.
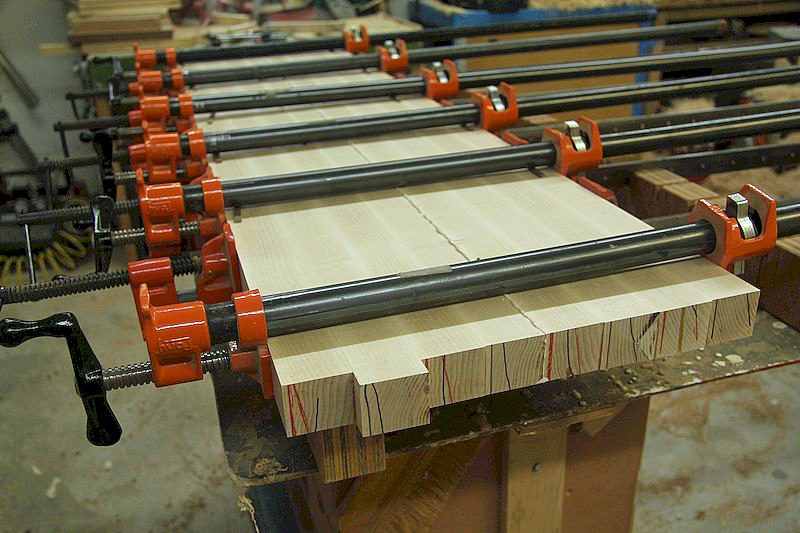
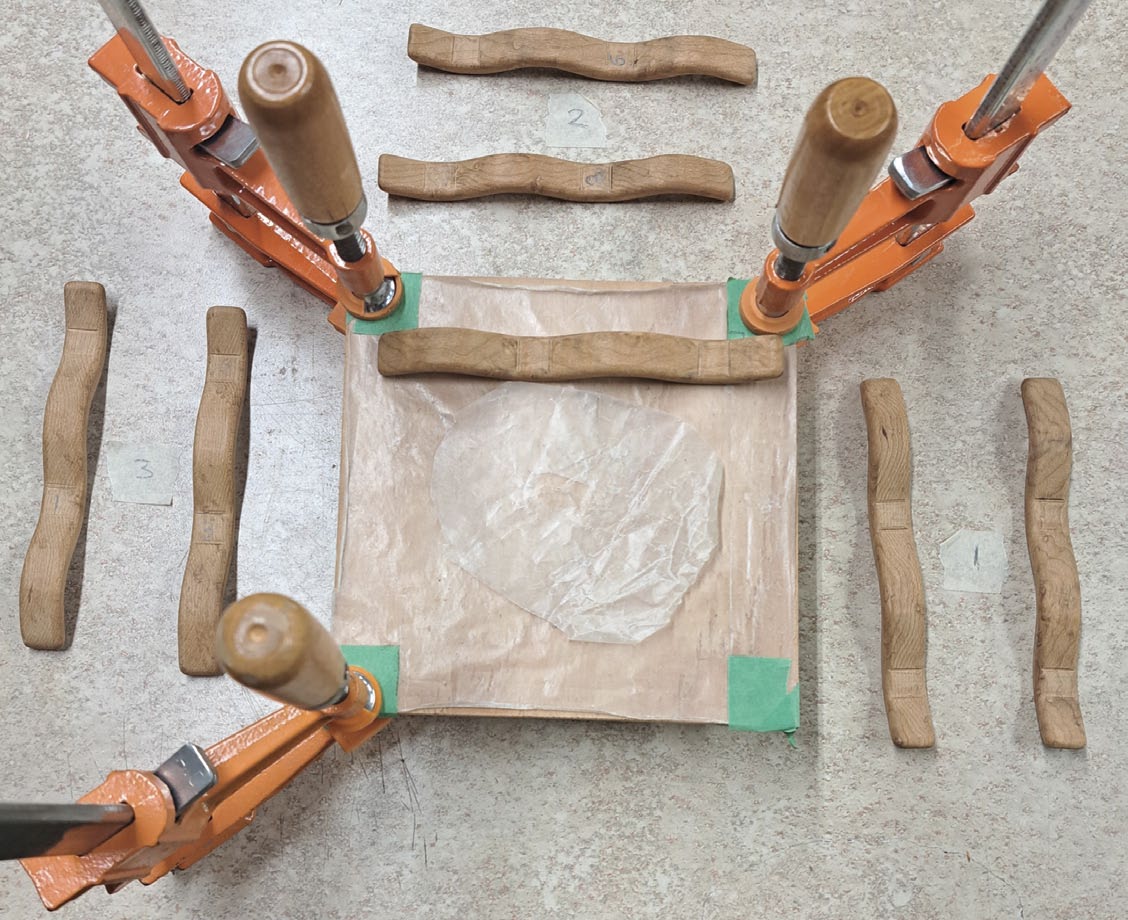
Cut a 6″ × 6″ square piece of 3/4″ thick scrap plywood. This will be the flat gluing surface needed to end up with a flat trivet. Three clamps, in three corners of the plywood square, can initially act as table legs for the square.
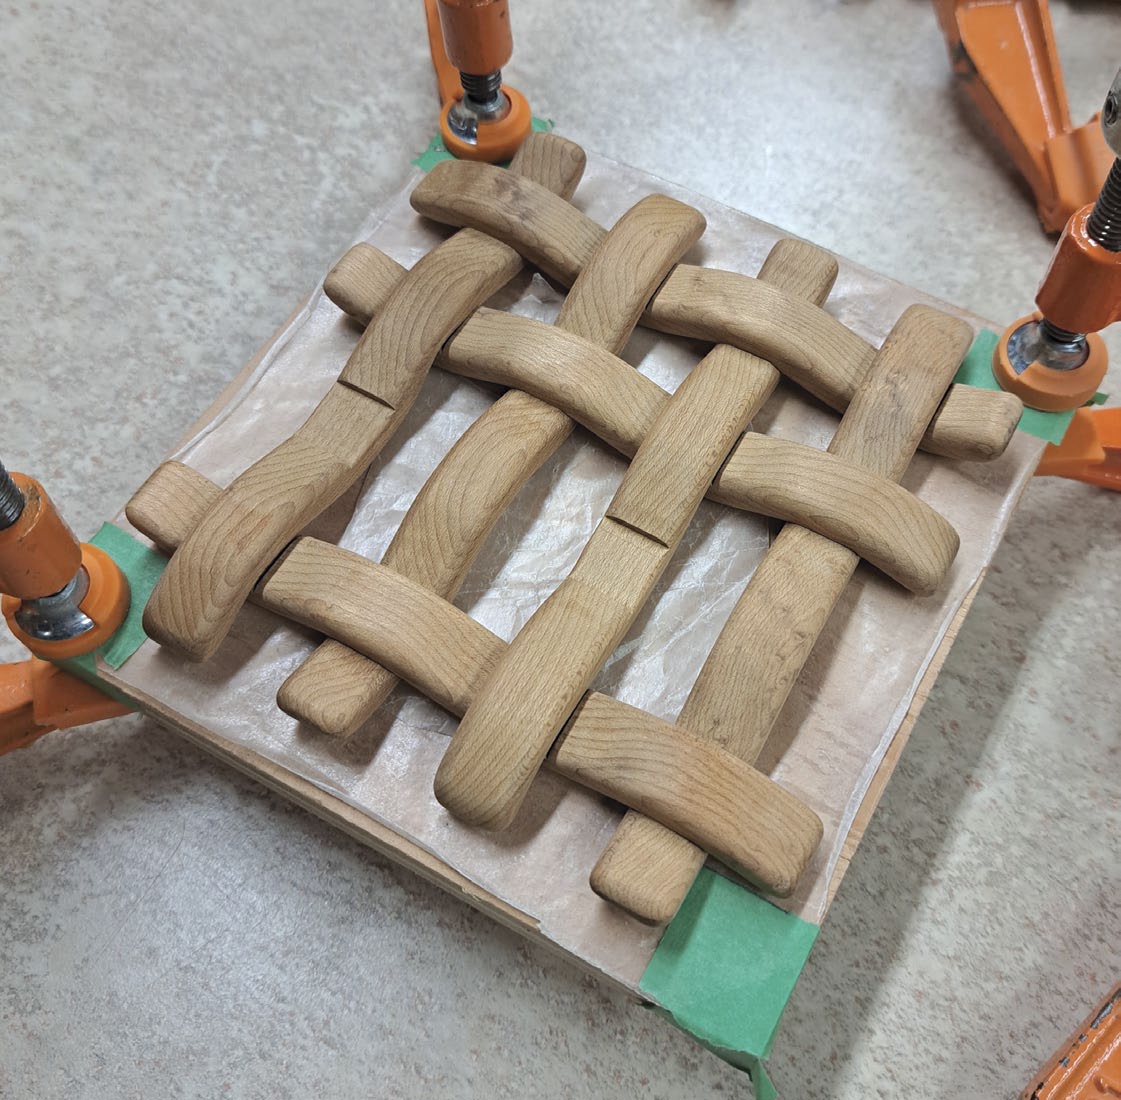
Gluing the trivet is a bit fiddly and is done in two phases. In phase 1, assemble all seven full-length pieces, leaving one middle row empty for later assembly with the cut pieces. Assembly will be done in a specific order that’s hard to describe with words. A photo included in this article shows the order. With one piece on the clamping board, two others get added perpendicular to this initial piece. These two pieces simply get placed on top of the initial piece. Next, two more pieces get placed onto the assembly parallel to the initial piece. Again, these two pieces just need to be placed on top of two of the other pieces already in place. Finally, two more pieces get added to the assembly perpendicular to the initial piece. These last two pieces will need to be placed underneath the existing pieces. Practice this before applying glue.
Once you’ve practiced this, and are confident in the process, put a small amount of glue on all notches, except the ones needed for the cut piece assembly, to be done later. To keep things straight, it might even be a good idea to add a small piece of masking tape over the notches that don’t get glued in this first setup.
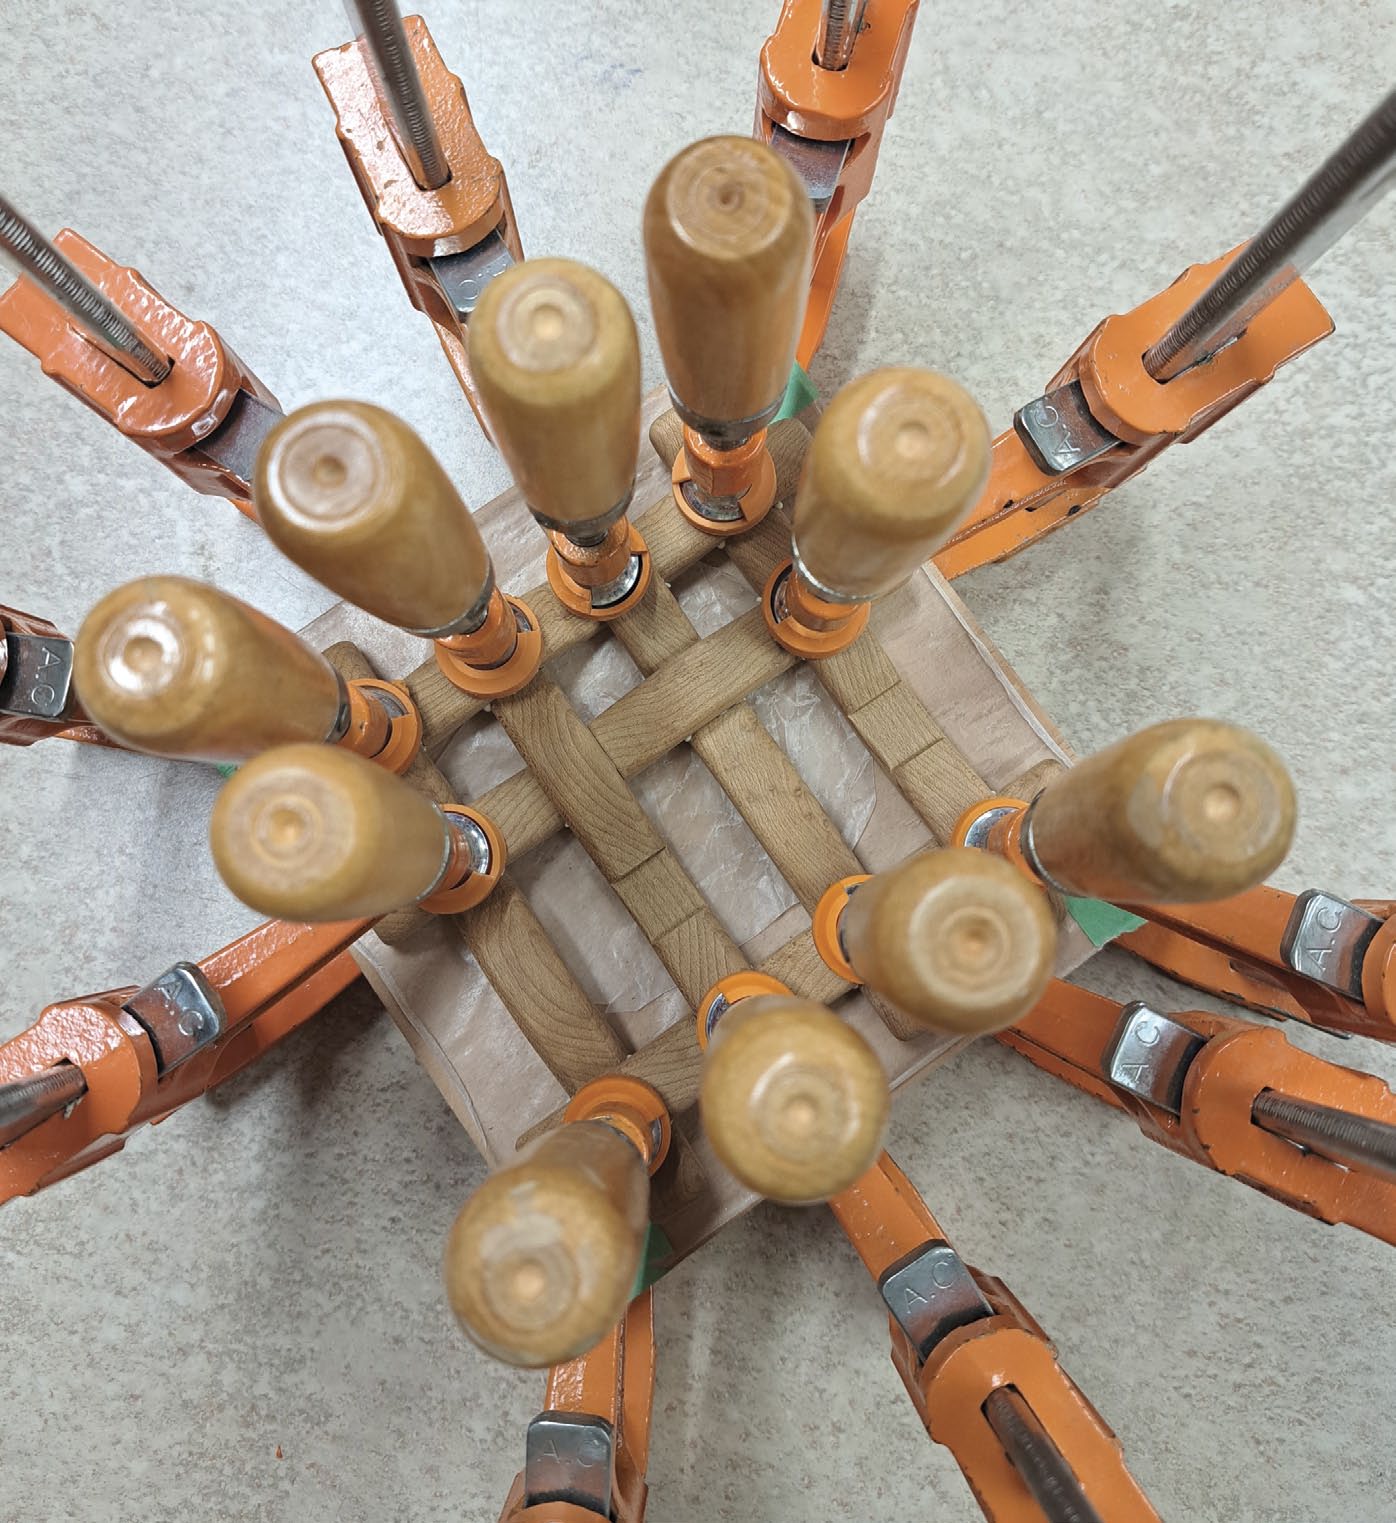
It’s important not to add too much glue to the notches, as dried, squeezed-out glue is tedious to remove later. One small drop of glue per notch is enough. Carefully assemble the trivet, in the order you practiced, trying to let just the glued notches touch one another. Once it’s all together, start clamping the trivet overlaps to the piece of plywood. Ten or 12 clamps can be used, though you might not be able to reach the middle two overlaps. You can reuse your three corner clamps once a few more are added. With all those clamps in place, it’s not really possible to wipe off any glue squeeze-out.
Assembly – Phase 2
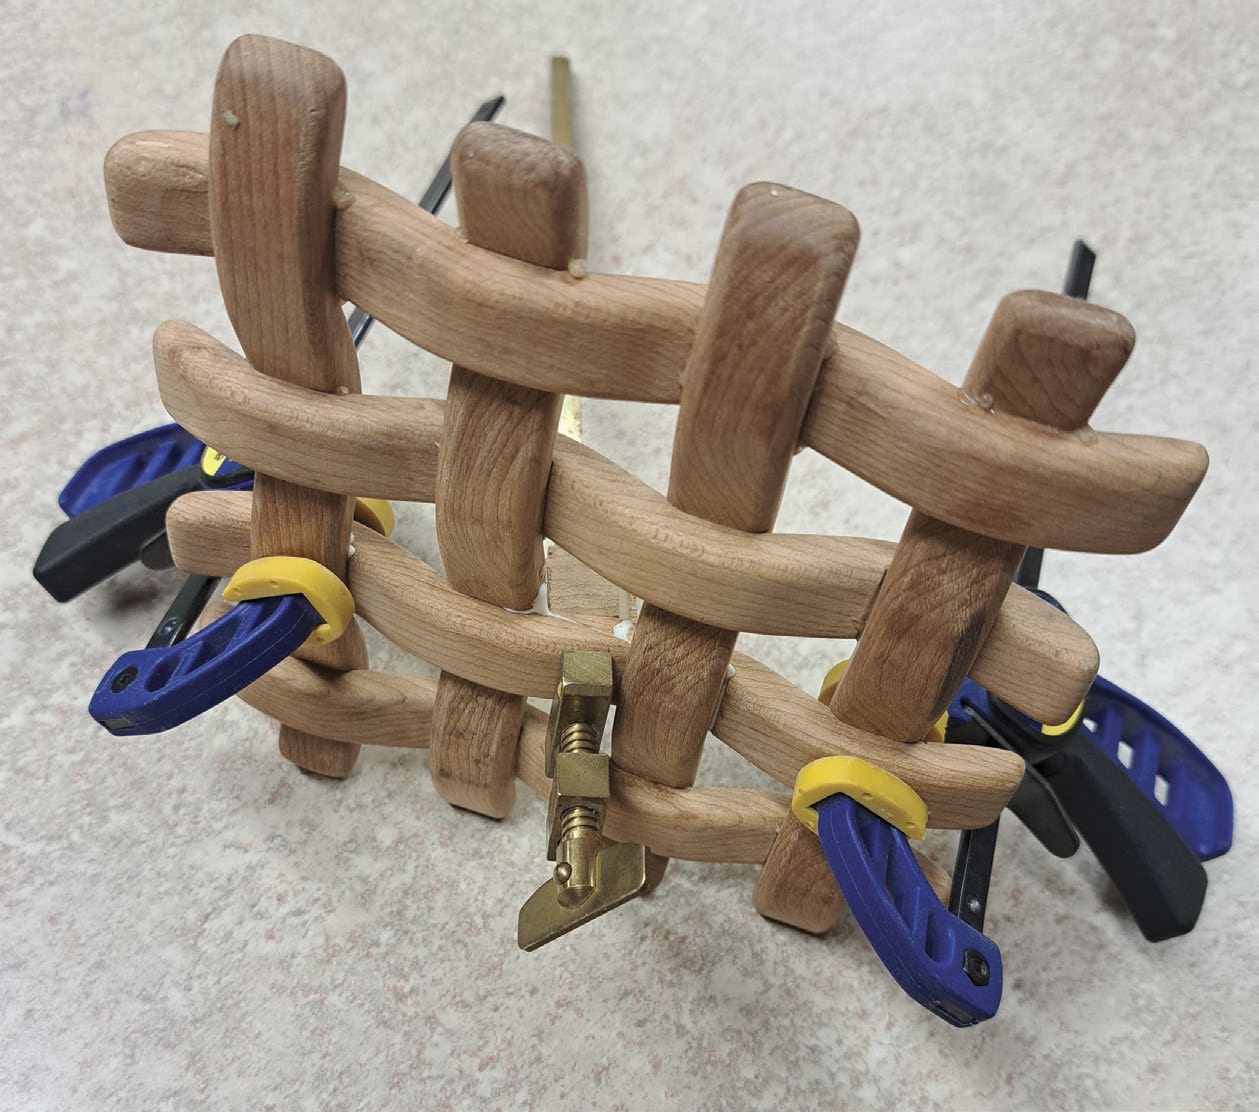
Once Phase 1 has dried, gluing in the cut halves is next. Apply glue to all the notches and the cut surfaces, too. Clamp the outer two trivet overlapping pieces and the overlapping cut section. You may not need to clamp the inner two overlaps once the cut section is clamped together. You may be able to wipe off any excess glue in this gluing phase.
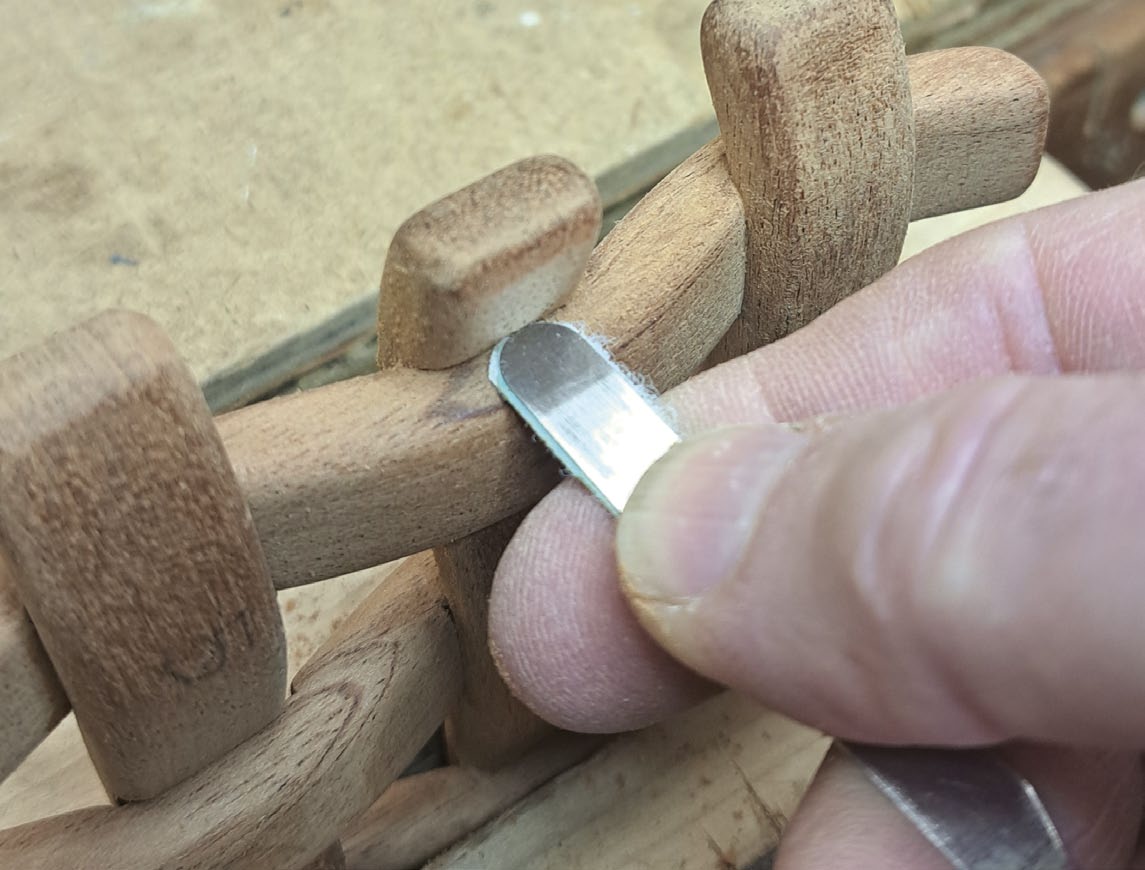
After the glue is dry, unclamp the trivet and check for any excess dried glue. Use a sharp chisel to carefully cut off dry glue. Be careful not to scratch the wood as you do this. Some sanding will likely be needed, too. I find if you don’t clean the trivet in an organized manner then you’ll miss some glue here or there. Using a pencil to number each of the 16 overlaps helps to track systematic progress. This process takes time, especially if you have a lot of glue squeeze-out.
Flatten and finish
Now you have an assembled trivet. See if it lies flat on both sides. This step is important to ensure your teapot sits smoothly on the trivet. If it doesn’t, then sand the trivet slightly on a piece of sandpaper that has been placed on a flat table saw or jointer bed surface. Rub the trivet on the sandpaper and check it for flatness frequently. Stop sanding as soon as the trivet lies flat.
Once it lies flat, re-sand the curves on any sanded-down areas. Also re-form any 1/8″ edge round overs to unify the overall shape and design of the trivet.
Apply a finish of your choice. Many finishes will work fairly well against a medium amount of heat, but none will stand up against as object as hot as a frypan. An oil-based polyurethane is quite durable, but it may be hard to apply evenly to a project this complex. You could try spraying it on, though it would be hard to coat all the sides evenly. A wiping oil like Danish oil or polymerized linseed oil should stand up fairly well to heat, and it could also be easily re-applied if needed.
I’m sure your trivets will spark some interesting conversations when you bring them out when company is over.
Stephen has lived his whole life in Ottawa and has enjoyed woodworking since his childhood. He recently retired as a software development manager, and is enjoying spending more days in his workshop.
Photos by Stephen Gabe; lead photo by Rob Wood
Accuracy Counts
This jig, described by Stephen Gabe’s dad, Eric, in a past issue of Canadian Woodworking & Home Improvement, helps dial in the depth of the notches accurately.
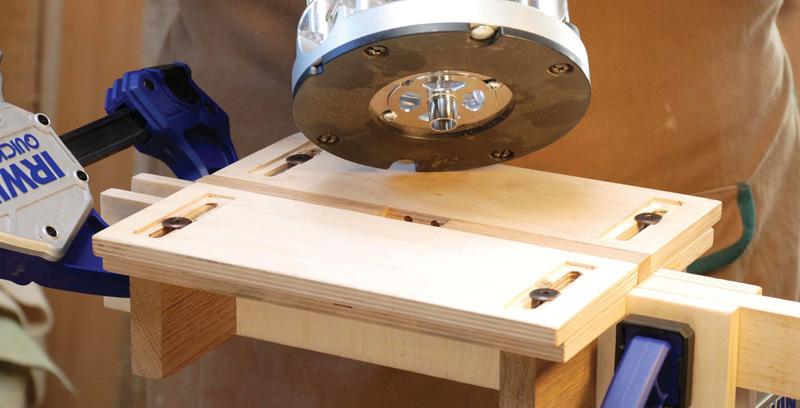
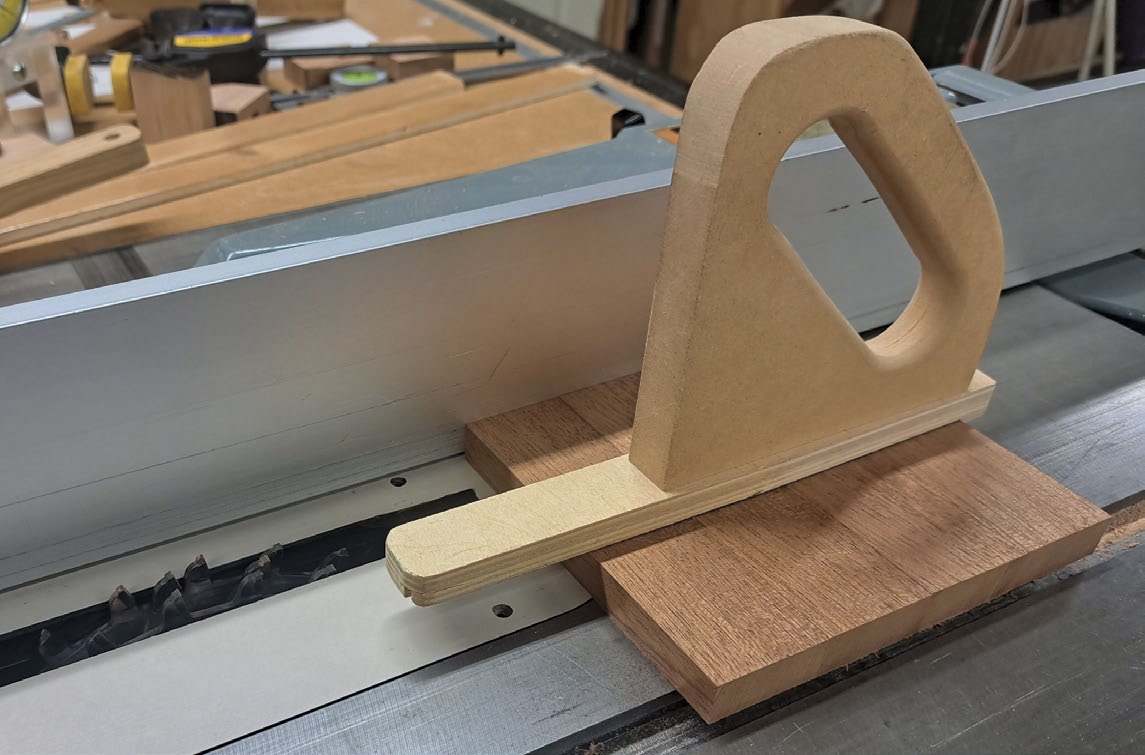
Dedicated Jig
This is the jig Gabe uses to machine the cross-grain notches in the 5/8" wide × 5/8" thick × 5-5/8" long workpieces. The block of wood keeps the jig and workpiece square to the rip fence, while the plywood protrusion at the front keeps the workpiece down during machining.
The Ruler Check
A ruler laid across the bottom surface of the notches will show you if the notches are deep enough. Having the notches even 1/64" too shallow means they will be hard, or even impossible, to assemble.
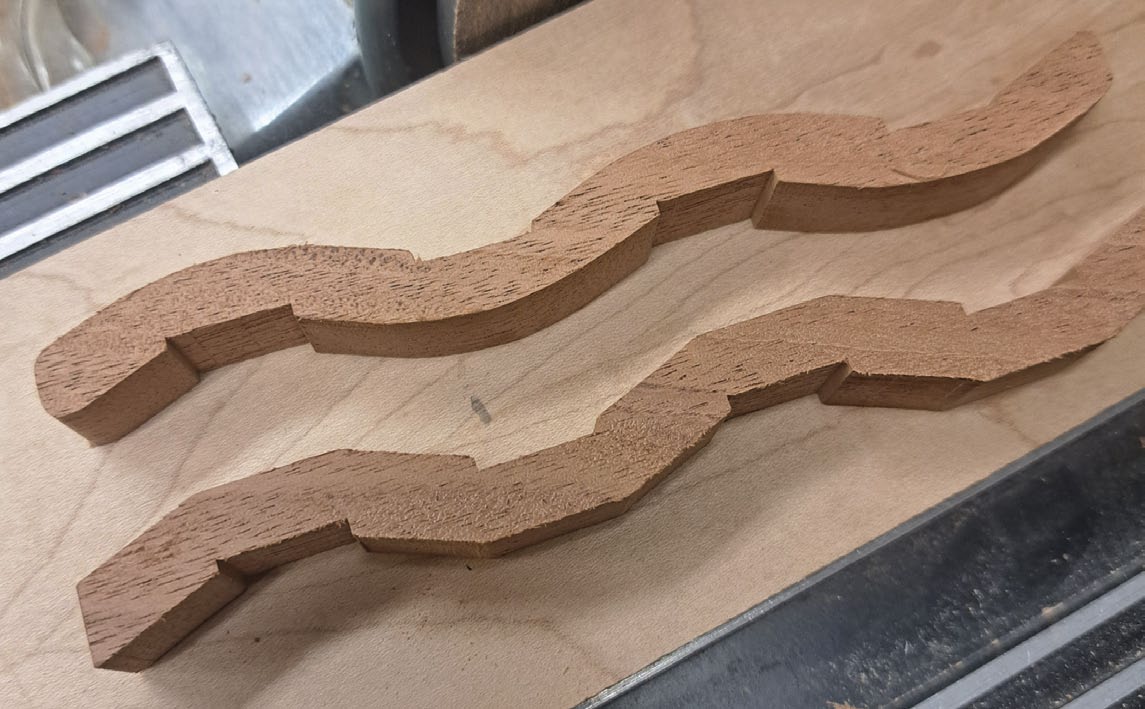
Notched and Angled
Once the notches are machined, angle the dado blade and machine the angles between the notches, creating a workpiece more resembling a double “S” bend.
Graceful Curves
The lower workpiece is fresh off the table saw, while the upper workpiece has the angles faired and its ends rounded.
Rounded Edges
Once the workpieces have been sanded to a smooth curve, add a small round over to their edges on a router table. Be careful not to round over the notches.

Split in Two
A knife blade will help you split the final piece of the puzzle into two halves. This step can be tricky, as the grain may cause the split to extend through the workpiece. Having a few extra workpieces on hand can save the day.
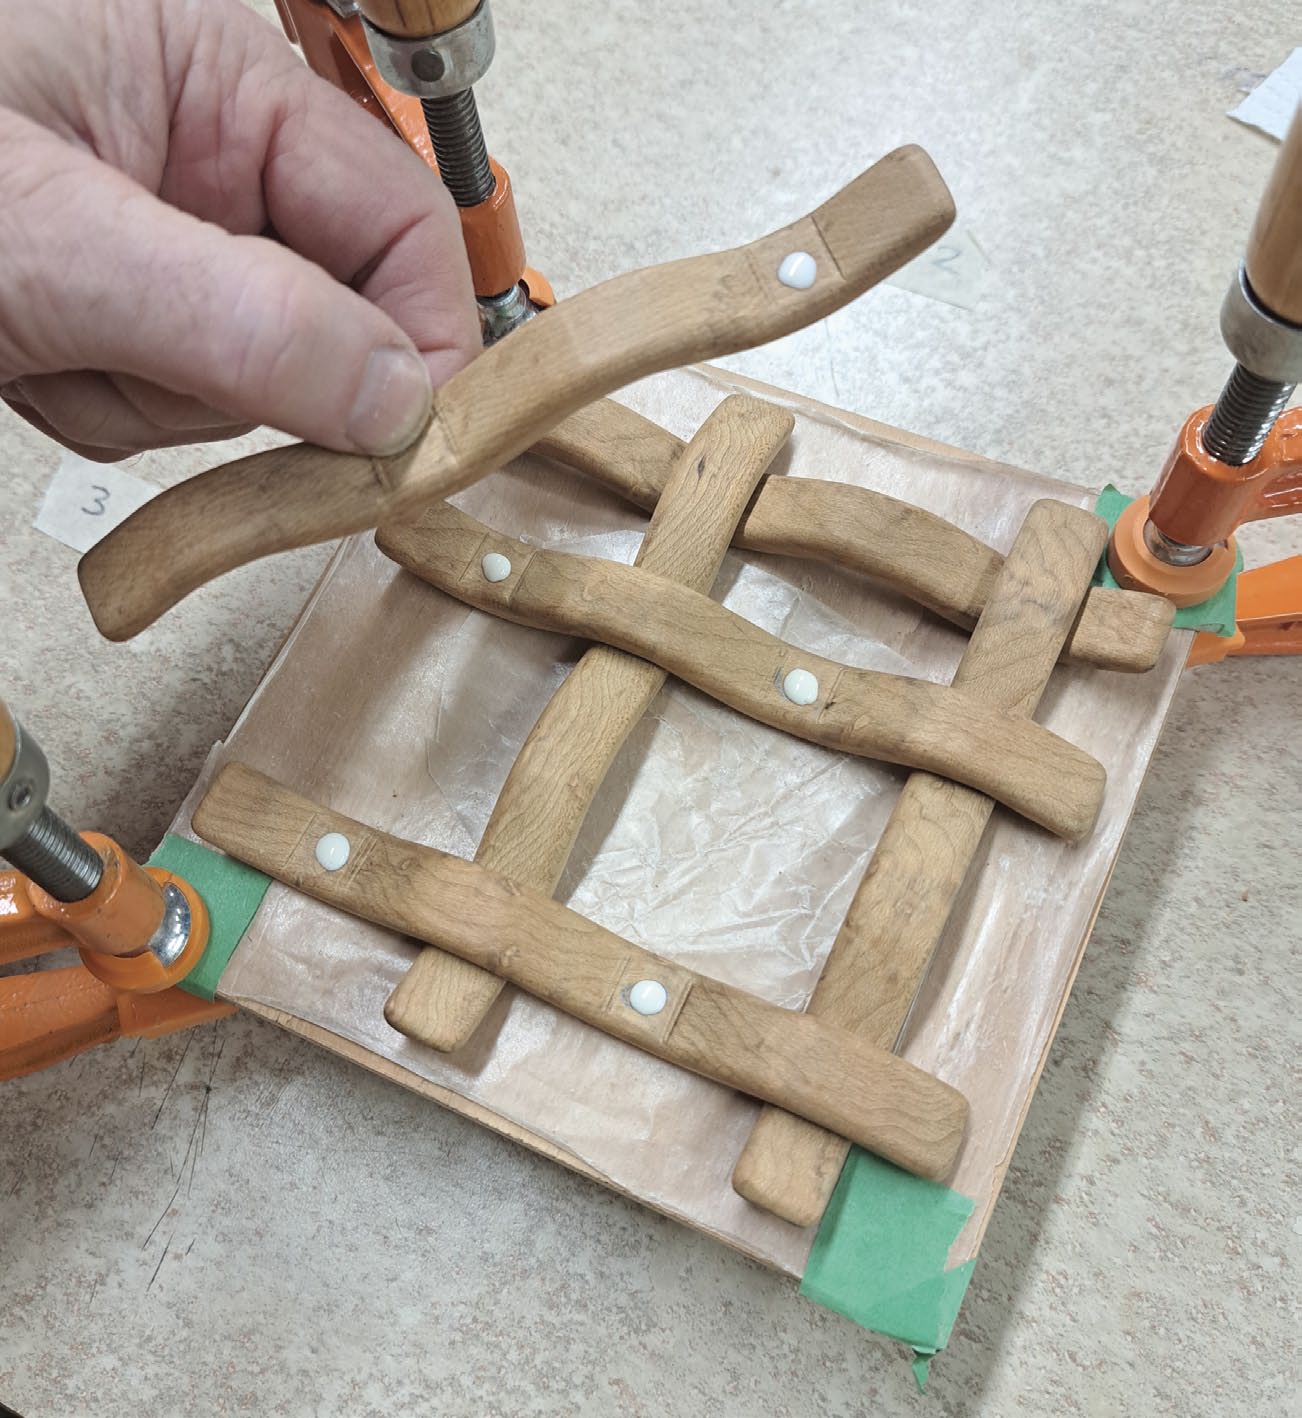
Starting Point
A dry assembly will help ensure the trivet can be assembled. Starting with one piece laid on the plywood gluing surface, add the two pieces on the right, followed by the two pieces at the top. All of these pieces just fit on top of the others that are on the plywood panel. The final two pieces (at left) get woven into the assembly.
Dry Run Complete
Now that you know how the first phase of the assembly should go together, carefully disassemble the trivet and get ready to add glue to the notches.
A Drop Will Do
Gluing the notches is an important step, but just be sure to not add too much glue. Excess glue will make prepping for a finish tedious and difficult. These drops might even be on the large side.
Phase 1 Complete
Clamps on the joints will bring the parts together for good. Heavy pressure shouldn’t be needed.
Get In There
An assortment of hand tools will help you get into the corners and remove any glue squeeze-out. Here some sandpaper is two-sided taped to a small tool. As they say, an ounce of prevention is worth a pound of cure.
Phase 2
Once the first phase is dry, you can add a small amount of glue to the notches on the split piece, as well as the cut joint, then position the two halves in place. Adding a bit of clamping pressure will seal all the joints for good. A small clamp can be helpful for clamping the cut joint. A bit too much glue was used in this specific assembly.
[illustrations_gallery]