PROJECT
Make a photo string frame

Annabelle Brown

Find more Gifts / Crafts projects
Editor Rob Brown’s daughter writes about the photo string frame she made for a gift. Decorative bevel joints added a focal point to an otherwise fairly simple project.
This customizable frame using string and clothespins can be easily altered to fit as many photos as you’d like and be adjusted for new ones, too.
I have an Instax photo printer, which does a great job printing out digital photos from my phone. My photos measure 2-1/8″ × 3-3/8″. There are likely other instant photo printing options as well. There’s also nothing wrong with using standard 4″ × 6″ (or larger) images to hang in this type of frame.
Make a photo string frame
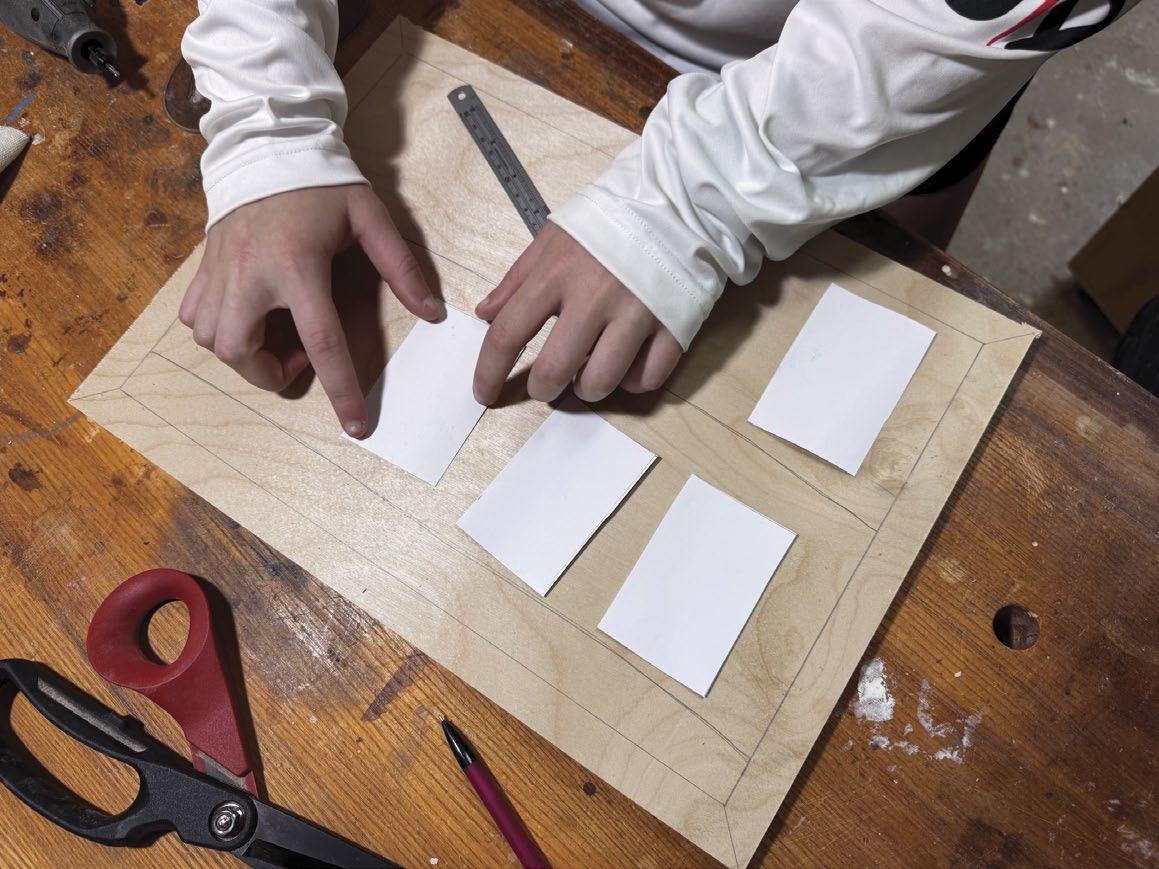
Mapping it out
First, create a model of your frame. I made mine 11″ × 15-1/2″ to hold eight photos. The frame pieces were 1-1/4″ wide and 7/8″ thick. Before deciding on the final dimensions, I drew the frame on a piece of plywood and placed the eight photos inside it, arranging them with an appropriate amount of space between them, adjusting the size of the frame to fit the eight photos nicely. Adjust the size of your frame to give you the inside dimensions and visual proportions you’d like.
Breakout
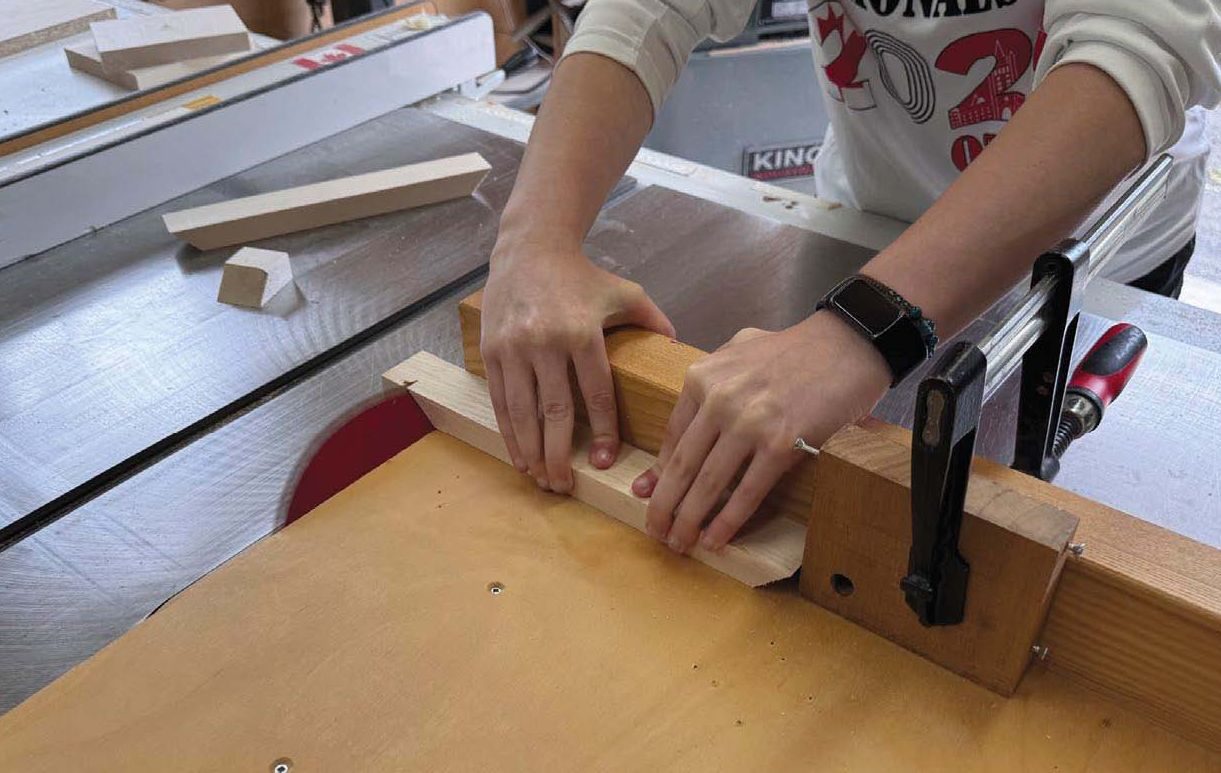
I started with a piece of maple 53″ long and 1-1/2″ “ wide, which gave us a few inches extra to work with. There’s also nothing wrong with obtaining the four frame members from a shorter, yet wider, piece of lumber. I broke out four pieces to use for the frame; two 11″ long and two 15-1/2″ long, adding one inch to each piece to leave room for error. Once this was done, I jointed and planed the pieces so they were flat and to the final thickness.
Rip the pieces to their final width of 1-1/4″.
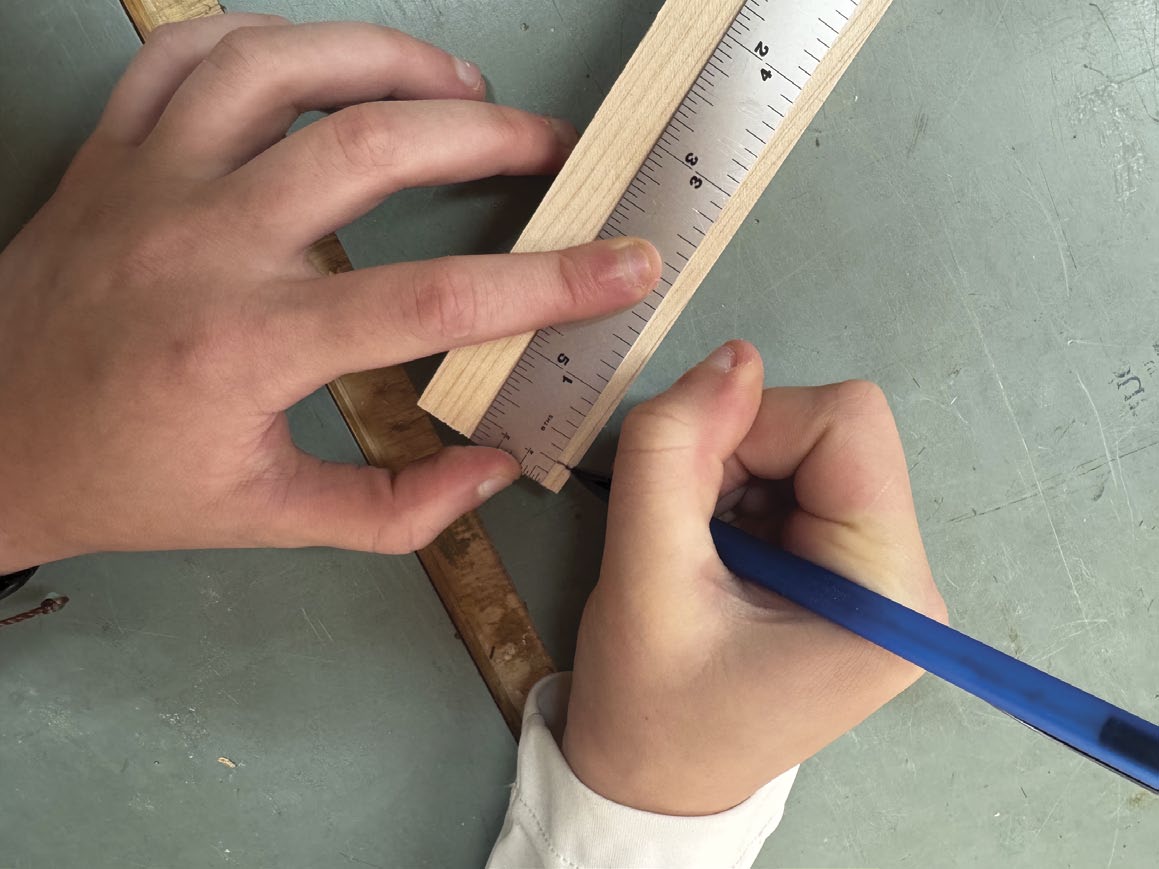
Bevel the frame ends
You’ll now need to cut both ends of each piece on a 45° bevel, ensuring the length of the two opposing pieces are identical.
To do this, start by cutting bevels on one end of each frame piece. Next, mark the desired length on one of the side pieces, set up a stop block and cut the two side pieces to length. Following that, mark the desired overall length on the top piece and set up a stop block. Make the two cuts on the top and bottom frame pieces.
Crazy corners
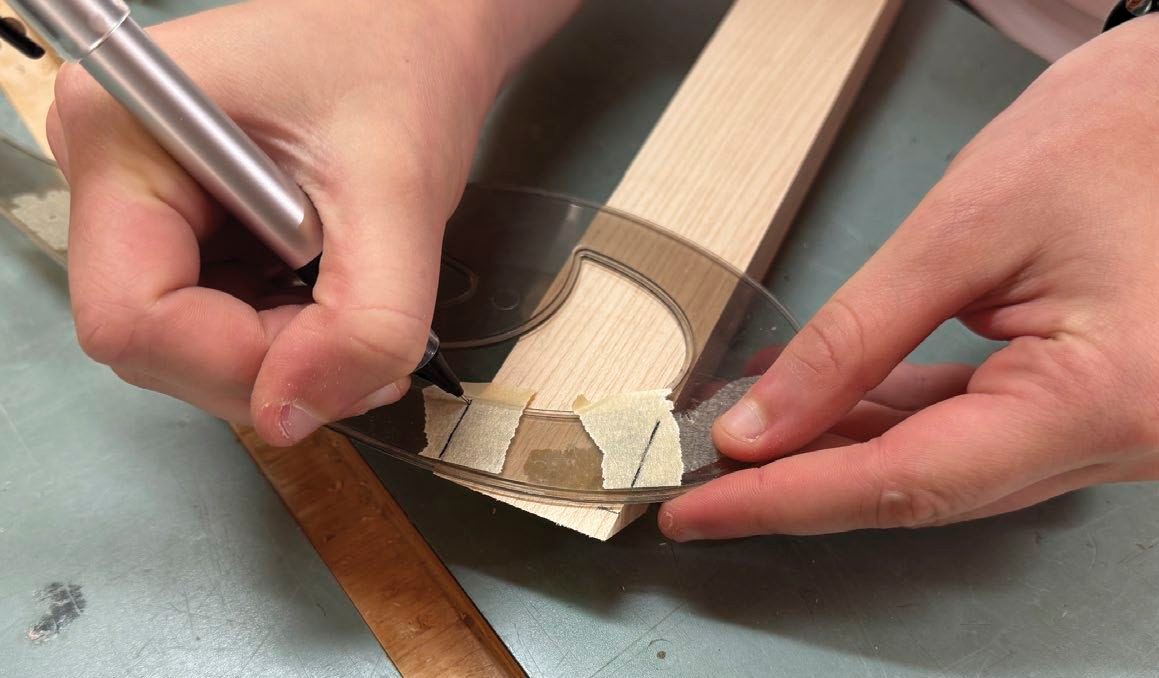
Simple bevel joints are nice, but since I wanted to add a unique detail to this special frame, we decided to have some fun with the corner joints. There are lots of options, but I took inspiration from one of my dad’s favourite Canadian woodworkers, John Glendinning, and created what looked like a gap on the four corner joints, before adding colour and texture to all four joints.
I played around with some scrap to give us an idea of how it would look, then we determined the amount of gap we wanted in the corners. I then turned to the four frame members and marked a line 1/4″ away from each bevelled corner, on the front edge. Next, I marked the curve on the outer face of each workpiece using a French curve. I added a couple of pieces of masking tape to the French curve, then marked two lines on the tape, so I could consistently align the French curve template and draw the curve on all the workpieces. While marking the frame members, I made sure the gap was being marked towards the front edge, not the rear edge.
Sand the gap
After I labelled the sides, I used a disc sander to add the curve into each of the bevels, using a 30° angle. It’s easy to remove too much material with a disc sander, so move slowly and try not to sand beyond the line. Check to make sure all the joints look good and resand them, if necessary.
Decorate the open joint
I brushed on two coats of royal blue milk paint to add colour to the small curved, visible surfaces of the bevel joints on all four corners of the frame. You could also use just about any other type of paint for this.
Once the paint dried, I used a rotary tool to carefully add texture to the curved surfaces. It’s crucial to be patient with this step, as going fast will cause the finished result to be messy. While I was using the rotary tool, I noticed that resting the edge of my hand on the workpiece was helpful for keeping the rotary tool steady and allowing me to leave a fairly even texture. If you leave the tool on the surface for too long, the surface starts to burn, which looks bad in the final product. Practicing on some scrap, and having lots of patience, will ensure the texture looks great.
Sand and ease
Sand the three visible surfaces of the pieces in your frame, taking care to not only remove all machine marks, but to also remove any blue paint that may have been applied where it shouldn’t have been. Finally, ease all four edges of each frame piece.
Screw eyes
A screw eye in each side will secure the end of each length of string, so four screw eyes were needed, in total. Working with our initial sketch, I marked the height of the screw eye pilot holes, ensuring they were centred on the width of the frame. For our frame, I positioned them 3/4″ from the top and 5-1/4″ from the bottom. After the pilot holes were marked, I drilled them using a drill press. A hand held drill would also work.
How to hang it
The bottom of the frame could be set on a surface, with its top resting against a wall, but I wanted the recipient to be able to hang this frame.
You could attach a picture frame clip to the rear edge of the top piece, but I decided on a more secure approach. My dad used the router table to rout a picture hanging slot in the back of the top piece for hanging the frame. You might want an experienced adult for this step. We adjusted the fence so the bit routed the picture frame groove in the centre of the rear edge of the top piece.
Assembly
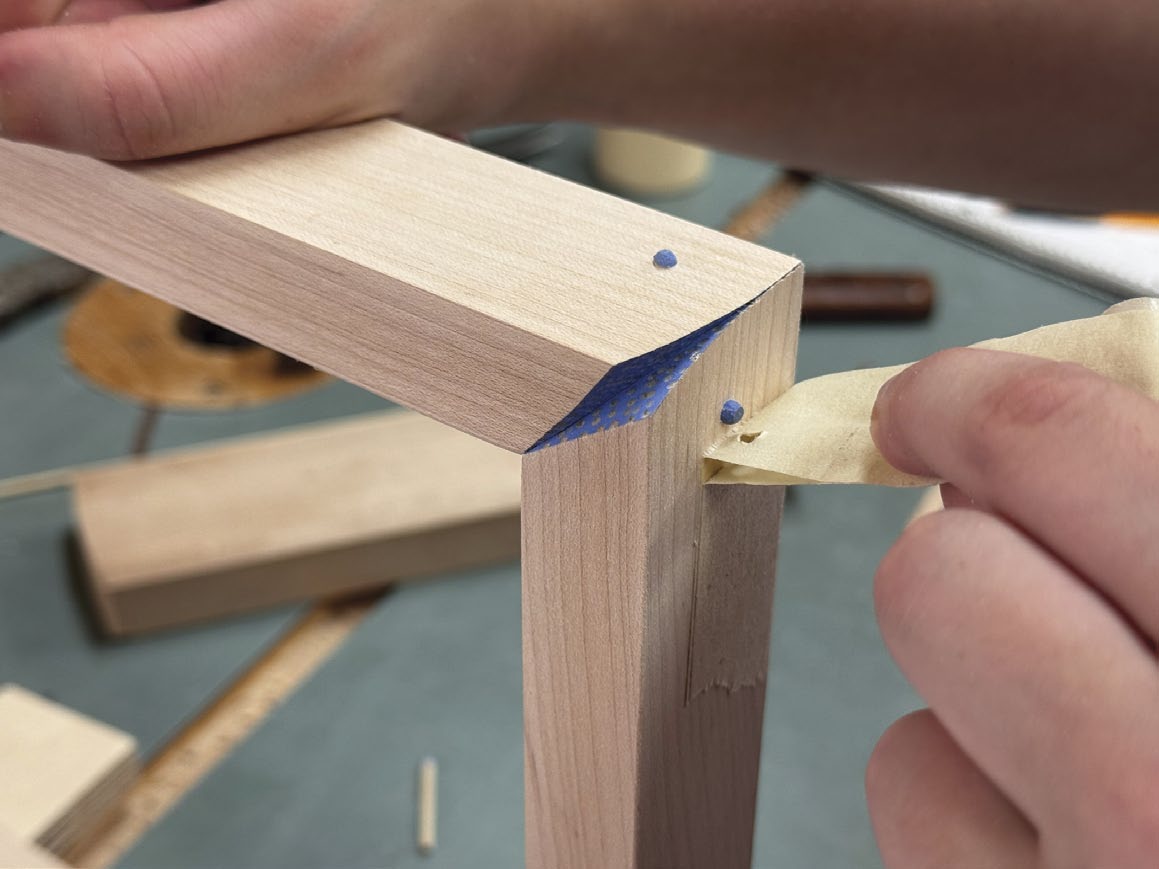
I set out the frame pieces so their inner faces were down and with the mating edges butting together, then put a piece of tape across each joint, ensuring the corners were fairly tight together. Make sure to add a few layers of tape all across the width of the joint, as this will help bring the parts together, and also keep glue off the wood’s surface when you install the painted dowels.
I applied a light layer of glue on the joints first and then rubbed it in. Then, I applied a bit more glue to the joints. I wrapped all four pieces together to assemble the frame, added another piece of tape across the fourth joint and let the glue dry.
In the meantime…
The dowels I added serve two functions: to add strength to each corner joint and to add some spice to the design. Before doing any work on the dowels, or drilling holes in the corners of the frame, check the dowels you’re using fit into the hole you’re drilling. I used food preparation skewers made of bamboo, but standard dowel rods from a hardware store are also an option.
While the glue on the frame was drying, I cut the dowels to length. They were about 1-1/4″ long. I also cut a few extras, just in case they didn’t fit perfectly.
Chuck each dowel into the drill and use a sanding block to round one end of each dowel while the drill trigger is being pulled. Once they were rounded, I painted the rounded ends of each dowel with the same royal blue milk paint as we used for the curves, then set them aside to dry.
Drilling, again
Once the frame and paint had dried, I drilled the holes in the sides of the frame for the dowels to go into. Be sure to drill the holes through the masking tape used to hold the four frame joints together for gluing. If the tape isn’t where you want the holes to be, simply add more tape in that area. Also be sure to drill the holes deeper than the dowels are long, so you can fine-tune the amount that each dowel head will protrude above the surface of the frame during installation. You don’t want any of the dowels to bottom out in the holes. I used a drill press for this step in order to ensure the holes were straight, clean and deep enough.
Install the dowels
After I drilled, I tested to make sure the dowels fit into the holes. Some of them were too big to fit so I sanded them slightly, reducing their diameter. This is more easily done before applying glue to any of the surfaces. Both bamboo skewers and hardware store dowel rods aren’t always uniform in diameter.
I positioned dowels on the visible side of the joint, slightly offset, so they wouldn’t interfere with each other.
Once the holes were drilled, and I knew the dowels fit, I added some glue to the holes, a tiny bit of glue to the dowels and pressed them into the holes. Light hand pressure, followed by a few light taps with a small hammer if needed, should be enough to seat the dowels so their heads protrude slightly above the surfaces.
Final touches
Once the dowels were in, and the glue at least partially dry, I took the tape off and eased the edges. Removing the tape should remove any glue squeeze-out from when you installed the dowels. I removed any glue squeeze-out that remained and prepared for finishing.
Finishing it up
I applied three coats of oil-based aerosol spray polyurethane, sanding between coats. It takes some time to dry properly but offers good protection.
Once the finish was dry, I put in the screw eyes to hold the string. I tied the string through the screw eyes and added the photos using colourful clothes pins. At this point it was ready to wrap. I wish my gift wrapping turned out as nicely as this great picture frame.
Photos by Rob Brown
Get Organized
Drawing out the frame and string placement full-size is a great way to determine the project’s size based on the number and dimensions of photos you want to include.
Cut Bevels
Once a bevel joint is machined into one end of each of the frame pieces, you can set up a stop block to machine the bevels on the other end of each mating workpiece. You’ll need two setups, as the top / bottom workpieces and the two sides are likely going to be different lengths.
Mark the Curve
For accuracy, mark the front end of the curve on each workpiece. The curved portion of this joint was positioned so it ended 1/4" away from the corner of the workpiece.
Keep It Consistent
Adding two pieces of masking tape to the French curve, directly over where the two edges of the workpiece are, allow you to consistently mark the curve onto each corner.
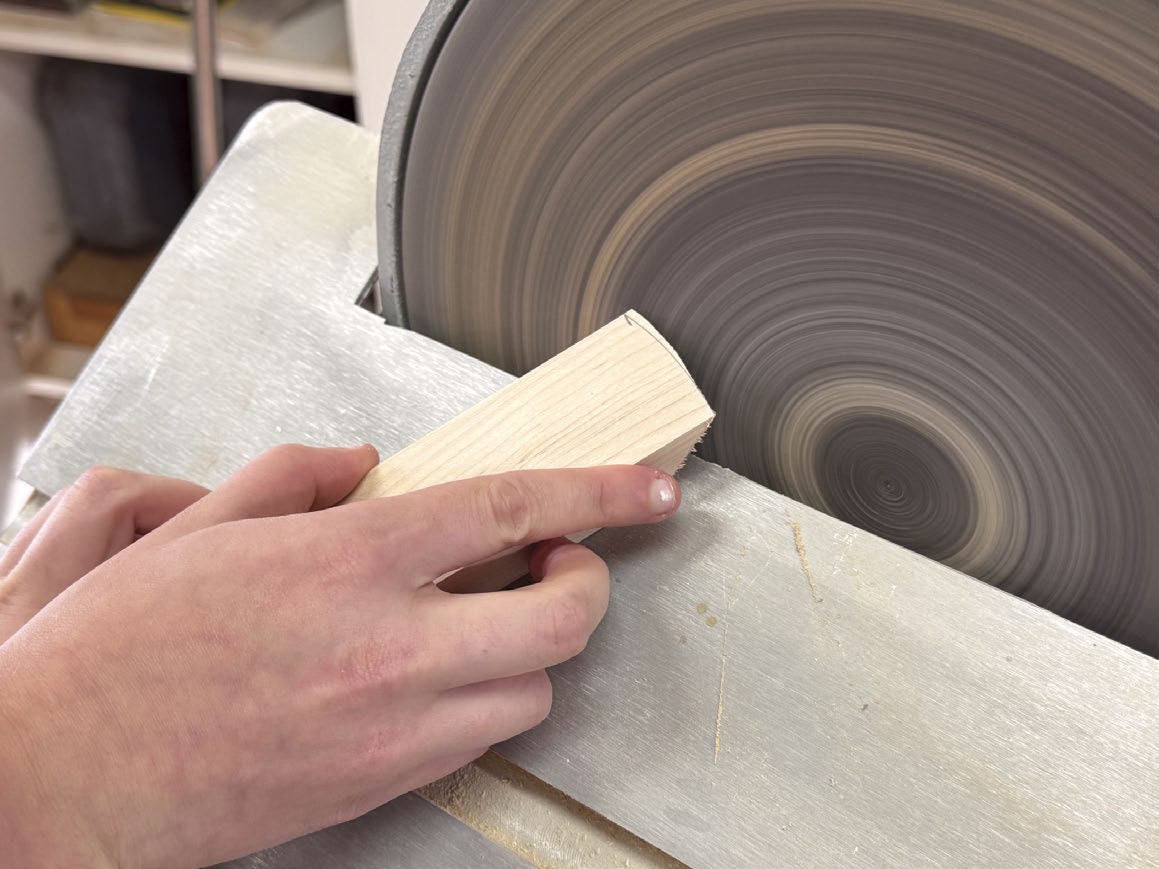
Sand the Curve
A disc sander with its table tilted allows you to accurately machine the curves into the eight workpieces.
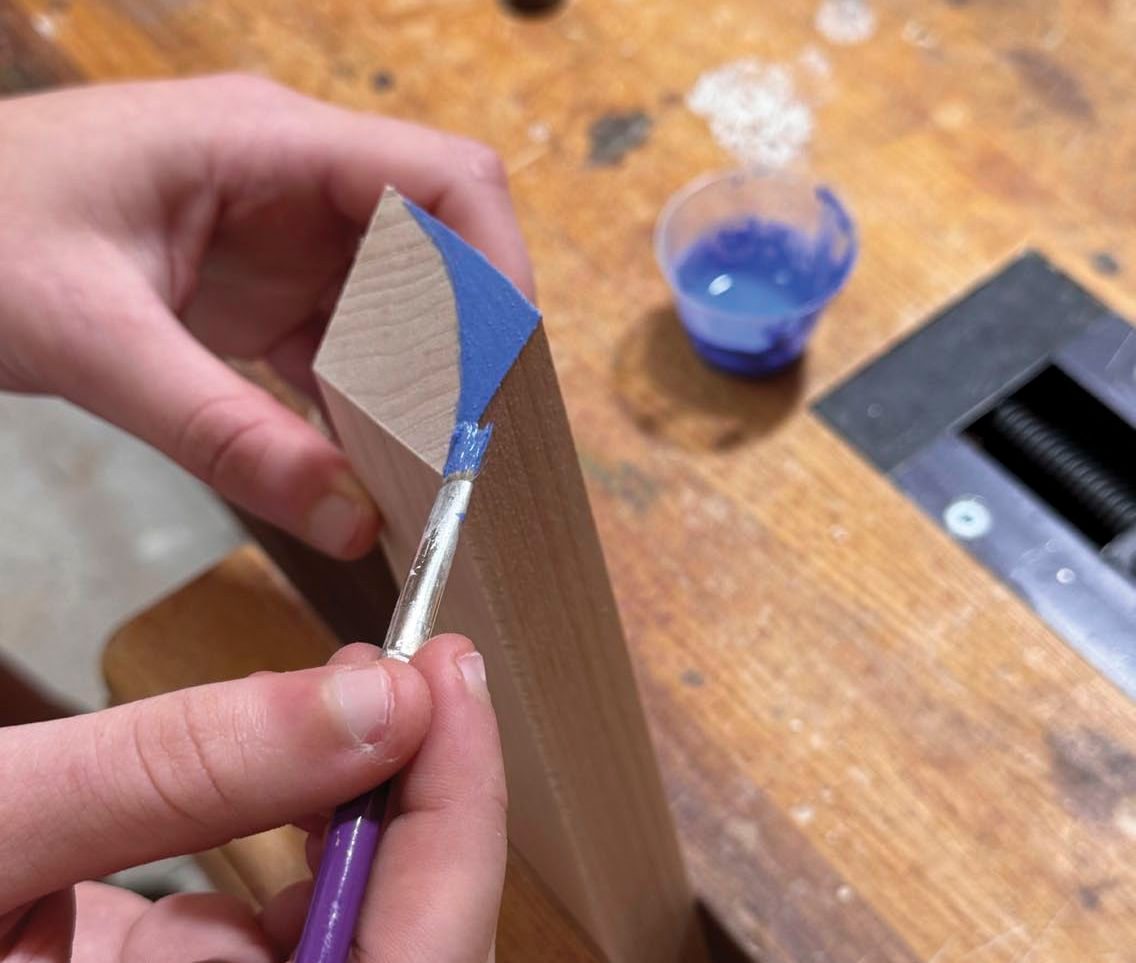
Colour Your World
A splash of colour will add a bold focal point and provide great contrast with the wood you choose for your frame.
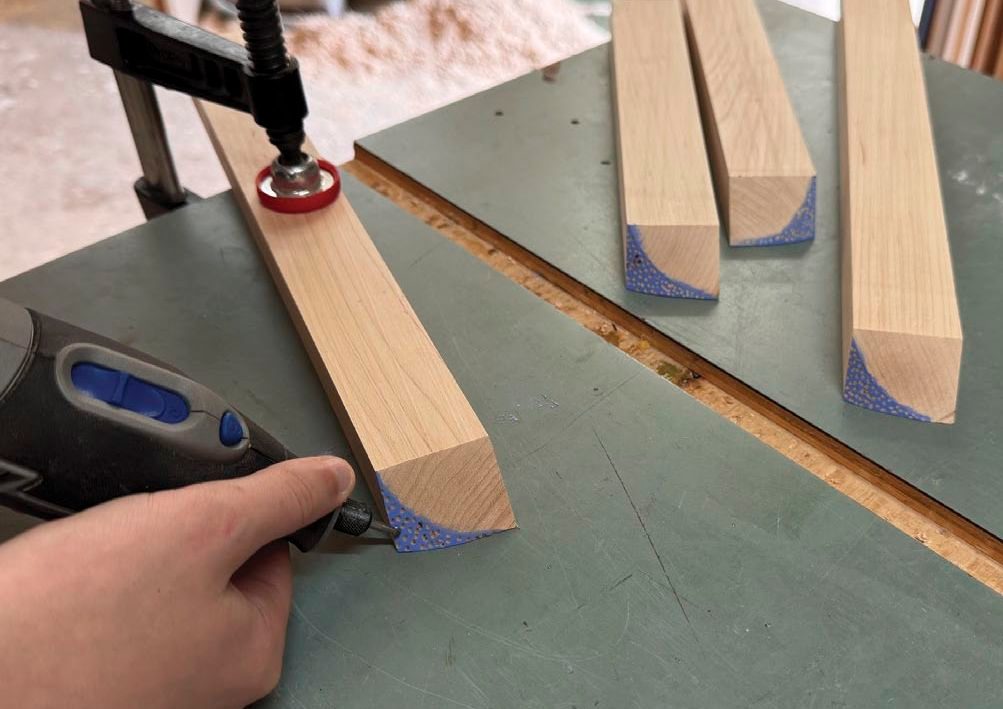
Time for Texture
The addition of texture also provides a strong focal point, especially because you remove paint from the areas you’ve textured. Patience and practice help produce a fairly even pattern and a pleasing look.
Mark String Locations
Checking string heights against your full-sized pattern will help you determine where to drill the screw eye pilot holes. The frame is just held together with masking tape at this stage.

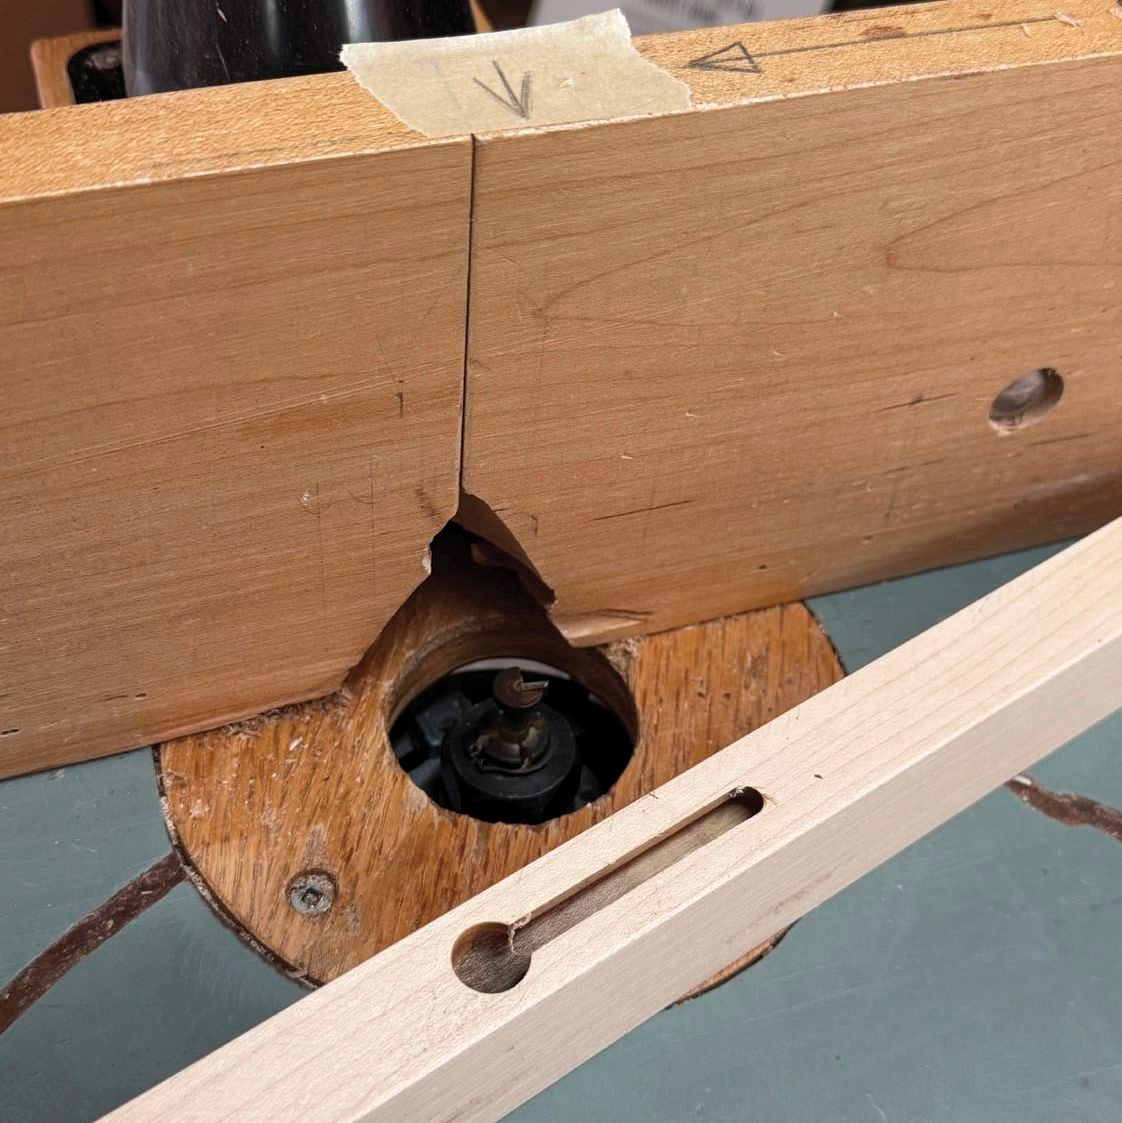
Hanging Options
One option to be able to hang the frame is routing a picture frame slot into the back edge of the top frame member. You could also attach a standard picture frame clip to the same rear edge.
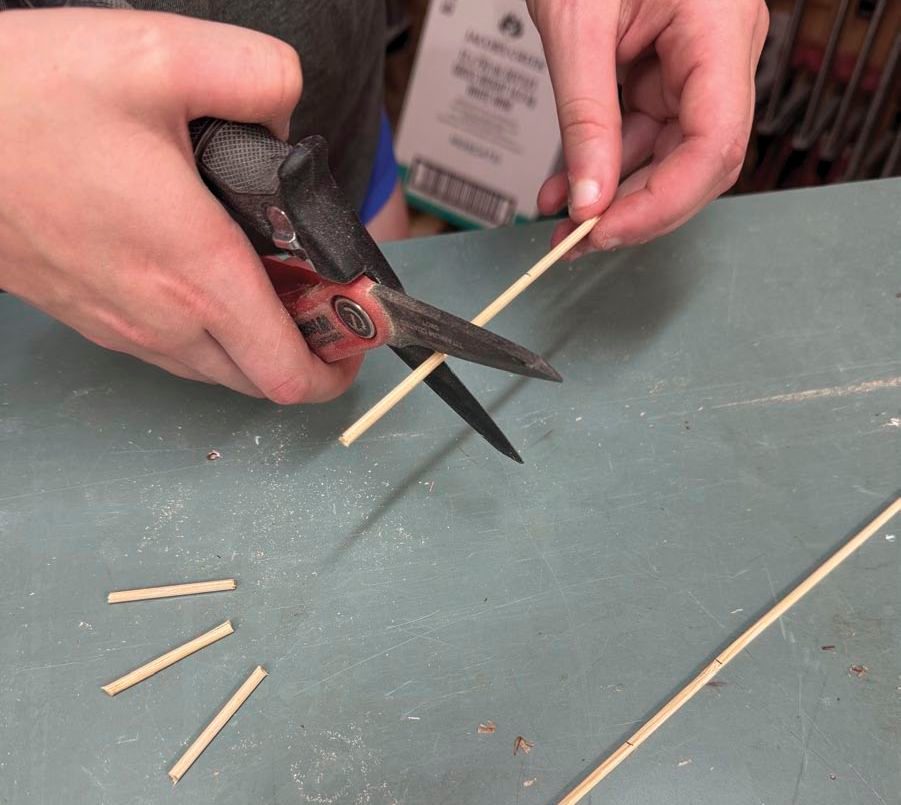
Snip to Length
A pair of heavy-duty scissors or snips will quickly cut the 1/8" diameter dowels to length.
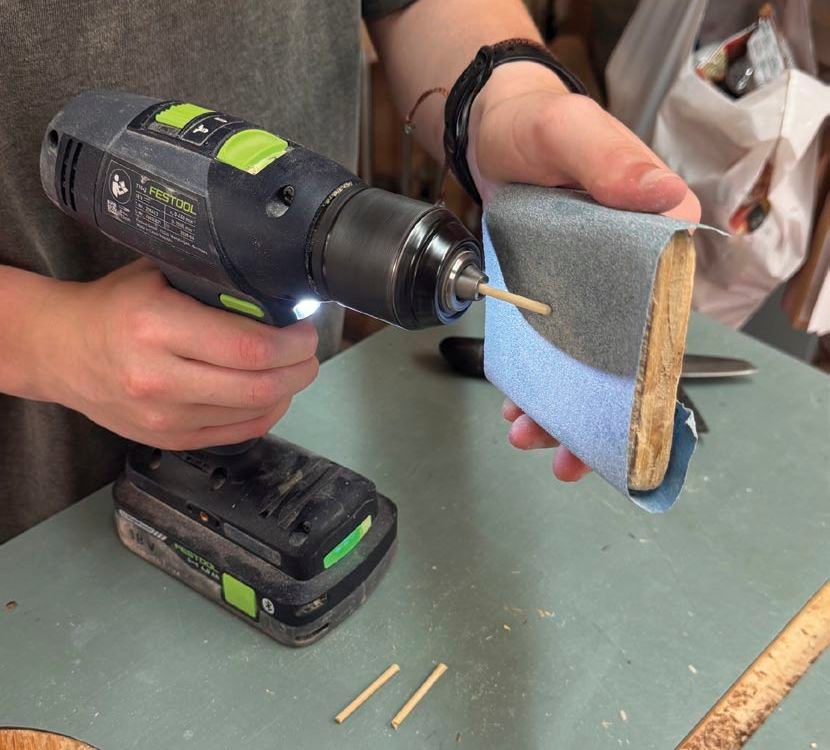
Shape Their Ends
Once a dowel is chucked into a drill, you can pull the trigger and shape the tip to your liking with a sanding block.
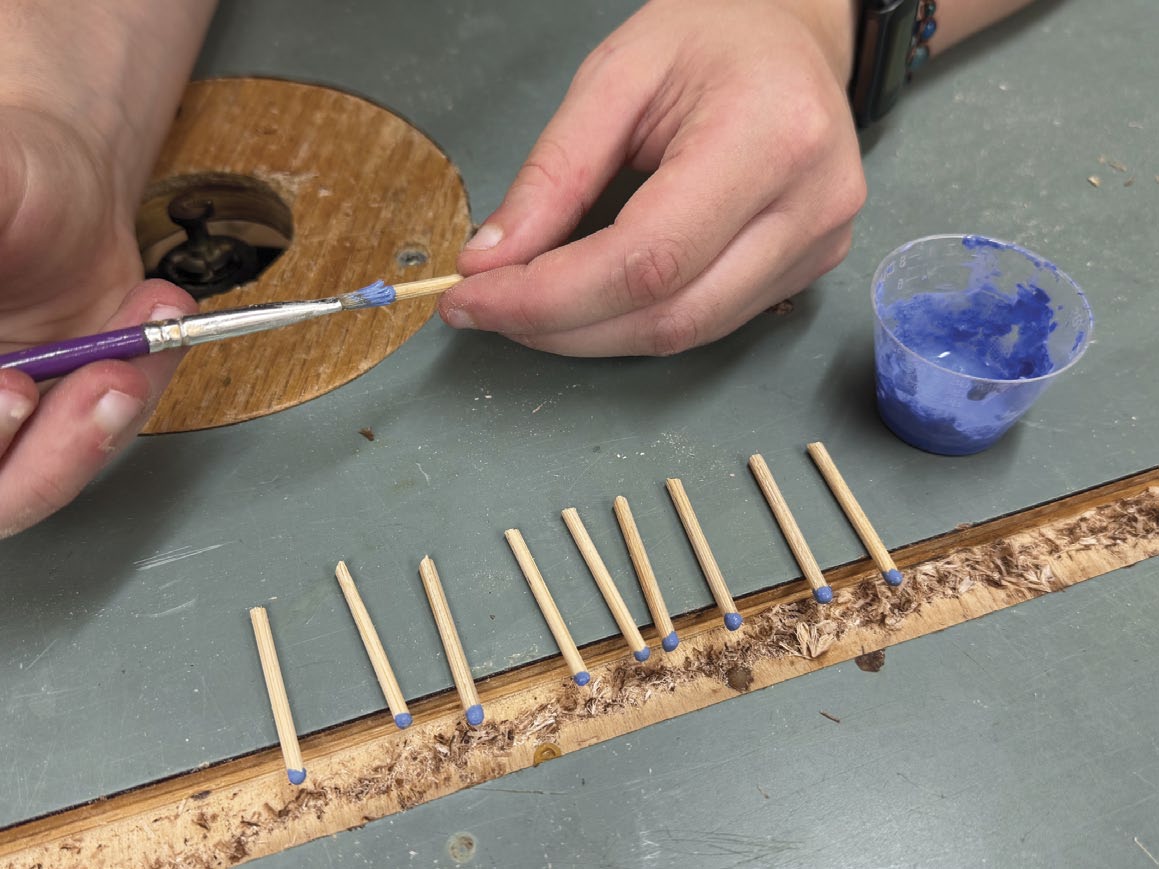
Colour the Tips
Once shaped, each dowel tip can be coloured to match the bevel joints.
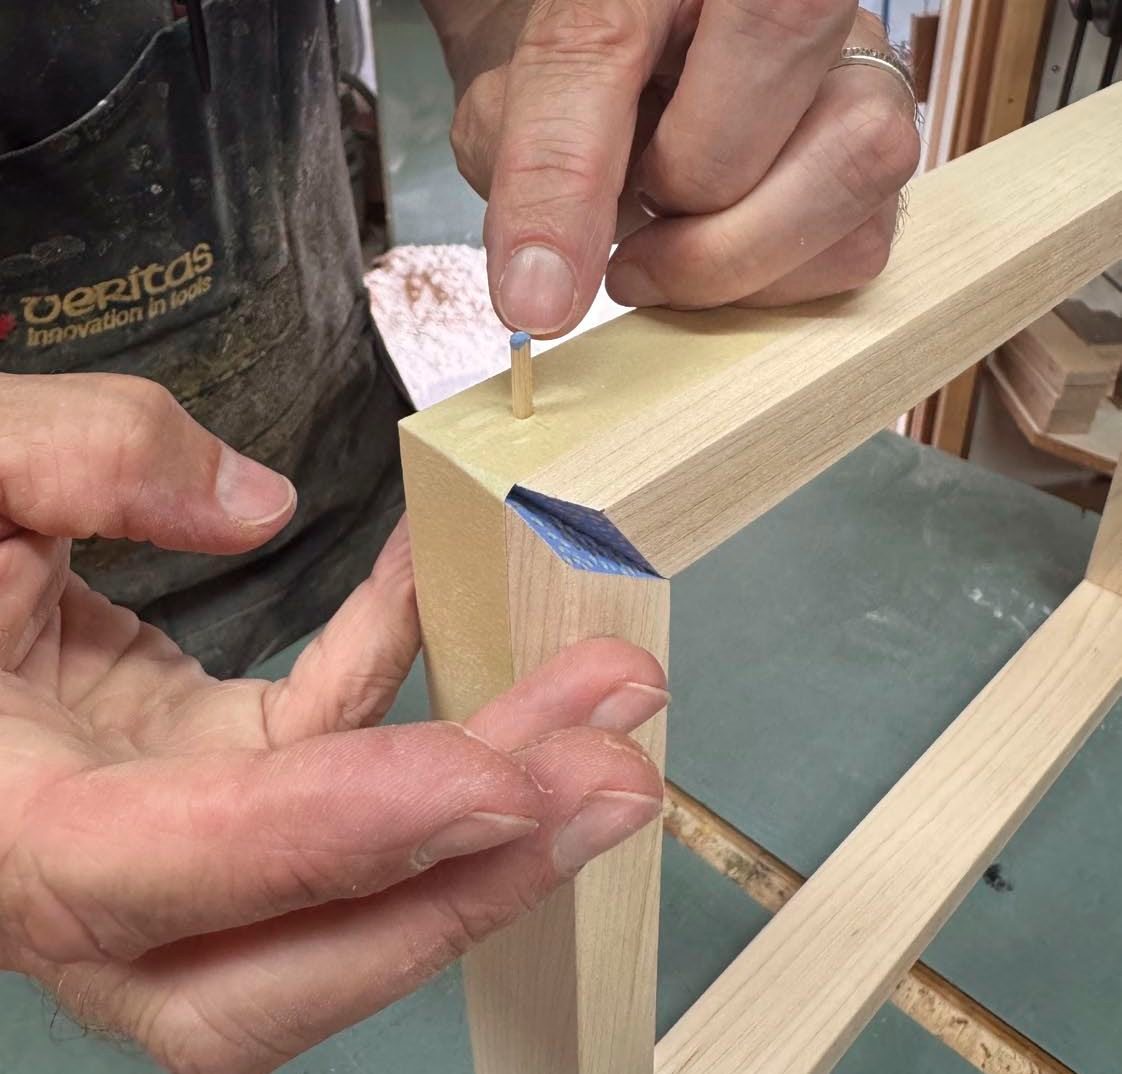
Press Them In
Finger pressure should be enough to seat the dowel. If that’s not the case, a few light taps from a small hammer should do the trick. Just ensure the dowels are all sized properly before colouring their tips, and either discard the thick ones or sand them down a bit.
Like Magic
Once the dowels have been installed, and have had a chance to partially dry, remove the tape. This will remove any glue squeeze-out created from installing the dowels.
[illustrations_gallery]