FROM ROB'S BENCH
A reader asks: What’s the design process?

Rob Brown

Blog for February 19, 2026
A recent email from a new member included a question I don't often get, but one that a lot of new woodworkers (and many seasoned woodworkers, too) have at least considered.
I thought it might be best to share his letter and my thoughts here, so we could start the conversation and learn from each other.
Hi Rob,
I’m a new subscriber and am enjoying not only your current issue, but all of the past project articles online. There are so many designs to choose from which makes it great for someone like me. One thing I keep wondering about is how new woodworkers come up with a design.
I know there are a lot of joinery techniques I need to learn in order to make furniture, but those sorts of things seem to be fairly straightforward. There seem to be only so many joints, and I probably only need about a dozen or so in order to have a half-decent repertoire to work with. I can learn these joints on a “need to” basis as they come up in projects.
But, as I mentioned above, the most difficult thing for me is design. I can easily just build projects that are outlined in your magazine, but what if I want a different design altogether? And how the heck did you and your writers come up with the designs in these project articles in the first place? I may be far from designing my own pieces of furniture, but I’d at least like to know how the experts do it, so I can get a more well-rounded idea of how furniture design works.
Jeff P.
Rob's Reply
Approaches to design vary from woodworker to woodworker. I’ll go over a few different approaches to how woodworkers of all stripes design the pieces of furniture they build.
The "No Design" Design
At the “K.I.S.S.” end of things, new woodworkers, as well as those who don’t want the challenge of designing their own furniture, just stick with published designs from magazines, books and some online sources. These folks don’t want to worry about coming up with a design themselves, fearing the project might not look great or be strong enough if the design isn’t engineered properly.
There’s nothing wrong with this approach. They can see a photo of the finished piece, and if it’s pleasing to the eye, solves a functional requirement, and they think they have the skills to build the piece, they dive into it. The build is enjoyable and they end up with a lasting and properly functioning piece of furniture they built themselves.
The "Slight Adjustments" Approach
The next step up from the simplest approach is to take a design you like and modify it slightly. Maybe you like a rectangular kitchen table design we’ve published, but the one in the article is too long to fit in your space. The process of resizing the table is fairly simple. The length of some of the parts may need to be adjusted; in this case it will likely be just the tabletop and the two side aprons. Those are the only parts that make up the length of the table, so they’re the only parts that need to be shortened. If the maker needs the table 12″ shorter, that’s the amount they reduce the length of the top and two side aprons by.
This approach works for most pieces of furniture, as long as the change isn’t too extreme. Using our kitchen table project as an example, if there was an overhang of 16″ at both ends of a 72″ long table, that leaves a footprint that’s 40″ long, which is still very stable. If you were to shorten the overall length by 20″, that will leave you with a footprint that’s only 20″ long, which is far too short to offer enough stability.
The "Major Adjustments" Approach
Sometimes a woodworker will like only certain aspects of a project and want to incorporate them into a build, but not the other aspects. Using our kitchen table as an example, maybe that table design had nice, tapered legs, but the maker didn’t want to build a kitchen table, but rather a side table. The shape and proportions of the legs can be adjusted to suit a side table design. While the overall height of the legs might not have to change, the legs will likely have to be smaller in both width and thickness, as they would look too large and chunky for a more refined side table.
The length and width of the table would also have to be adjusted to suit the space, not to mention the thickness of many (likely all) of the parts, as a side table is generally a lot smaller than a kitchen table. On top of that, although they likely don’t have to be adjusted, the joints could also be machined in a slightly different way, if needed, as the external forces acting upon a side table are much less than the external forces acting on a kitchen table, where many people will be sitting around it at the same time.
This approach allows a maker to have a more “mix and match” approach, using a leg design from one project with an apron design from another project, then coupling them both with a top design from yet another project.
This approach to design will allow you a fair bit of flexibility, though a half-decent background in selecting and machining joints will come in very handy.
The "Look at History" Approach
There will be times when a woodworker will see a photo or come across a piece of furniture in real life and want to build a similar piece. This can be difficult because there’s often no way of knowing what joints were used. If you have the piece of furniture in front of you, you can measure its overall dimensions, not to mention the sizes of the different parts. This will give you a huge head start. But with a photo you’ve come across on the internet, you might only have overall dimensions, if that. This will mean you have to fill in all the blanks. There are many industry standards (kitchen table height, chair seat height, etc.) you can start with, but the rest you’ll have to use your best guess to figure out.
This approach opens up a lot of doors for you to create a custom piece of furniture, though it also requires not only a bit of joinery and engineering knowledge, but also have a bit of an eye for proportion and overall shape to end up with a piece of furniture that functions properly, looks good and will stand the test of time.
Full-Rogue Design
This is the upper level of furniture design. To be honest, it can be very frustrating (I hope that’s not just me!) and time consuming, but the payoff can also be quite high. The custom piece you end up with will fit the space you have, and as long as you’ve done a good job, will complement the design aesthetics of your home.
This approach can certainly start with some design inspiration, like the table leg example above. I often see a certain shape or form and run with it. This shape or form could come from a piece of furniture, though it more often comes from nature, another trade (pottery or metalworking, for example) or another part of life, altogether. Keeping your eyes open to the curves, patterns and shapes you come across on a daily basis will help you develop new furniture design ideas.
The trick with this furniture design approach is that you need a strong background in furniture construction methods and engineering. A keen eye for the aesthetic side of things is also important. Having said that, you don’t need to be a professional designer to have success with this general approach. We all learn by doing, so as long as you’re okay with ending up with a piece of furniture that isn’t perfect, coupled with the odd strike out, this will all be a part of learning.
Generally speaking, I start with the overall design, then work out how to build the piece. Having good joinery skills will go a long way here, though you don’t often need to get too fancy. Thinking outside the box from time to time will also open up a lot of joinery options, leaving you with a solid, beautiful and functional piece of furniture.
Mock-ups
Materials are expensive. Time is also valuable. Furniture design and construction can use up both of these things quickly. If you’re at all unsure of a proportion, a joinery technique, a shape or any of the other things that come together to make an attractive piece of furniture, do yourself a favour and make a mock-up. Using cheap materials and very basic joinery techniques to make a mock-up will allow you to see what the full-size piece will look like, not to mention work out how the different parts can best fit together.
I use typical construction materials like 2x4s and cost-effective sheetgoods, though I also have used paper, plastic and other non-traditional materials to build a mock-up. My favourite mock-up material is corrugated cardboard. It’s fairly strong, can be easily cut to just about any size and is free from your local lumberyard or big box store.
For joinery, pocket screws, hot-melt glue and tape can help hold the different pieces together. A mock-up isn’t permanent; it just needs to stay together for hours, or even minutes, while you stand back and see how it looks.
I’ve even spray-painted different parts to give me the sense of different species. Having an assortment of browns, reds and beiges on hand will allow you to come up with a quick representation of most wood species.
How do we do it?
Most of the projects you see on our pages were likely designed with a mixture of the last two approaches. Our writers have the skills and experience to design and engineer great looking projects. While they range from beginner to advanced in terms of skill levels needed to make them, they are all well thought out and the articles will guide you through the process of completing the piece. And if you have questions, you can contact either the writer directly or myself for clarification. We’re always happy to help. And who knows, in the near future you may have enough experience to write a project article for us. I’m looking forward to it.
Until then, if you have questions about your next project, or design in general, send me a message.
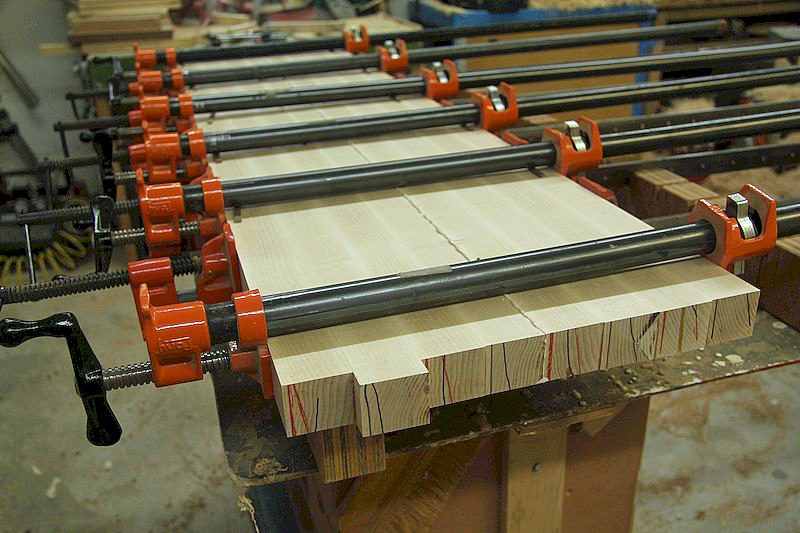
Made to Fit
This was a kitchen table I built about five years ago. Here, I'm laminating some of the boards to add to the table top's width. By cutting this top panel shorter (or making it longer) and then adjusting the aprons to suit, the overall dimension of the table will be shorter (or longer).


Your comment about “standards” ring true and is the basic building block to consider when designing anything in my opinion. Seating heights, widths and depths, table heights and such all have to conform to human scales. Is the object for large adults or children to use and enjoy? Once the size is determined, the next thought has the be the placement of the elements within the design, here an understanding of simple norms like the “Fibonacci Sequence” and the “Golden Ratio” have huge implications for how the final product will appear and function. In the end, we want to craft objects that attract a user toward it so they want to engage with it and derive satisfaction from it.
Hey Rob, great insights on the design methods and process. I am a fan of the cardboard mockup as well.
Can you or your designers recommend any books or articles on furniture design concepts, basic engineering considerations, and the like?
Hi Alex. Good question. I’ve enjoyed “Studio Furniture of the Renwick Gallery” by Oscar P Fitzgerald. I’ve also enjoyed the “500 *blank*” series. They have publications on chairs, boxes, cabinets and other types of pieces. From Lark Books, I think. It’s not so much about design, as it is about showing a wide range of pieces. There’s no discussion about design, but there are a lot of nice pieces pictured.
Another classic is “Designing furniture from concept to shop drawing: a practical guide” by Seth Stem. Its photos / examples are a bit dated, but the concepts are still solid.
Here are a few past articles from our pages:;
https://dev.canadianwoodworking.com/techniques_and_tips/referent-based-design/
https://dev.canadianwoodworking.com/techniques_and_tips/14-practical-steps-to-designing-furniture/
https://dev.canadianwoodworking.com/techniques_and_tips/seven-fundamentals-of-good-design/
https://dev.canadianwoodworking.com/techniques_and_tips/outside-the-box/