FROM ROB'S BENCH
Wrapping up 2025

Rob Brown

Blog for December 31, 2025
The project I probably wrote the most about in 2025 were the koi shoji screens I built. I first met with the client in February and finally got the three pairs of screens installed mid-December.
Don’t get me wrong; I didn’t work on them the entire year. It wasn’t until early summer that I was able to put together some mock-ups of what the koi, which were the focal point of the pair of screens to be installed in the front hallway, would potentially look like. Then there were some back-and-forths with the client about design specifics, followed by more mock-ups. At this stage it was more in my head, which is often how I come up with design ideas. Thinking about the design, along with a bit of sketching and playing around in the shop, was what was happening most of the time.
As the project deadline got closer, I thought more deeply about the design. As these things usually go, I had an ah-ha moment and the rest more or less fell into place. But that only got me to the stage of being ready for the installation. Thankfully, installations never go wrong in any way. They take exactly the time you anticipated, you never wish you would have brought along any extra tools or hardware, floors and ceilings are always square and plumb, and you’re home earlier than you think. Right?
The good, bad and the ugly
Let’s start with the good; the three sets of screens are in, the client is happy and I was paid in full. But that’s boring, isn’t it? Or at least it’s boring after the fact.
As always, right up until the last screen was sliding perfectly, I worried about the measurements I took back in February. This was a slight worry during the entire build, but it wasn’t such an extreme worry that I contacted the client to put a tape measure on any of the three openings. Thankfully, my measurement worries were unfounded.
My worries about the client not liking the hallway screen design was also unfounded. There’s always that slight thought in the back of my mind and I’m glad to report that wasn’t an issue either.
To Toronto!
I told my wife there was a chance I’d be back early, as in theory, these screens shouldn’t take long to install. My plan was simple; secure the upper track, place the lower track on the floor, directly below the upper track, set the screens in place and test them out. There’s a good chance they all fit, as there’s a little bit of both side-to-side play and height play factored into my design that an extra 1/16″ — heck, even 1/8″ — in any direction shouldn’t cause any troubles. Although I wasn’t positive, I was pretty sure my measurements were within 1/16″ in all directions.
My wife wished me luck, but her sense of pessimism was palpable when I told her this might be a really simple install. She was kind enough not to laugh out loud when I told her this, though.
About those "accurate" measurements…
When I measured the height distances in these three closet openings I did so near either edge of each opening. I (stupidly) didn’t account for the height in the centre of the opening. Condo floors are never perfectly flat, but in my experience they usually don’t vary too much over short distances. Since these closets were all less than 6′ wide, I assumed the height at the centre would be close enough. Big mistake.
While packing tools, I considered bringing my thickness planer, as it would come in handy if the height was off. I could easily remove some material from the unexposed face of either the upper or lower track, bringing the final height to something that would work. Rather than bring this heavy, bulky and loud machine with me, I ploughed a few 1/8″ deep grooves in the underside of all the tracks, leaving less material for me to remove with a hand plane, if needed. Good idea, but I didn’t anticipate the centre of one of these closet openings to be about 3/16″ smaller in the middle and well over 1/4″ smaller in another.
Fast forward to the jobsite
I decided to start with the two sets of bedroom screens, as they would allow me to get the lay of the land before installing the koi screens in the front hall. The first set started well. After removing the mirrored sliding doors and metal tracks, I had the upper track installed in the first opening. I set the lower track in place, then tried a screen. It didn’t quite fit in place, but wasn’t too far off. Some hand planing (with my block plane), test fitting, hand planing, test fitting, more hand planing, more test fitting and a little more hand planing and I was finally ready for the final test fit. The fit was not quite perfect, so a few more rounds of hand planing and test fitting were in order. Once the screens fit into the groove, I secured the lower track to the floor to wrap up the first closet.
The problem was mainly in the centre of the closet opening, as both the ends of tracks were the right distance away from each other, but the middle was too tight. The 1/8″ deep grooves made the work easier, but it’s still not easy to remove 1/16″ of material from the underside of the track, especially when you’re working on the floor of a condo bedroom, trying to be both quiet and tidy.
At this point my hands were surprisingly tired, and showed slight signs of blisters on one of my thumbs. The first screen took me about 90 minutes to install, but the next two would be easy, I assured myself. I had some lunch, considering it was about 1:30, and I had the two “easy” screens left.
Screen #2
My first snag came when I realized there was nothing to secure the upper track to. The upper track in the first opening happened to have some metal studs in just the right spot, but I wasn’t so lucky with the second screen. After a trip to the local hardware store to grab some drywall anchors, I was ready for action. For the record, I spent the entire walk to and from the hardware store kicking myself for not bringing any drywall anchors.
With the upper track now installed, I simply placed the lower track in place and reached for one of the screens to check its fit. It was absolutely nowhere near fitting, which made my heart sink. To be clear, the screen was made the correct size, but since the floor was so far from flat, I had a problem.
The grooves on the underside made the first five minutes a breeze, but I still had a good 1/8″ to go. Rather than bring you along for the whole, ugly ride, I’ll just sum it up by saying it was arduous. A very sore back and finger blisters were the first things I had to deal with, aside from what seemed to be uncharacteristically dense maple with twisty grain. I eventually got to the point where I wasn’t even sure completing the installation would be possible with the tools I had. And in the back of my mind I was always thinking about the fact that this was only the second of three screens I had to install.
Change of scenery
After about two hours, and still with no obvious end in sight, I had to switch gears. The client was popping in and out of the bedroom to check on progress, not to mention encourage me. He was a nice man who understood the fact that installations sometimes don’t go smoothly. He was also lending a hand whenever he could, which was appreciated. He appreciated how hard I was working to wrestle this second set of screens into submission.
I told him I needed to switch what I was doing for a short while, partially to reconsider my approach to the second set of screens. He went back to doing what he was doing and I went into the front hallway. After a deep breath, I set to work. The mirrored doors were already gone, so I fixed the upper track in place, which took about three minutes. After placing the lower track directly below the upper track, the moment of truth was upon me. I reached for the first screen, which easily fit in place. The second screen followed, 10 seconds later. I was so excited I called my client to immediately come out to see what I did. “This is actually how smoothly it CAN go!” I said to him, with a big smile on my face, which only brought a huge smile to his face.
I told him the screens needed a bit of fine-tuning, but that would only take a couple of minutes. The crazy thing was that I was right. Three minutes later, the screens fit perfectly and it was time to install the lower track. In a matter of 10 minutes I had installed one of the three sets of screens. My energy came back, a touch of optimism returned to my thinking, and I proudly marched right back into the bedroom to complete the task I had virtually given up on just 10 minutes ago.
Now that I had a bit more energy, and I could somehow see the end in sight, things went relatively well. Within about 30 minutes I had shaped the lower track to the floor, adjusted the upper track to better fit the ceiling and the screens were fitting in place, though they just needed to be fine-tuned to fit square to the two side walls.
Sometimes it’s just the right state of mind that makes everything possible, though the right tools and hardware certainly play a role. Next time I’ll bring my thickness planer, just in case.
After taking some photos and loading up all my tools I started the car. It was exactly 9 p.m., which was about four hours after I told my wife I may be home. A quick text to her, to let her know I was on my way, followed by about 40 minutes of fighting the Toronto construction-induced traffic, and I was already thinking about the place I’d stop for a quick snack. I must have been tired, because I eventually found myself pulling into a McDonald’s on the highway. A tiny hamburger and a medium Coke weren’t quite enough. I grabbed a soft serve cone on my way out. Certainly not a celebratory dinner of champions, but it hit the spot.
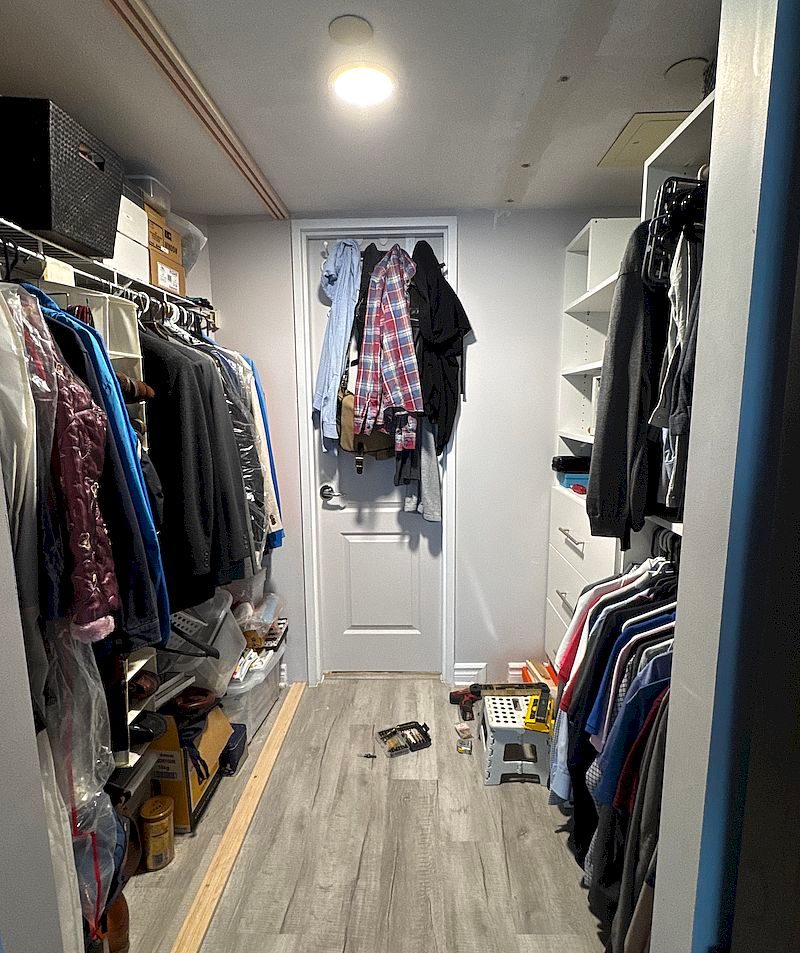
Before
Although there were two sets of mirrored doors covering the two closets, this was the look before I installed the screens. You can see the upper track installed on the left side.
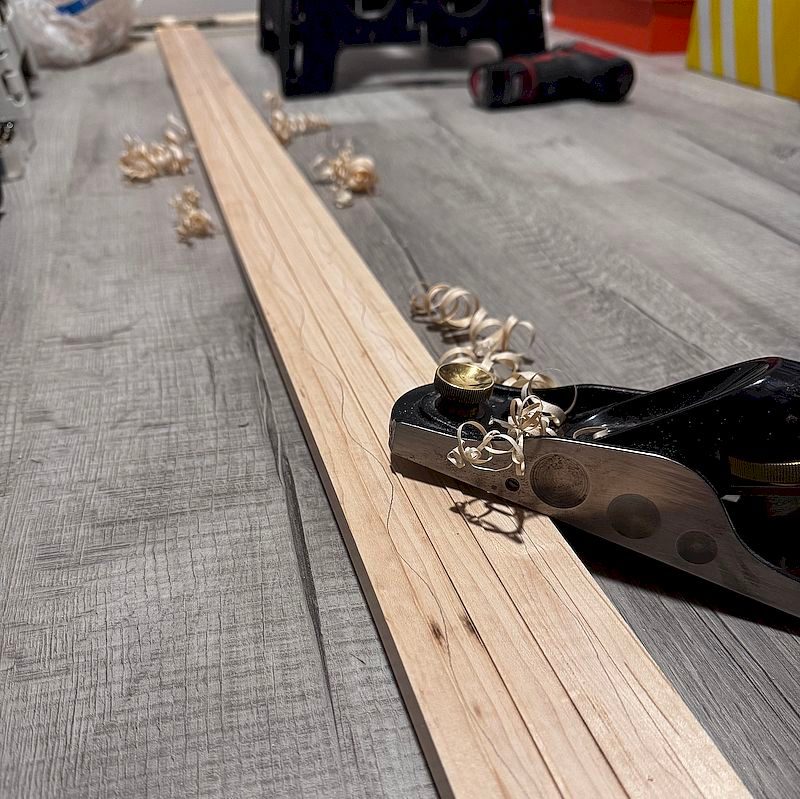
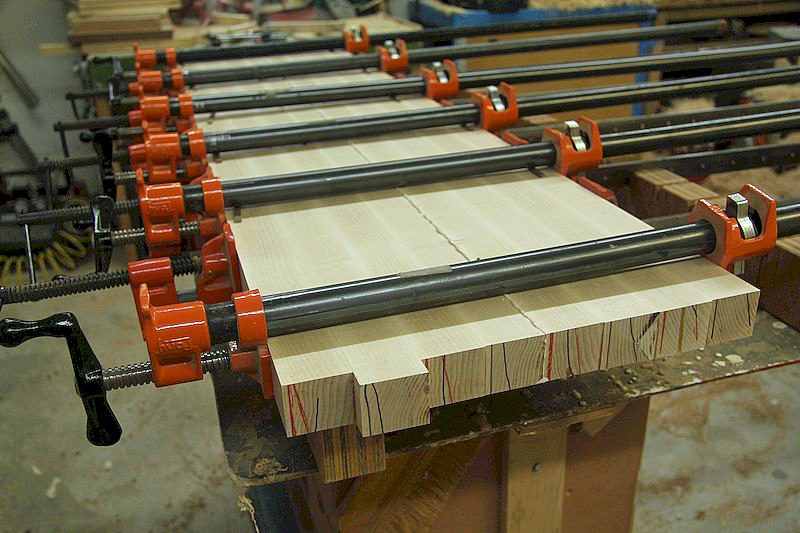
Hard Work
I should have been better prepared. I'm at least thankful I machined a few 1/8" deep grooves on the underside of all the tracks, so it was easier to remove some of the thickness. I know there are only a few random shavings in this photo, but rest assured the entire floor was nearly covered with curly shavings at one point. I was just too focused on the task at hand to take any photos at the time.
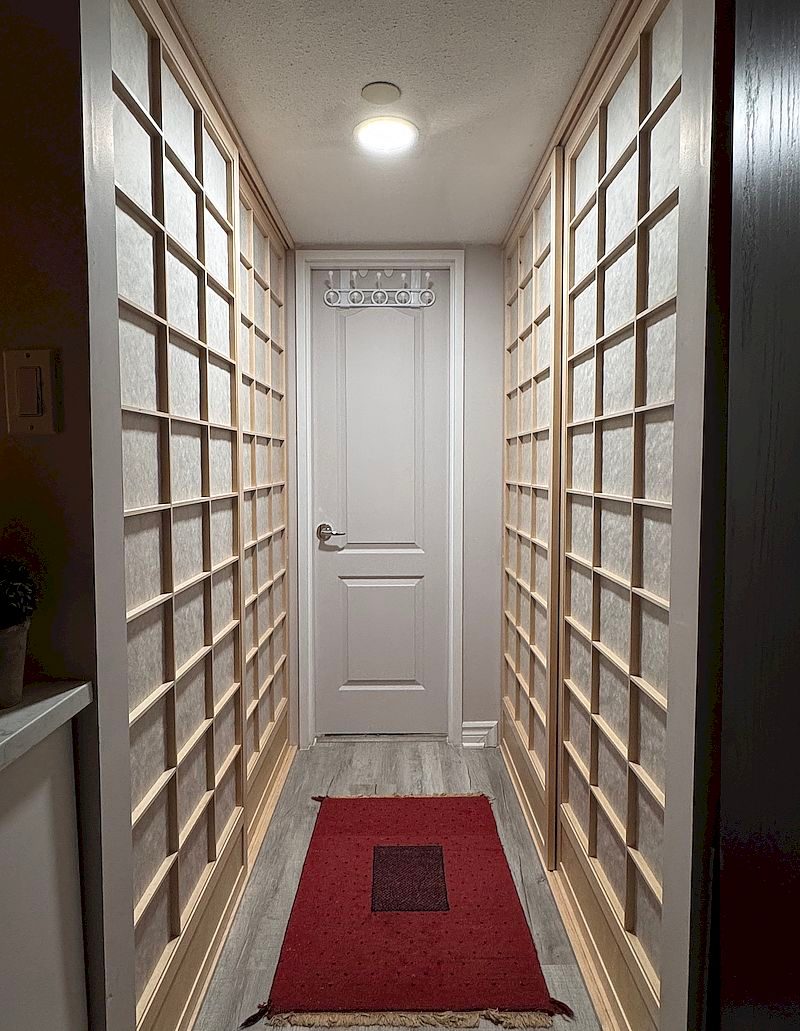
After
The two sets of screens, installed at last. The scene looks so simple and serene, though I can mostly remember carnage from when I was there.
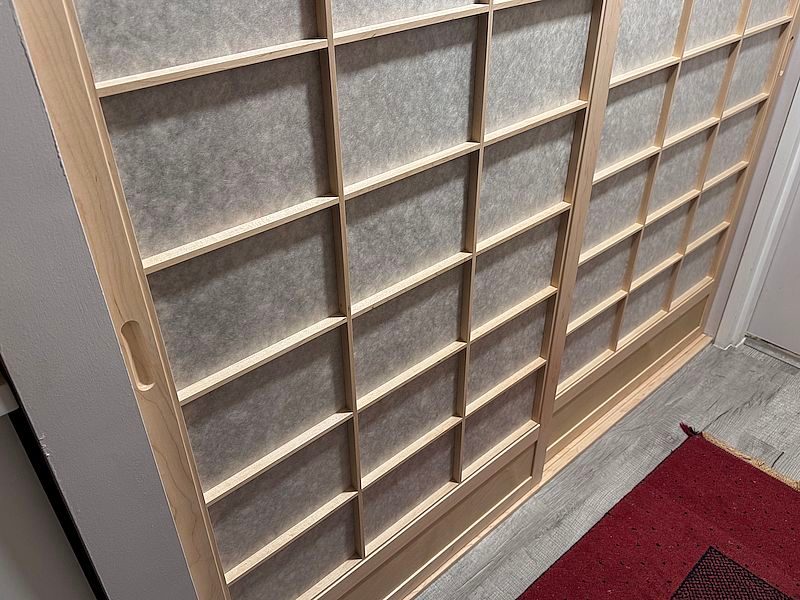
Form Follows Function
I routed rounded grooves for handles, which work well and also look attractive.
Main Hallway
Ironically, the most difficult screens to make were by far the easiest to install.
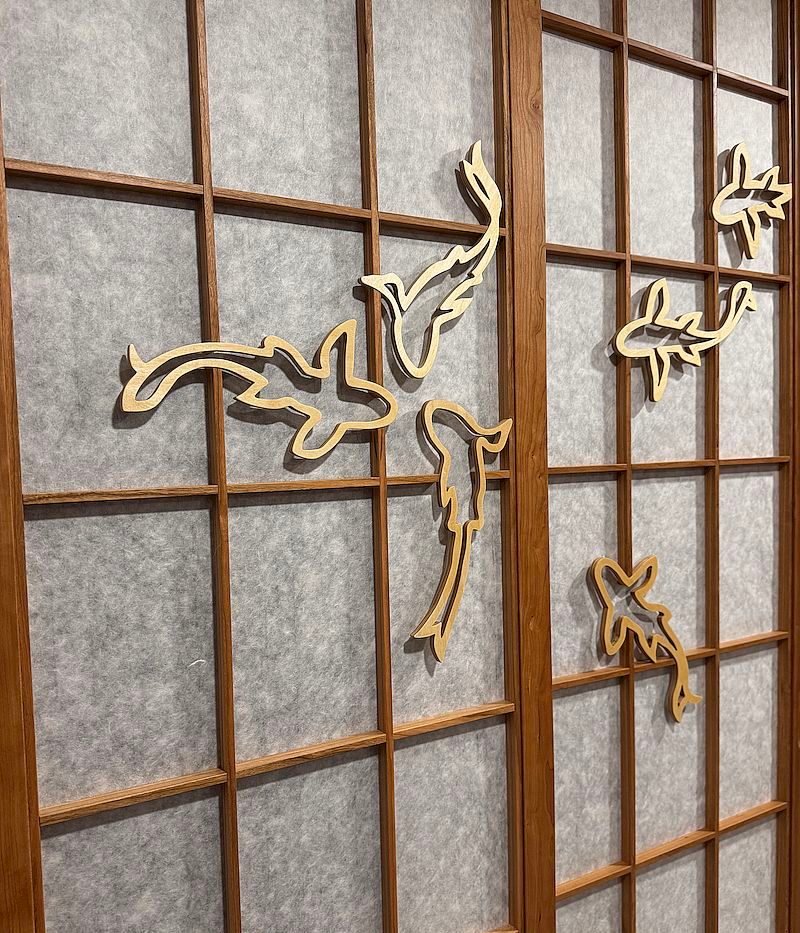
Koi Focal Point
Here's a closeup of the koi swimming on the screens.


Looks nice
Just think how easy installations would be if walls and floors were straight, plumb, level, and at 90 degrees to each other. Where would the challenge be?