FROM ROB'S BENCH
Not so smooth

Rob Brown

Blog for December 11, 2025
Woodworkers generally do their best to make sure all the surfaces of the finished projects they make are sanded or hand-planed smooth.
Once they get to that stage, finishing is next. I still aim for “smooth as a baby’s bottom,” too, as I almost always sand between coats and often buff the fully cured finish with wax and fine steel, or another substance, before releasing that project into the world.
That smooth surface that we’ve painstakingly perfected is also what everyone else first notices when they see a newly finished project. Their hands will immediately head straight for the largest, smooth surface and repeatedly slide over it a few times. If the maker has done a good job, and often even if they haven’t, the comments are usually similar to “Wow, how’d you get this so smooth?!”
Not so fast
It’s almost getting to the point where woodworkers began thinking that making a project as smooth as possible is the main purpose of woodworking. I also fall into that category sometimes.
The other week I was making a very simple coat rack for a neighbour. They supplied the 5′ long board and the six hooks, which were made by a local blacksmith. As I was leaving, my neighbour mentioned how this board came from a family-owned sawmill just outside of Bracebridge, Ontario, which he’s spent a lot of time at over the years. In a bit of an aside, he mentioned how he also liked the heavy, rough-sawn texture from the sawmill’s circular blade on the face of the board.
Up until this point, I had pictured a smooth plank, with the six hooks spread evenly across the length of the board, but suddenly a different idea popped into my mind. I could skip dressing the board, so it was partially smooth, yet still leave a lot of the visual and physical reminders of where it came from. I asked him if he’d like that approach and the answer was pretty clear. “Oh yeah, that would be great!” was his quick response.
How rough?
At the shop, I first trimmed the board to length, then considered what my next step would be. If I jointed it first, the board would obviously finish flatter, though it would remove more wood from either end. The only problem with that was when I shoved it through my thickness planer, the middle of the board would get dressed more heavily than both ends, resulting in an uneven surface. Instead, I ran it directly through the planer, ensuring a more even face, even if the overall flatness of the board was far from perfect. The flatness wasn’t important, as it was going to get screwed to a few studs anyways.
After two light passes, I stopped. The majority – I’d say about 60% – of the surface was freshly dressed, while the remaining 40% was as rough and discoloured as it was before I picked it up.
It was obvious if I continued to dress it with my thickness planer, there would be much less texture near the middle, as opposed to either end. Rather than create a more uneven look, I grabbed a hand plane and continued to even out the surface texture. A few passes here, a few passes there. The question very quickly became when should I stop? I aimed for a fairly even appearance, though not so rough the texture would catch jackets and scarfs as they were hung.
The edges
The edges were in a similar situation: rough sawn with a circular saw pattern on them. I put the board in my vise and made a few passes with the hand plane before stepping back to take a look. A few more passes and I quickly stepped back again to make sure I didn’t take off too much material. A few passes with a block plane to ease the four sharp edges and corners and it was ready for a finish. Three coats of finish later, I installed the hooks, each with a single screw. I planned for the hooks to be the right distance apart, so two carefully located screw clearance holes behind two of the hooks would secure the entire rack to the stud wall.
The funny thing is, even though the surface of this rack isn’t nearly as silky smooth as most of my other projects, I have a feeling people seeing the rack for the first time will be drawn to run their fingertips across the board even more than they would have been if this had a super smooth surface. Once again, texture for the win.
Fine Tune the Texture
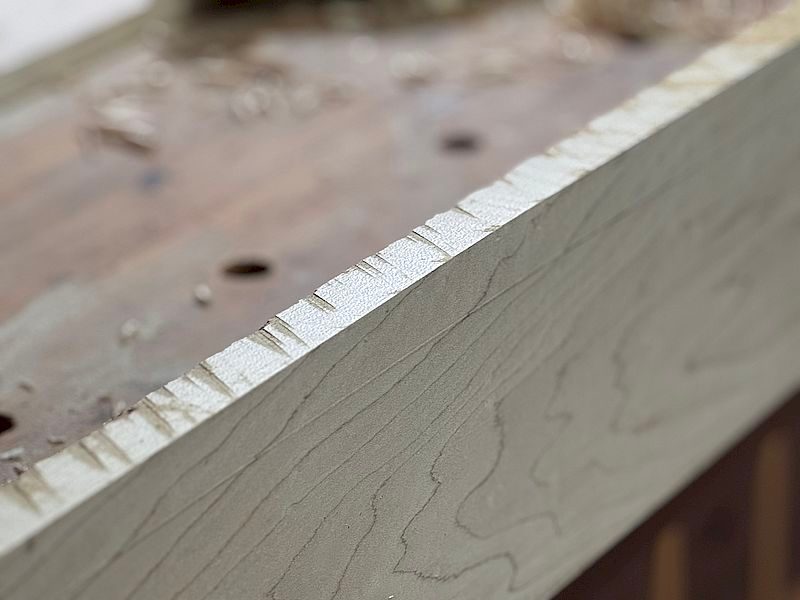
A hand plane allows me to hit some areas a bit more, so the sawmill texture is somewhat even across the entire board.
Edge Treatment
Even the edges had nice saw marks, so they also had to be handled with care.
Final Product
The new coat rack, ready to be fondled by everyone who sees it.
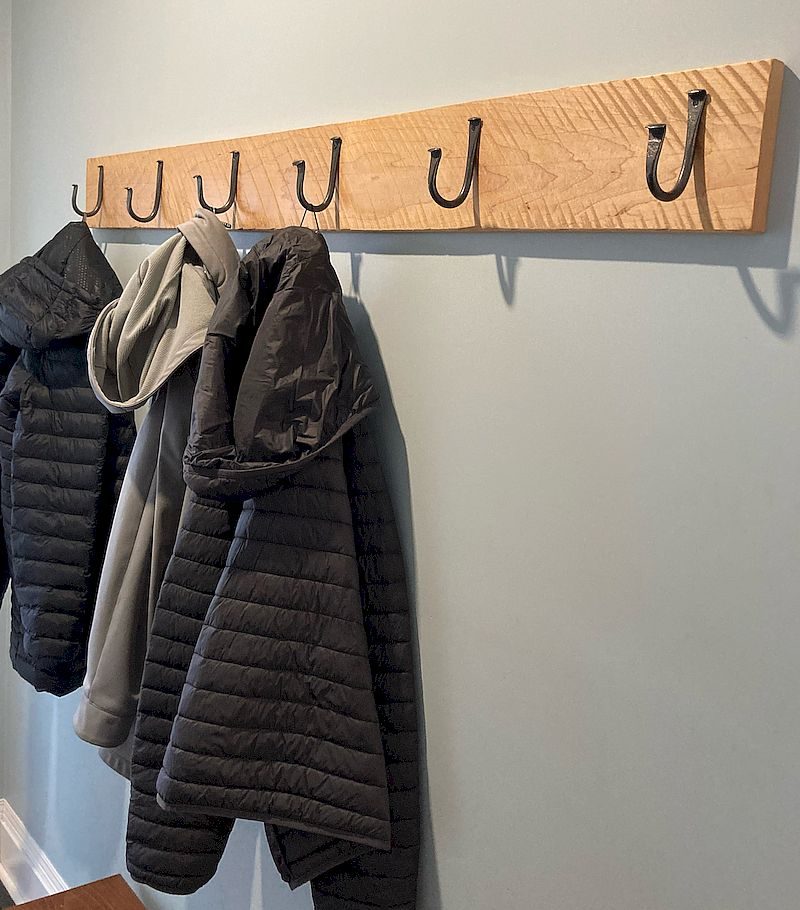


Texture works a treat in this project, giving the homeowner not only the desired functional piece but also memories if the woods origins. Win-win!
Texture is project specific; while it may attract the eye it may also repel the touch. It works in this case as the object will mostly be seen and not handled.
Another way to introduce the sense of texture is to feature highly figured woods against the general background of the primary species the object is crafted from. Say lacewood inlaid in a sapele cabinet or tiger striped maple within a cherrywood box. Finished to a high standard to draw out the chatoyance, the figured wood makes a visual 3D statement but is buttery smooth to the touch. Win-win!
Just avoid finishing that turns the richness of wood into the sheen of plastic.
Well said Rob. It’s not always about smooth. I don’t like when wood feels like plastic.