PROJECT
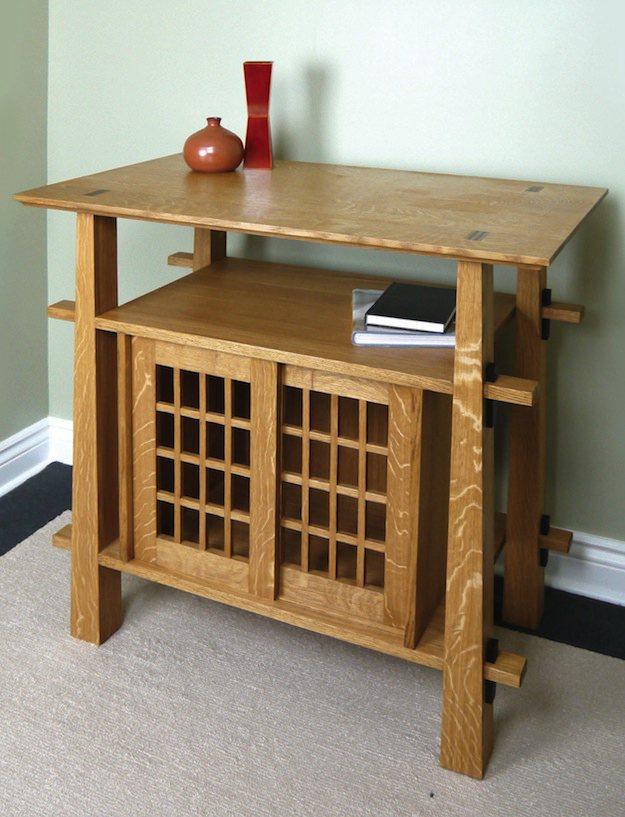
Make a stylish side table

Rob Brown

Find more Furniture projects
Three tapered legs, a curly sycamore veneered top and groovy carved aprons help create a stand-out table.
We needed a small side table for our living room, so I set forth to design and build one that would not only hold a phone, cup of coffee and a book, but also be unique and eye-catching.
Make a stylish side table
The design stage
The design went through many stages. I knew it was going to be three-legged, but other than that, other details were wide open. Using 2×4 material for the legs and aprons, and some scrap sheet goods for the top, I mocked up a few different designs in the shop, brought them home and placed them next to our new living room chair. My wife and I could then talk about the pros and cons of each design and do our best to refine one to our liking. Thankfully, we were generally on the same page, and this is the design we came up with.
We knew we wanted something fairly light in colour, as many of the other pieces in the living room are on the darker side. This meant maple for the legs and aprons. I was very tempted to use a contrasting wood species for the tabletop, but since I had some beautiful curly English sycamore that would be perfect for this sized project, I opted for it. Making the top out of a darker species would be an attractive option.
The rough design of the mock-up provided overall measurements to work with, as well as the shape of the legs. I was able to play around with one of the mock-up legs to further refine the cross section and overall shape of it, which was great once I got to shaping the real set of legs for the table.
Legs and aprons first
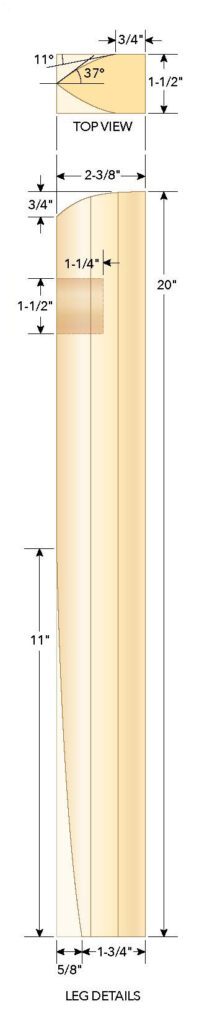
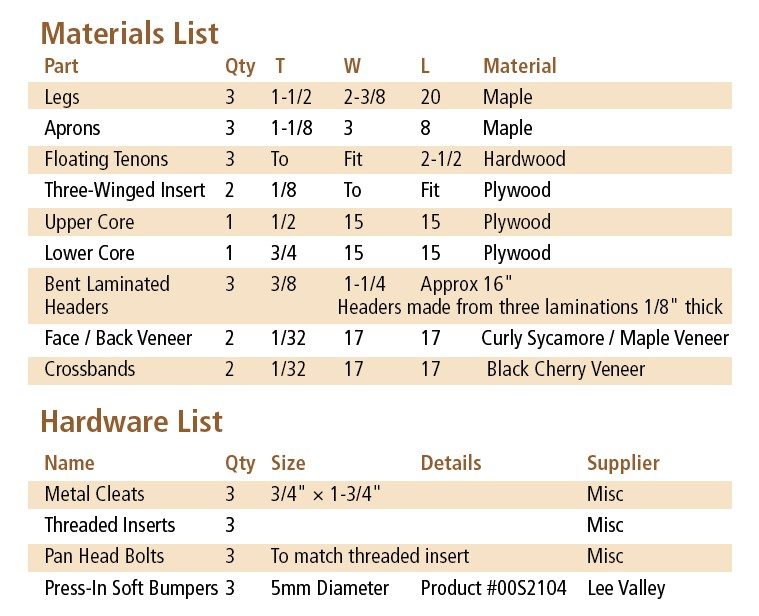
I broke out the three legs from 8/4 hard maple. Since the legs finish only 1-1/2″ thick, this gave me some material to work with. I wanted the two outer faces of each leg to have the simplest grain possible. This meant I needed to machine them so the annual growth rings in the end grain were running as close to front-to-back direction as possible. I jointed them and ripped them on the table saw to achieve this, then completed the breakout process on the jointer and planer. I then cut the three legs to 1″ longer than their final length.
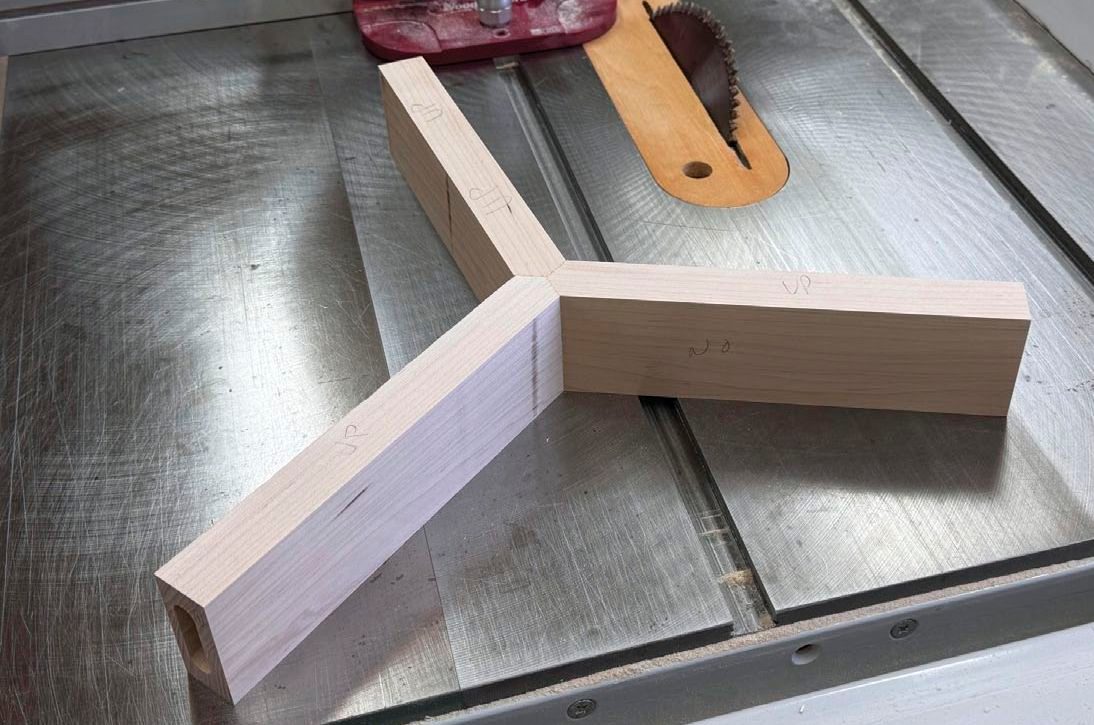
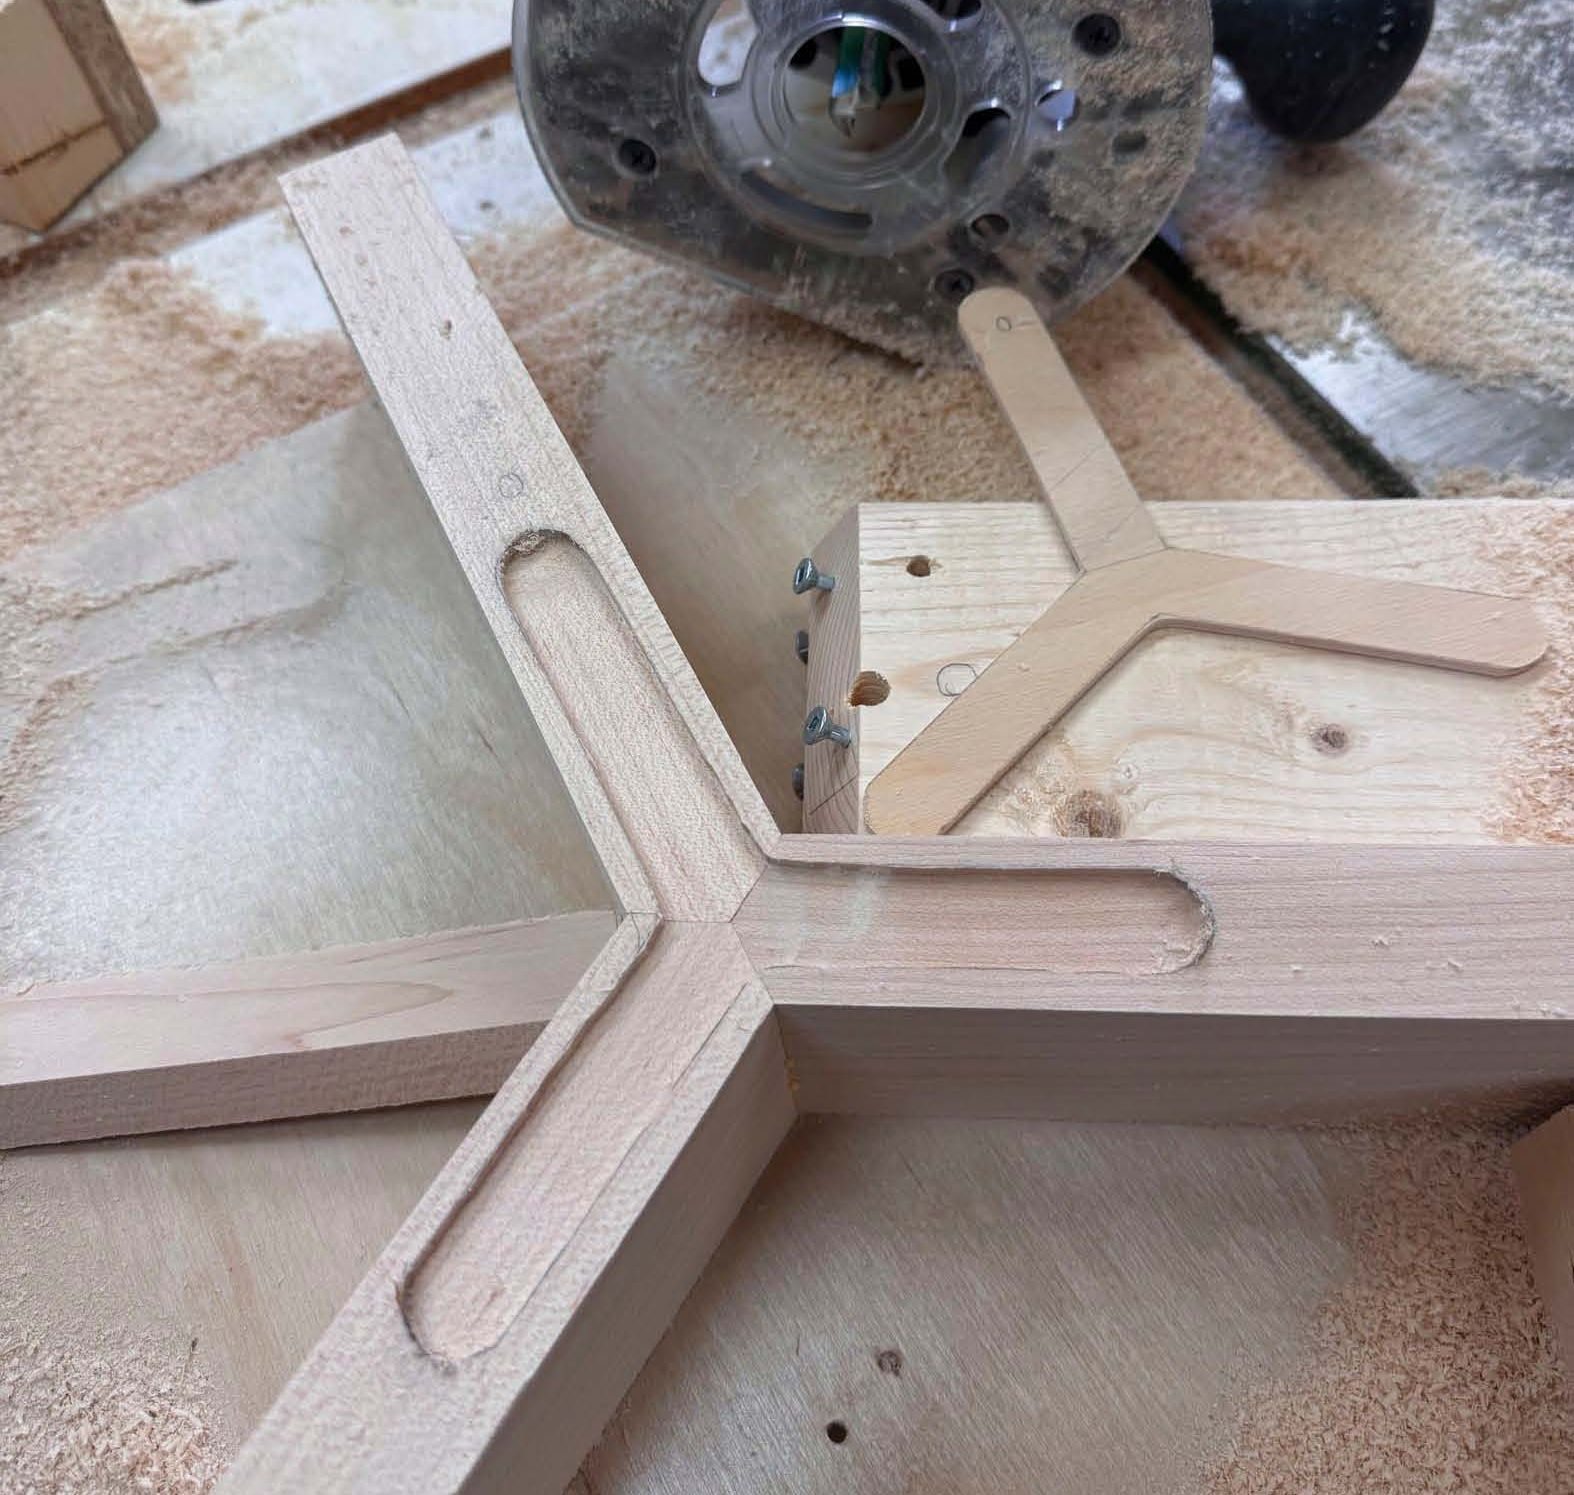
There are many options for joining the legs and aprons. Mortise and tenon joints are always strong. Adding a number of dowels to each joint would also work just fine. I opted for Dominos, as they are quick and accurate to cut and create a strong joint. With the legs and aprons still the same thickness, one setup would give me mating Domino mortises in all the parts. Once they were cut, the aprons could be dressed to final thickness by removing an equal amount of material from both faces.
My Domino XL leaves a 25mm wide mortise. That would have provided a lot of strength, but by machining two Domino mortises side-by-side, with their centres separated by 1/2″, I could end up with an even stronger mortise, about 1-1/2″ wide.
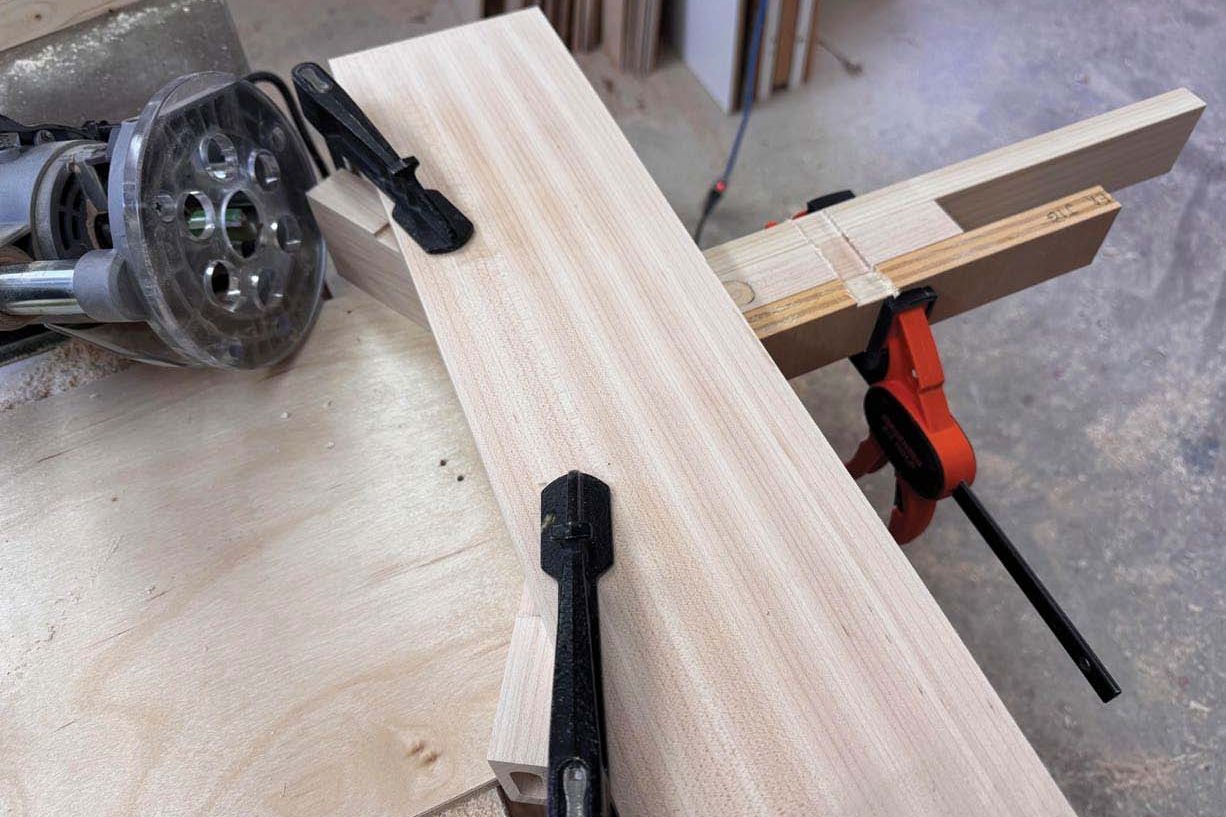
Next, I machined floating tenons that fit the mortises.
While I was breaking out the legs, I machined three lengths of lumber that would eventually be made into the three aprons. Even though the aprons were going to finish thinner than the legs, I left all of these parts the same thickness for now and dressed them to final thickness after the leg-to-apron joinery had been cut.
Leg joinery
There are many options for joining the legs and aprons. Mortise and tenon joints are always strong. Adding a number of dowels to each joint would also work just fine. I opted for Dominos, as they are quick and accurate to cut and create a strong joint. With the legs and aprons still the same thickness, one setup would give me mating Domino mortises in all the parts. Once they were cut, the aprons could be dressed to final thickness by removing an equal amount of material from both faces.
My Domino XL leaves a 25mm wide mortise. That would have provided a lot of strength, but by machining two Domino mortises side-by-side, with their centres separated by 1/2″, I could end up with an even stronger mortise, about 1-1/2″ wide.
Next, I machined floating tenons that fit the mortises.
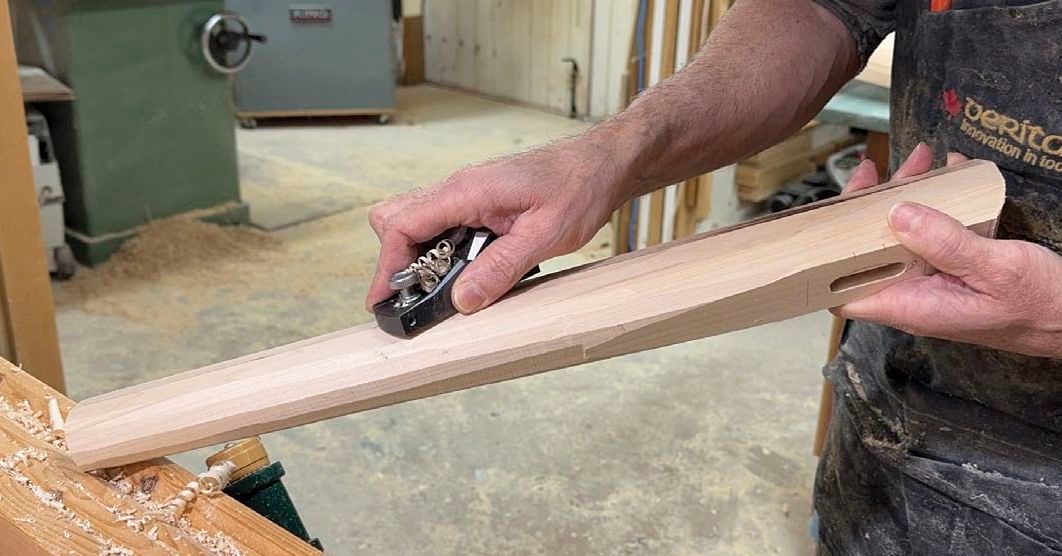
Shape the legs
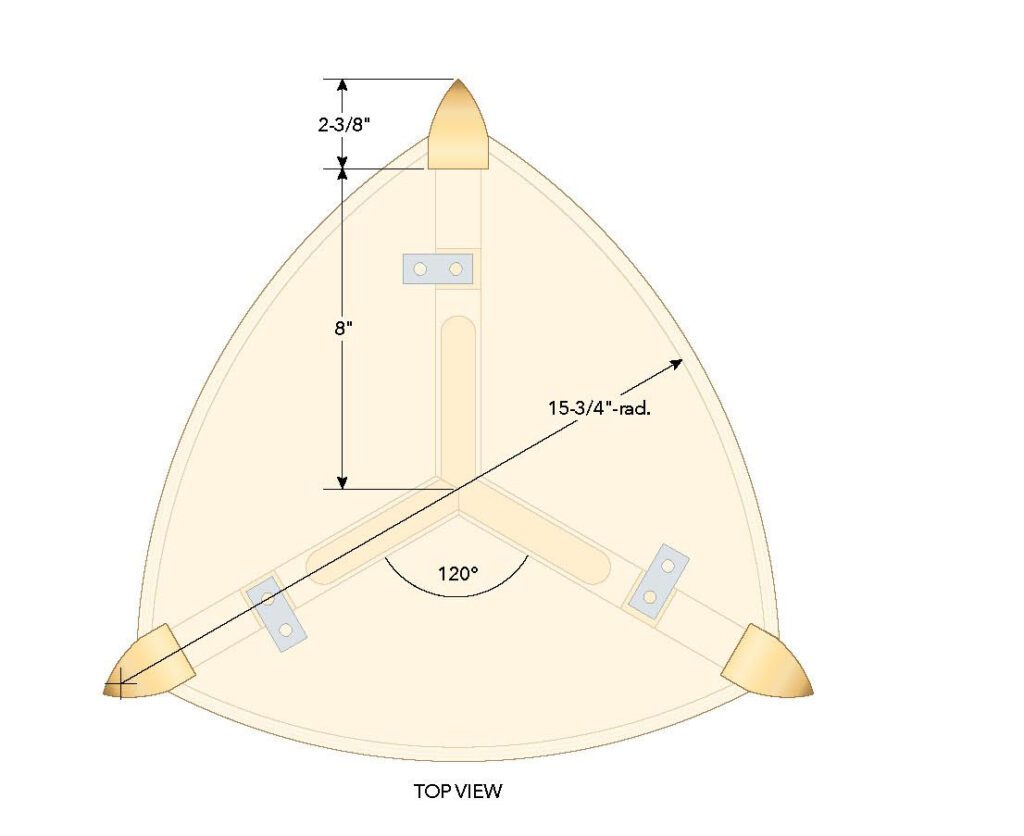
The first step in shaping the legs is to cut the arcs on their tops. Use either a French curve or paper or cardstock to make a template, then cut the curves on the bandsaw and sand them smooth and even. The inner termination of this curve should be at the same height as the finished table surface, so some planning and some math is important now.
The outer two faces of the legs will get shaped with a gentle curve, but rather than do all this shaping freehand, use the table saw to remove as much material as possible. This will give you a head start on keeping the three legs the same.
Draw the shape of the two outer faces onto the end grain of one leg to act as a template for setting up the table saw cuts. Between angling the blade and adjusting the position of the rip fence, the vast majority of the waste can be removed.
I have a right-tilt table saw, so you may have to take a slightly different approach than I did to remove most of the waste, but either way it can still be done with the table saw. I set the angle of the first cut to about 37° and adjusted the rip fence to leave me with the pointed front end of each leg. The height of the blade was set so the blade didn’t protrude out the side of the leg blank, giving me more material to reference off of for the next pair of cuts and making the cuts easier. After making the first cut, I rotated the blank end-for-end and made the second cut to leave me with the pointed front corner of the leg. I also repeated this operation for all three legs.
For the next pair of cuts on each leg I adjusted the blade to about 11°, raised the height of the blade and adjusted the location of the rip fence so the cut would nearly remove the waste from the outer face of each leg blank. I say “nearly” because I set the blade height low enough that it didn’t fully cut through the blank and remove the waste, so the second rip cut on each blank would have more material on its side to run against the rip fence. Leaving between 1/16″ and 1/8″ is good. When complete, a chisel, mallet and hand saw assisted in removing the waste from each leg blank.
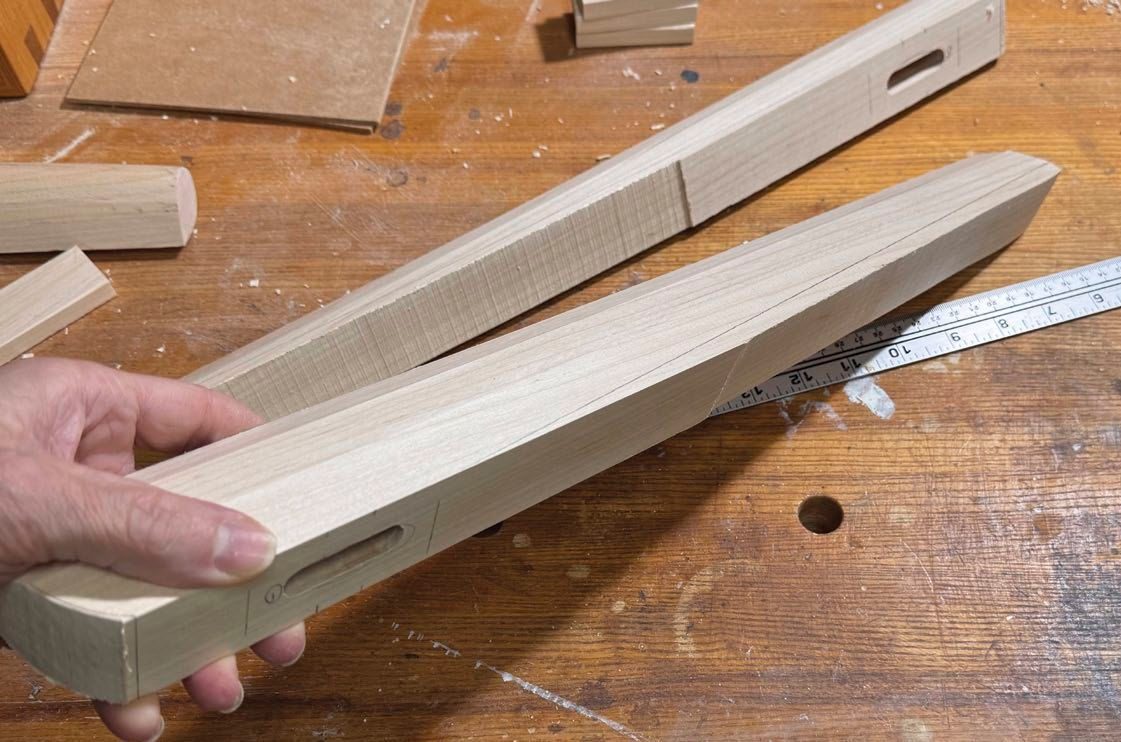
Taper the legs
When viewed from the side, the legs taper as they approach the bottom. Each taper starts 11″ above the lower ends of each leg and tapers outward 5/8″ at the bottom of each leg.
Mark the line with a pencil and straightedge, then cut it on the bandsaw.
Further hand shaping
Layout lines on the legs will further help create three legs that are as similar as possible. A line on both sides of the legs, parallel to the rear taper, is a good start. Offset it by about 3/8″.
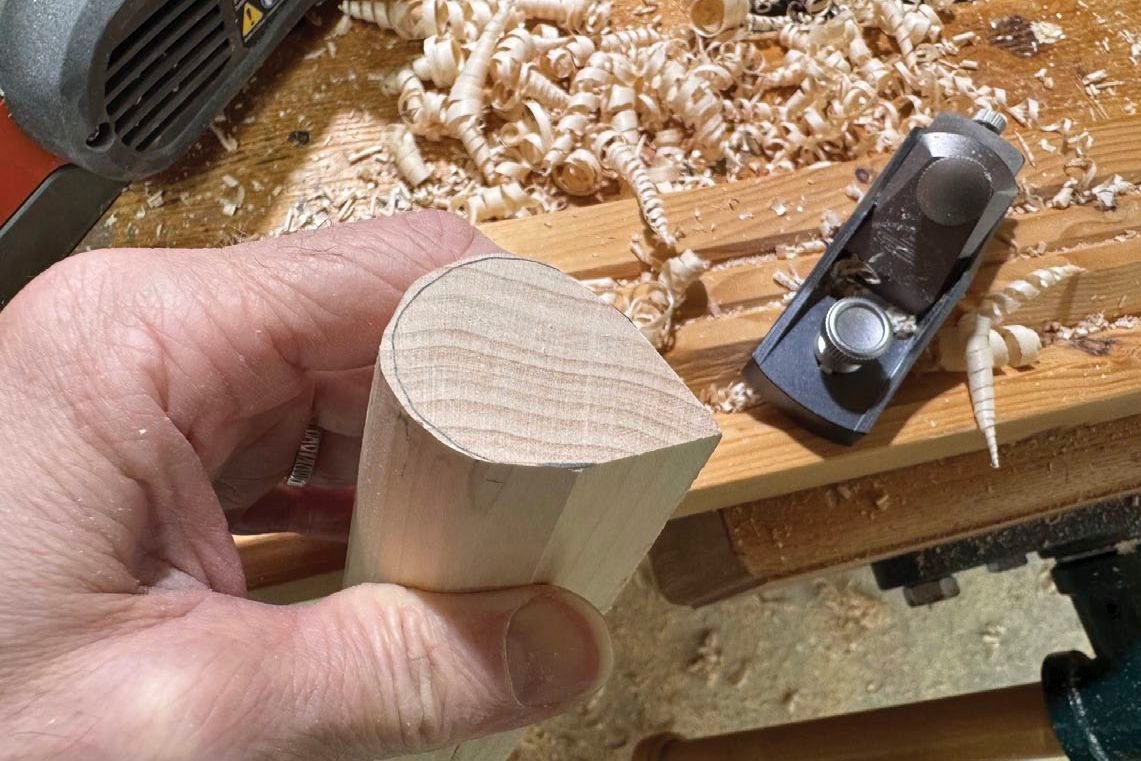
The top, inner face of each leg is flat, but the foot of each leg ends in a teardrop shape. Mark that shape on the bottom of each leg.
A hand-held power planer will remove some of the waste but can also leave you with too little material to properly shape each leg, so proceed with caution. An assortment of hand planes and spokeshaves is likely the safest option. Use the main test leg, which was shaped more completely than the others, as a guide and refer to it when needed. I found it helpful to shape all three legs in stages; rough them all out with a power planer, use a jack plane to further shape the three legs, then use a block plane and spokeshave to refine the shape of the three legs.
Back to the aprons
The leg-to-apron joint is complete, but the joint that fixes all three aprons together under the centre of the top isn’t. First, ensure the aprons are dressed to proper thickness, making sure to remove equal amounts of material from both faces of each leg.
Cutting the aprons to length, and at the correct angle, is next. Tilt the table saw blade to 30°. To check the fit, set up a stop block that will leave you with aprons longer than needed, and trim all their ends with a pair of 30° angles. While the aprons are resting on their edge, line them up to make sure they fit nicely. If there are any gaps, some slight adjustments to the blade tilt angle will be needed, followed by adjusting the stop in a small amount and re-cutting the end of each apron. Once you’re confident in the fit, adjust the crosscut stop locations to give you the right length and cut all the parts.
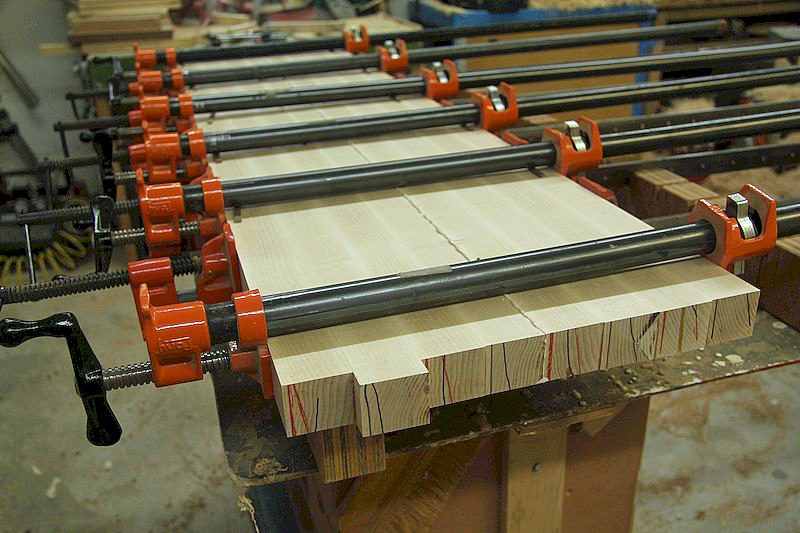
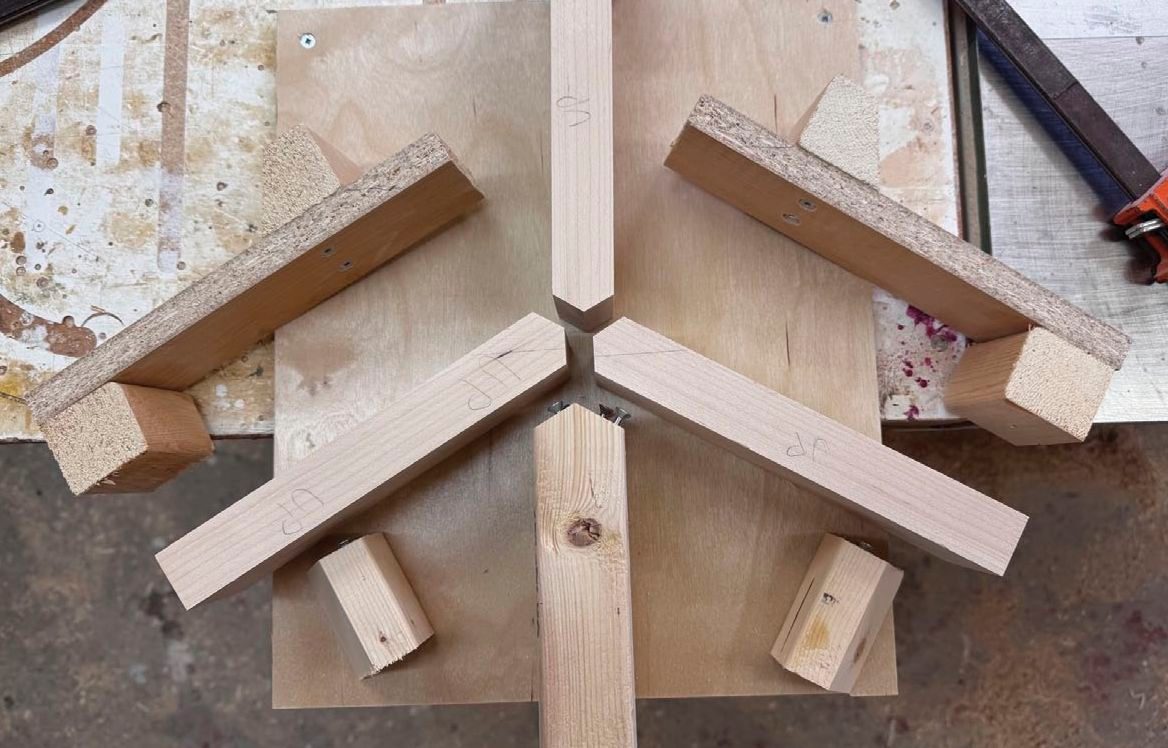
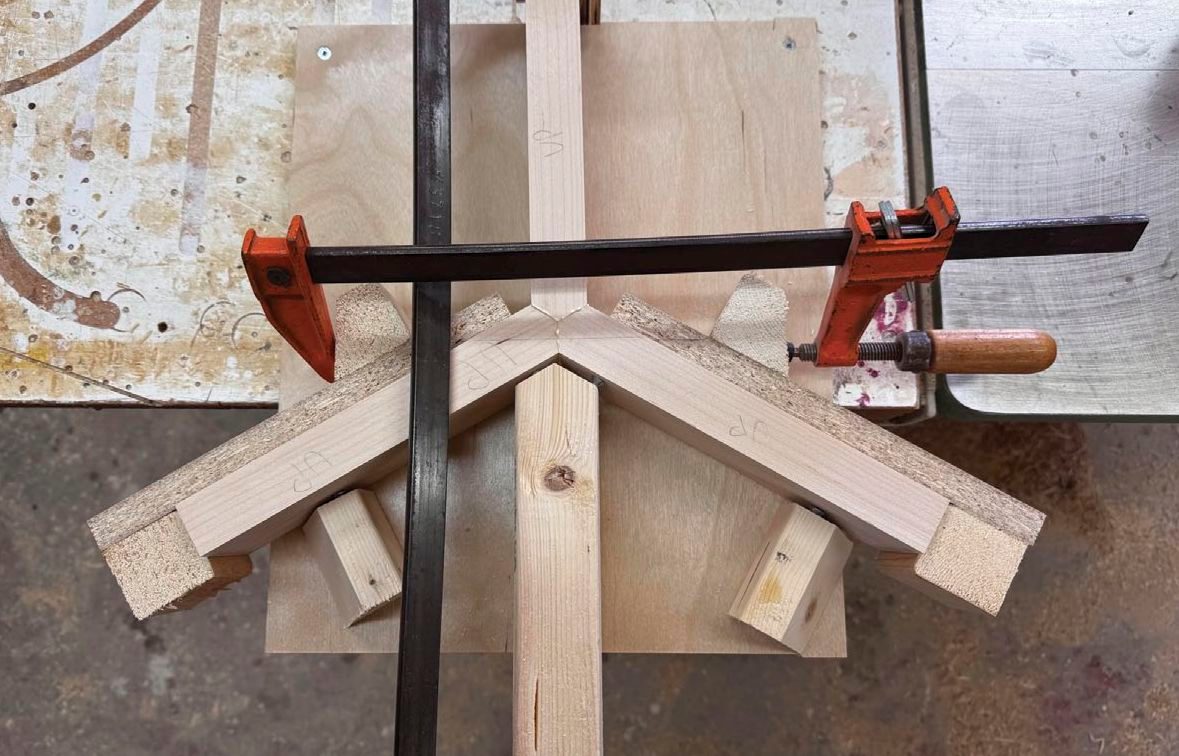
Glue up the aprons
This step is virtually impossible to accomplish accurately without a clamping jig of some sort. Keeping the top edges of each of the three aprons in the same plane, as well as keeping the aprons mating with each other at the centre joint comes together nicely, is important.
Although I’m sure there are other approaches, I decided to start with a flat piece of plywood about 18″ square, and add some blocks to its face. I dressed a 10″ long piece of 2×4 so it was straight and true, trimmed one end so it was cut with the same 60° angles as the aprons and attached it to the plywood. I then added a pair of screws to both 60° cut faces. These screws allowed me to fine tune the position and angle of the aprons that would come into contact with the jig during glue-up.
Next, I added two smaller blocks to the plywood, along with a screw into the face of each block that the aprons would rest against during glue-up. Like the screws in the first piece, these screws had to be adjusted so the first two aprons would come together with each other perfectly.
The only other parts needed to make this jig work are a mirrored pair of clamping hooks. Each hook has a longer main section, an angled clamping surface at one end and a cleat on the opposite end. When positioned over the end of an apron, a clamp will apply pressure to bring these parts together with the third apron.
A dry run is critical to ensure the jig and clamping hooks bring the three aprons together properly. Once you’re confident, sand the inner faces of each apron and glue them together all at once, applying even pressure.
Strengthen the centre joint
To be honest, this step might not be needed, as each apron will be attached to the underside of the top, but I wanted to be sure the parts all remain together for a long time. This step was a lot easier than I anticipated and doesn’t need to be super accurate to leave you with a strong centre joint.
I traced the three-winged shape onto a piece of plywood, offset the lines so the edges of the piece were about 3/16″ inside the outer edge of each apron, and cut it to size. One piece is needed for both the top and bottom of the centre joint. After labelling the two parts, I traced them onto the top of the apron assembly and used a router to freehand the mortise to accept both pieces before gluing them in place. A gap here and there is perfectly fine. With some light sanding to flush it up afterwards, the apron was super strong.
While I was working on the apron assembly, I ran three shallow notches to accept the steel hardware pieces that would hold the top in place. Note the legs still haven’t been glued to the apron assembly yet.
Texture
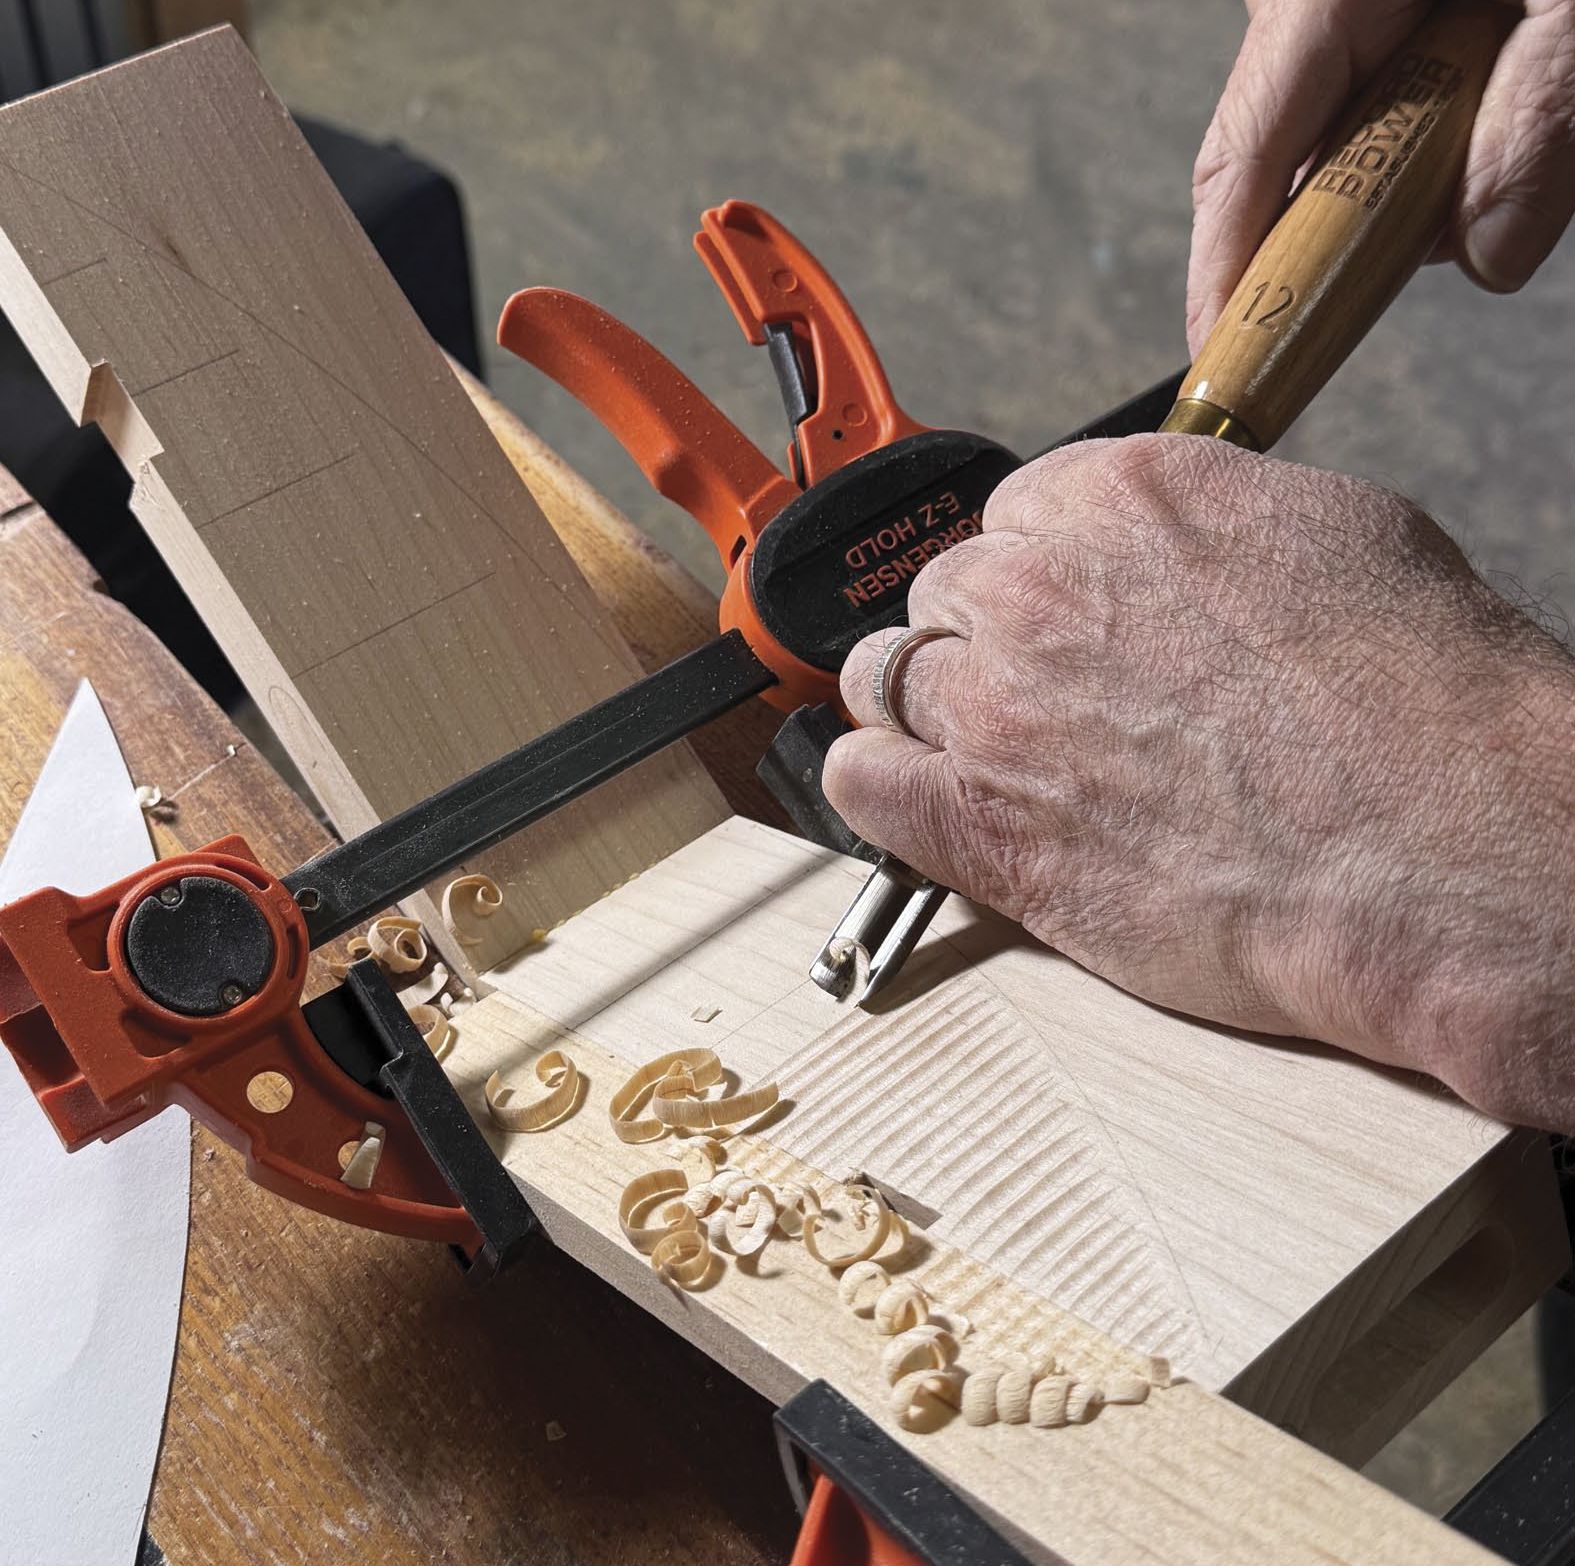
I’m a big fan of texture so I decided to add a series of tightly spaced carved grooves into the faces of the aprons. Rather than covering the entire apron faces, I opted to terminate the grooves at an arc between opposing corners of each apron. In hindsight, the texture isn’t quite as visible as I had hoped and if I were to make another one of these tables, I’d probably do something different. There’s also nothing wrong with keeping the faces of the aprons flat and smooth.
Top it all off
There are many approaches to creating a top for this table. Solid wood would work fine and is by far the easiest and quickest option. However, I wanted to use some curly English sycamore veneer I had tucked away for the top. This meant making a properly sized core with three curved edges, making a jig to form the bent laminated headers, gluing up the curved solid wood headers, adding those headers to the core, trimming them flush with the core, veneering the upper and lower surfaces of the top and fitting the top to the table so it notches around the three legs. Again, solid wood is the easiest option here.
Start with the core
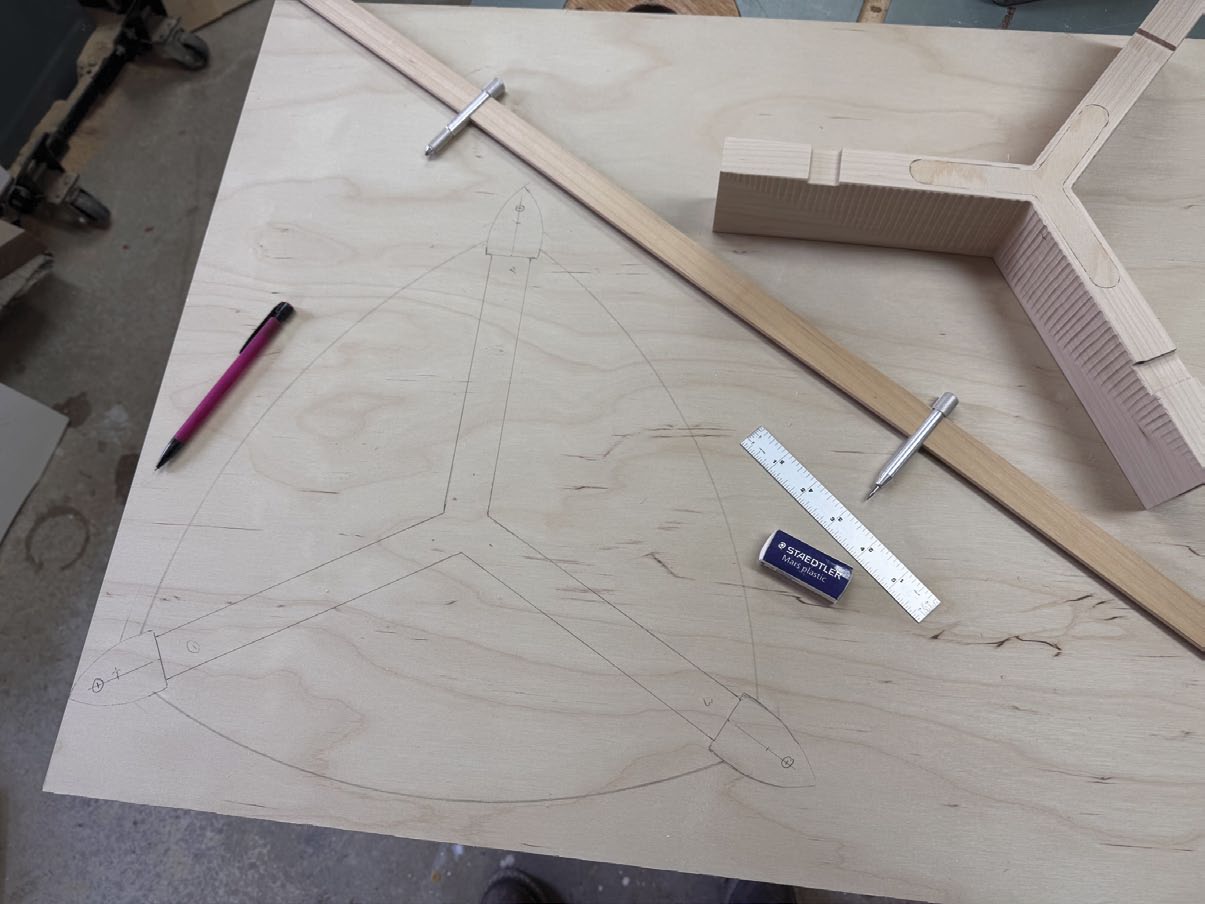
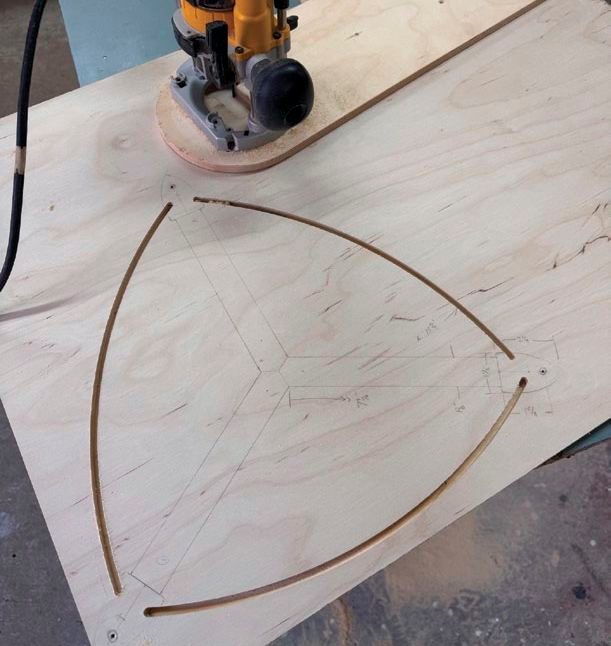
A full-sized drawing was the first step. Using the apron assembly as a guide, I laid out the locations of the legs and the angles of the aprons on a piece of 1/2″ plywood. I then cut this to size with the help of a router, straight bit and a circle cutting jig. Next, I laminated a piece of 3/4″ plywood to the 1/2″ piece and flush trimmed it with a router.
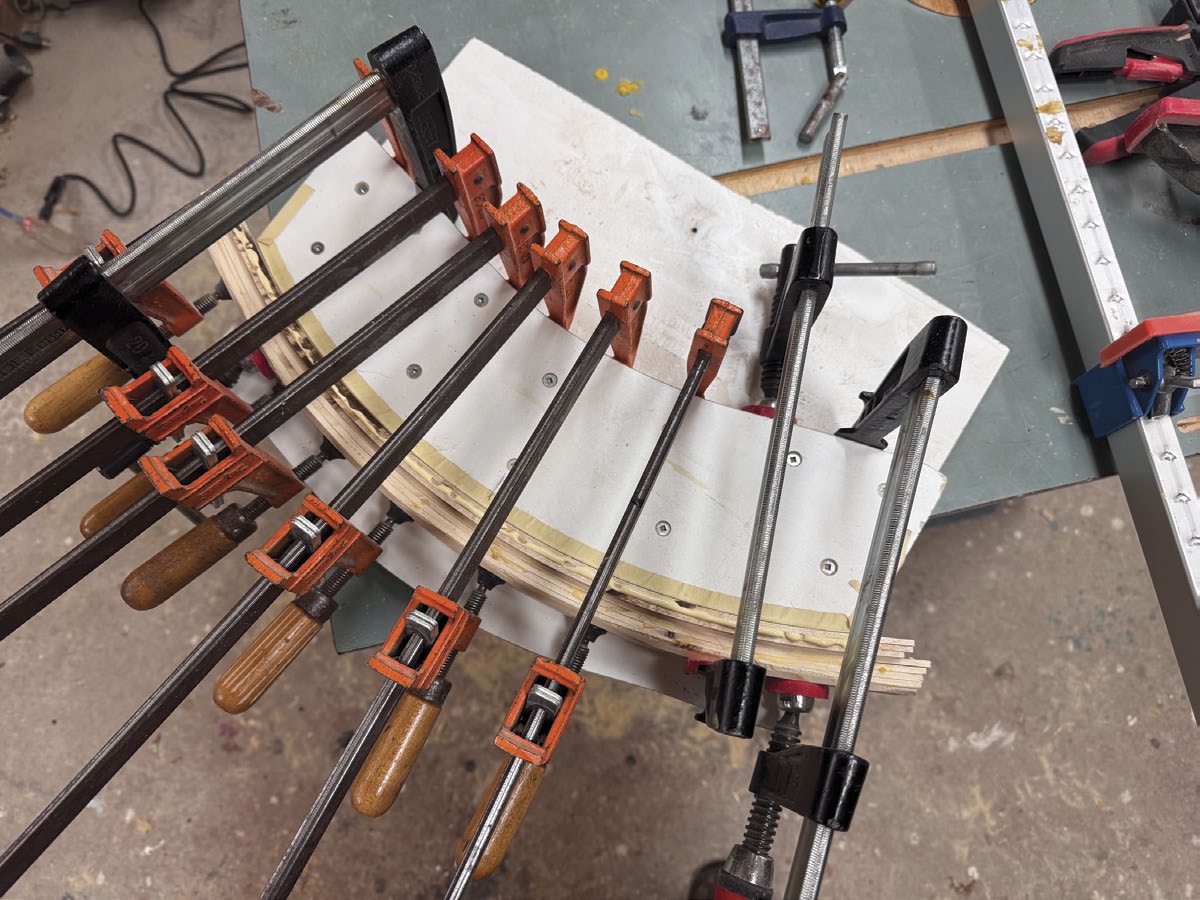
Bent laminated headers
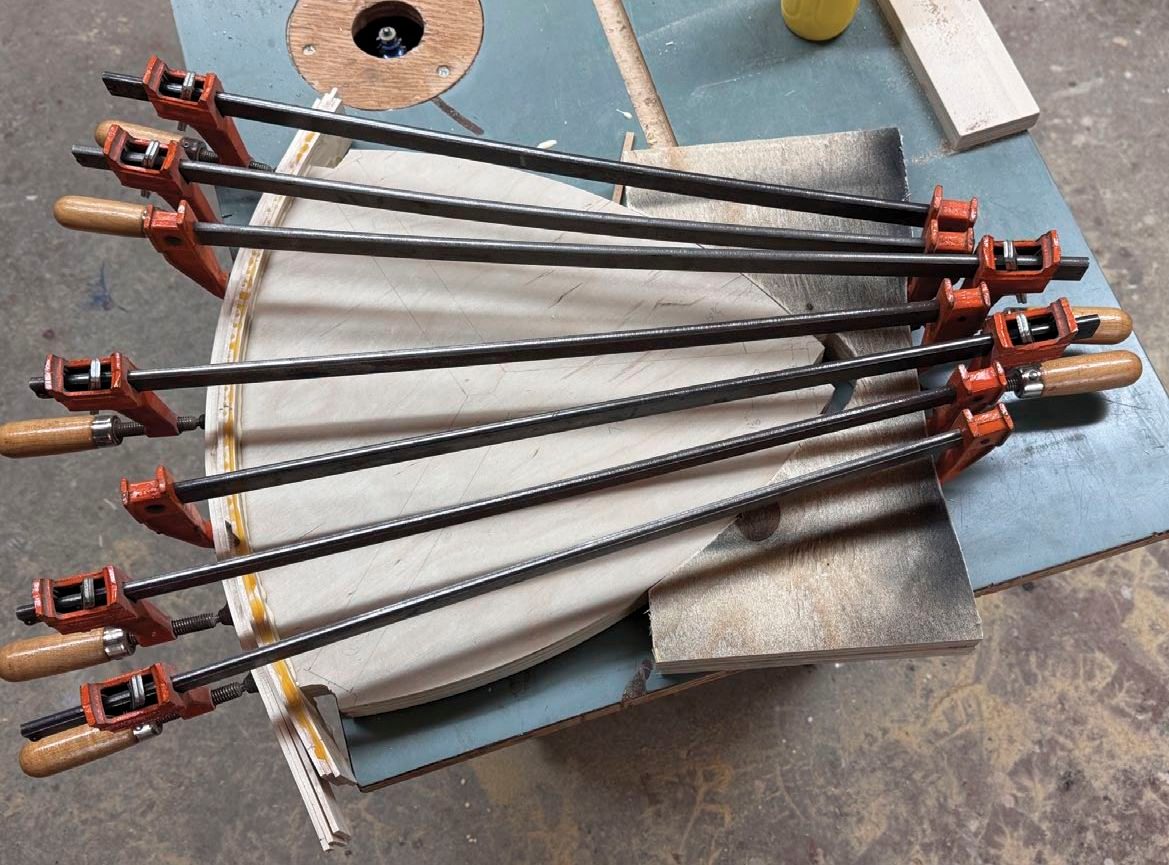
With the core complete, I needed to cover the exposed plywood edges. Because I was going to heavily ease the underside of the table, I needed to apply edges thick enough so the plywood edges wouldn’t show through after routing a round over to the lower edge of the top. I made a form with a radius of 15-3/4″ to create a three-ply bent laminated header for each curved top edge. When machining the laminations to thickness, I was paying attention to how flexible they were. Thicker laminations spring back more when they come out of the form, but thinner laminations can reveal glue lines in the finished table. For the maple I was working with, I found 1/8″ was a happy medium.
When the three bent laminations were dry, I attached them to the curved edge of the core one at a time. A router, equipped with a straight bit, was attached to a simple jig to flush the upper and lower edges of the headers to both faces of the top. Some sanding ensured the joints were all perfectly flush, otherwise they would telegraph through the veneer.
Veneer the top
At this stage it was time to add the crossbands as well as the face and back veneers. The crossbands run perpendicular to the face and back veneers and help hide the joints between the headers and core. I used my vacuum bag for this, though a caul slightly larger than the core, as well as a bunch of clamps, would also work. I used contrasting crossbands as I liked the pinstripe left by black cherry between the lighter headers and face veneer.
Fit the top
This was likely the most time-consuming part of this build. I made the mistake of gluing the legs onto the apron assembly before fitting the top. Doing otherwise would have allowed me to fit the top to one leg, then sneak up on the fit of the second corner, followed by fitting the third corner. I had to take them all into account at the same time.
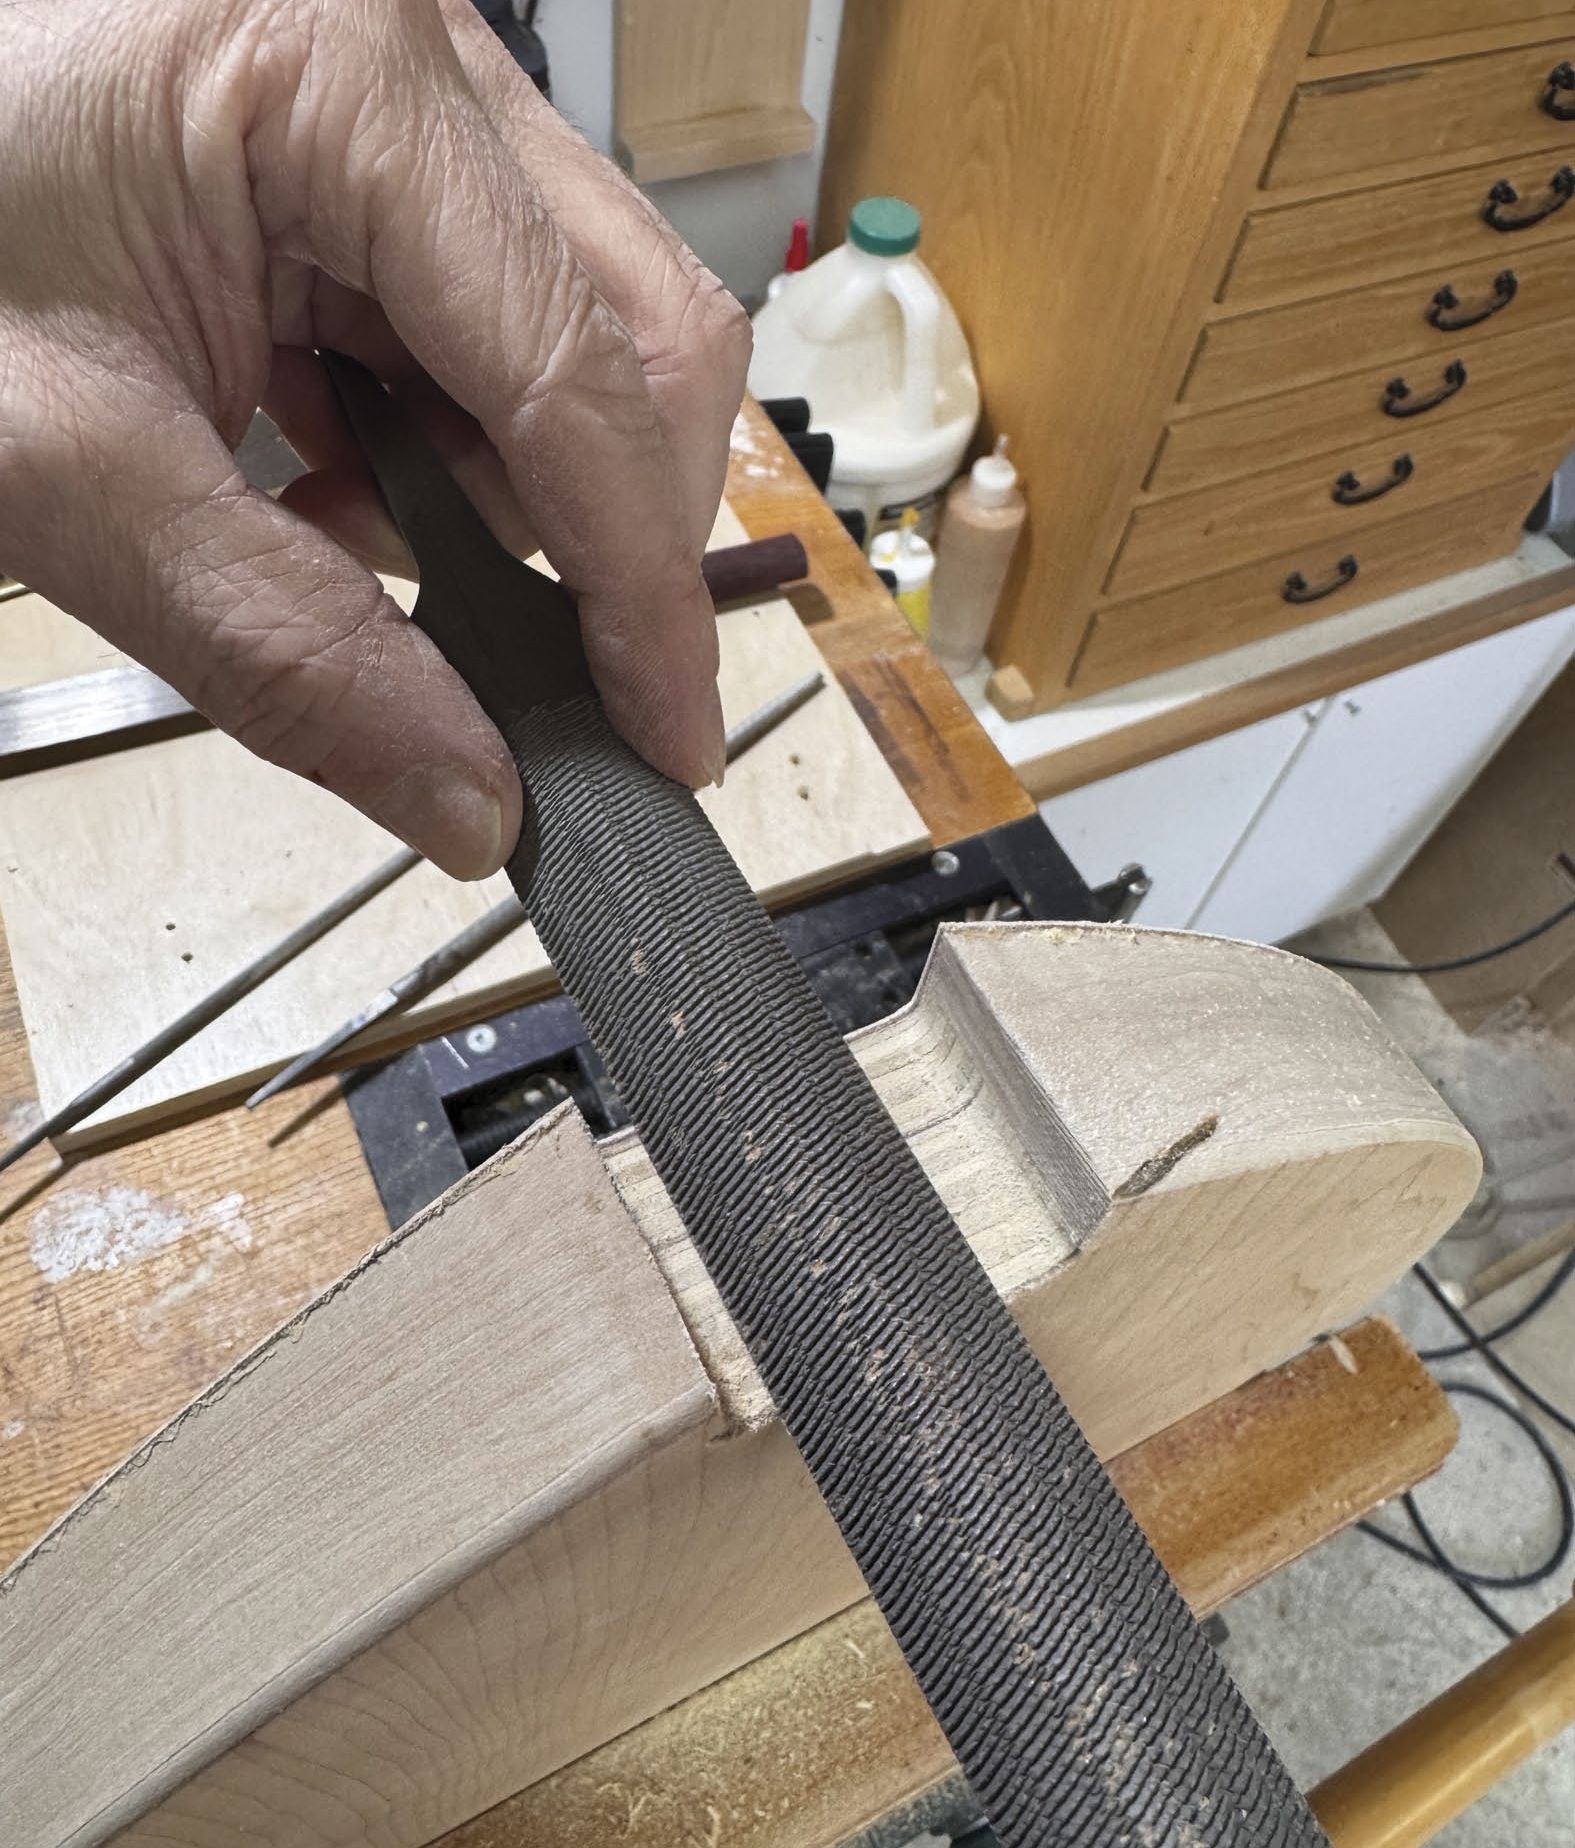
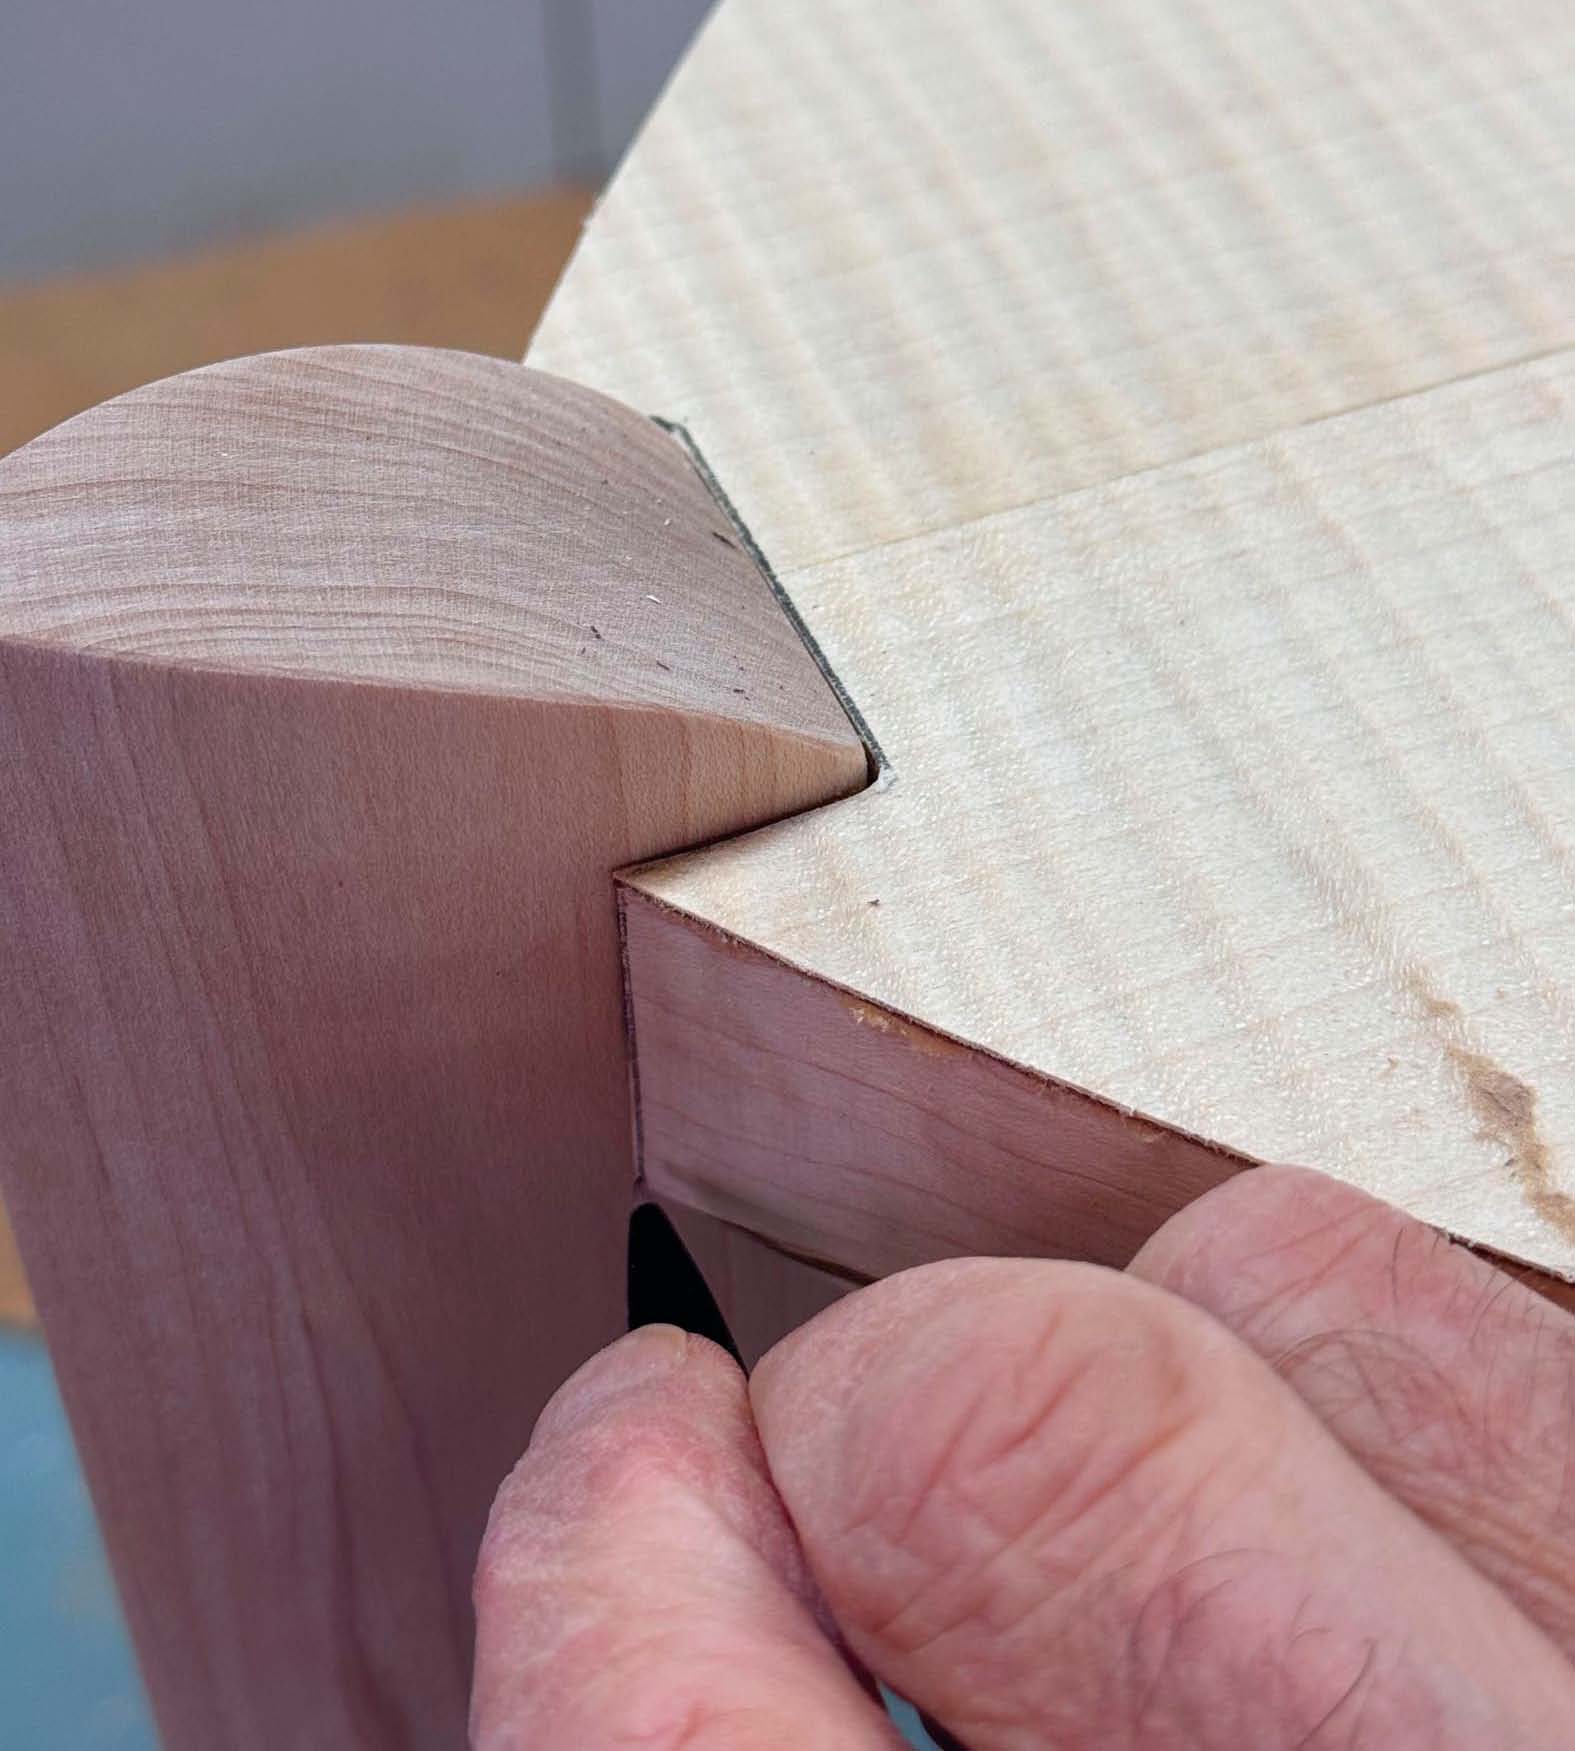
The fit was mostly dialed in by making a Masonite template that included notches to fit around the upper portions of the legs. This allowed me to trace the location of the legs onto the top, then bandsaw most of the waste away. From there, a selection of rasps, files and chisels allowed me to get the right fit. I finished with an even gap of about 1/32″ between the legs and the core. There would be nothing wrong with increasing this gap to 1/8″ or more. The most important thing is that the gap be even around each of the three legs.
Finishing touches
The lower edges of the top can now be rounded over with a 1/2″ radius router bit.
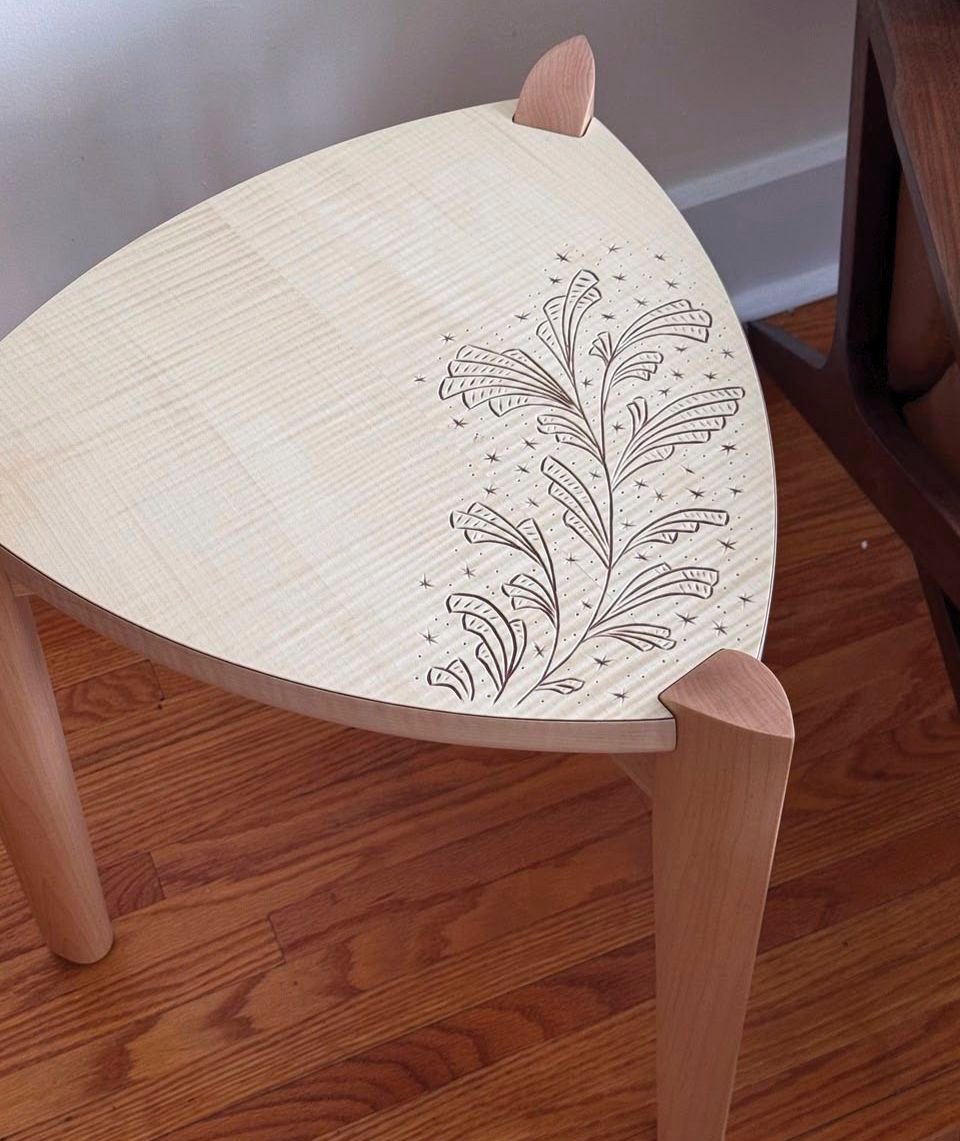
Cut and install the 3/4″ wide × 1-3/4″ long steel plates in the upper edge of the three aprons. Place the top on the base and mark where the threaded inserts need to be installed in the underside of the top. There’s nothing wrong with simply screwing the top to the base, but I’ve got half a mind to make a few different tops for this table, changing them as we rotate through the four seasons. Threaded inserts will last longer and be the easiest in the long term. Time will tell if I ever make another top, let alone three. The design carved into the top of this table is the winter design.
Once the piece was sanded and all the edges eased, I applied three coats of polyurethane, sanding between coats. This strong finish will stand up to any abuse that’s thrown at it.
Finally, I drilled 5mm holes in the underside of each leg and installed a small rubber bumper in each hole.
I brought the table home and encouraged my wife to test it out. Perfect fit! After a week I hit it with some paste wax and #0000 steel wool, which refined the feel of the finish.
Carved top surface
Although this step is obviously optional, if you have a sharp V-gouge, some patience and a bit of imagination, a carved top adds an incredible touch to this table. In my opinion, the carving on the table brings it from a nice side table to something that is unique and one-of-a-kind. With the carving, it’s a conversation piece, not just a table.
Design options
The design on this table was inspired by frost. I made it in the winter. In fact, I might end up making a different top for each season, and rotate through them as the seasons change. That’s the long-term goal, anyways, and talk is cheap right now. I prefer a design that’s inspired by nature, though a geometric design would also work nicely. I like taking a simple shape or pattern from the natural world and bringing it inside. It’s often a shape or pattern that’s fairly small and detailed, as opposed to something like a mountain scene, but everyone is different.
Making it happen
After sanding the tabletop, I drew the design on a piece of blank paper and transferred the design to the tabletop with carbon paper. Drawing the design first, and transferring at least the general overall shape and size of the design to the workpiece ensures you reduce mistakes and get the proportions correct.
Before you start carving the workpiece you’ve worked so hard to create, it’s a good idea to practice on some scrap. Ruining your workpiece is frustrating, time consuming and expensive. Using the same species of scrap wood is important, as different species react in different ways.
I used a sharp V-gouge to carve through the top veneer and expose some of the darker black cherry crossband. Using carving tools that aren’t sharp is a recipe for disaster on many levels. I tried to keep the depth of the grooves about the same so the look would be somewhat uniform. I started off carving the main outer grooves, then went back and added more detail later.
Once the carving was complete, it was time to fill in some of the empty areas with the smaller details. I used the V-gouge to create a lot of small star-like shapes. Each of these shapes has only three grooves that meet in the middle, creating the very simple star effect. Finally, I used an awl to add a bunch of dimples between the grooves and the stars to help further complete the design. None of these steps have to be perfect, as a bit of variation can be very pleasing to the eye.
Patience, coupled with some rest breaks, will go a long way to allowing you to get the best results possible.
Photos by Rob Brown
Cut the Joints
Brown opted to use his Domino cutter to machine wide mortises in both the legs and aprons. You can see the two small lines he used to align the machine on the workpiece to give him extra-wide mortises for added strength.

An Arc on Top
Brown used masking tape on a French curve to give him a repeatable curve to mark the tops of each leg. The curve terminates on the inner face of the leg at the same height as the future upper surface of the top.
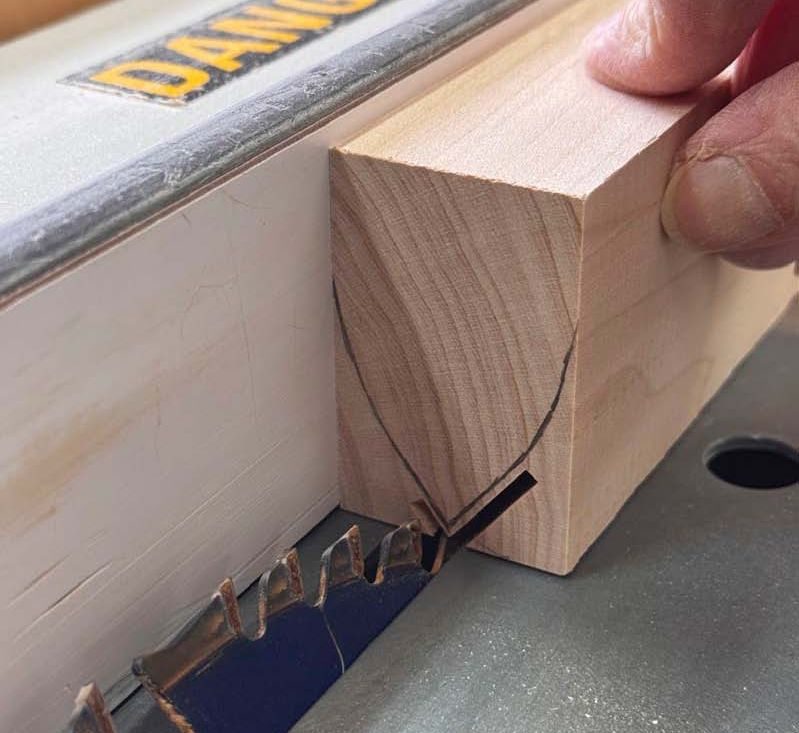
First Waste Cut
After marking the cross section of the leg on a leg blank, Brown adjusted the rip fence, blade angle and blade height to remove some of the waste. Notice he didn’t cut deep enough to remove the entire side of the workpiece, as that material will assist with machining the other half of each leg.
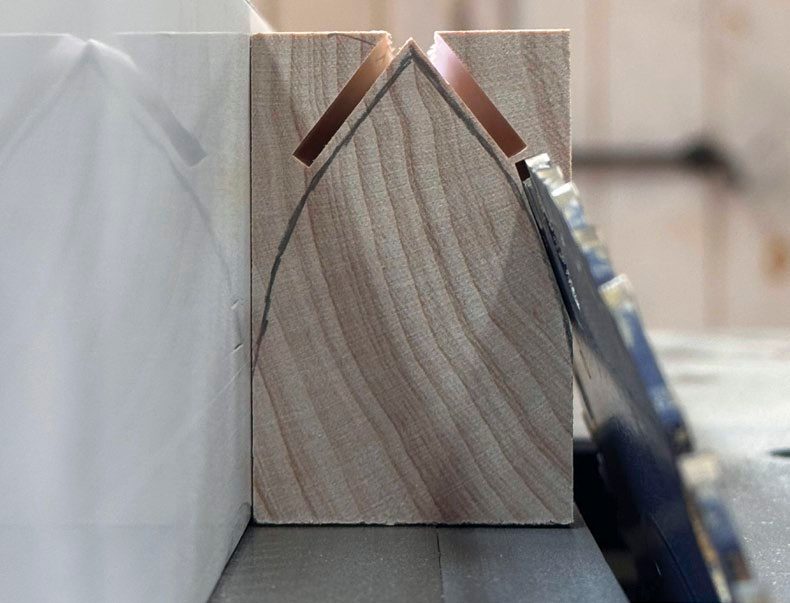
Second Waste Cut
Flip the leg workpieces over, then re-adjust the rip fence, blade height and blade angle to remove more of the waste from the legs. Leaving a small amount of material between the two series of cuts will keep the waste in place and make the second rip cut easier. It also keeps the large piece of waste from falling down on the rip blade during the operation.
Shaping Lines
With the leg blanks tapered on the bandsaw, Brown adds a few layout marks to help guide him during the shaping process. Here, you can see a line parallel to the taper and about 3/8" away from it.
Shape to the Lines
The bottoms of the legs end in a teardrop cross section. The layout lines are critical in keeping the legs as similar as possible.
Range of Tools
Hand planes go a long way in shaping the leg, but spokeshaves and hand-held power planers can also play a role.
The Correct Angle
Test the 60° angle setup on the aprons, which are still longer than they’ll finish. If there’s even a slight gap between the mating surfaces, make an adjustment to the angle of the blade. A stop, which the morticed ends of the aprons butt up against, will keep these cuts even across all three aprons.
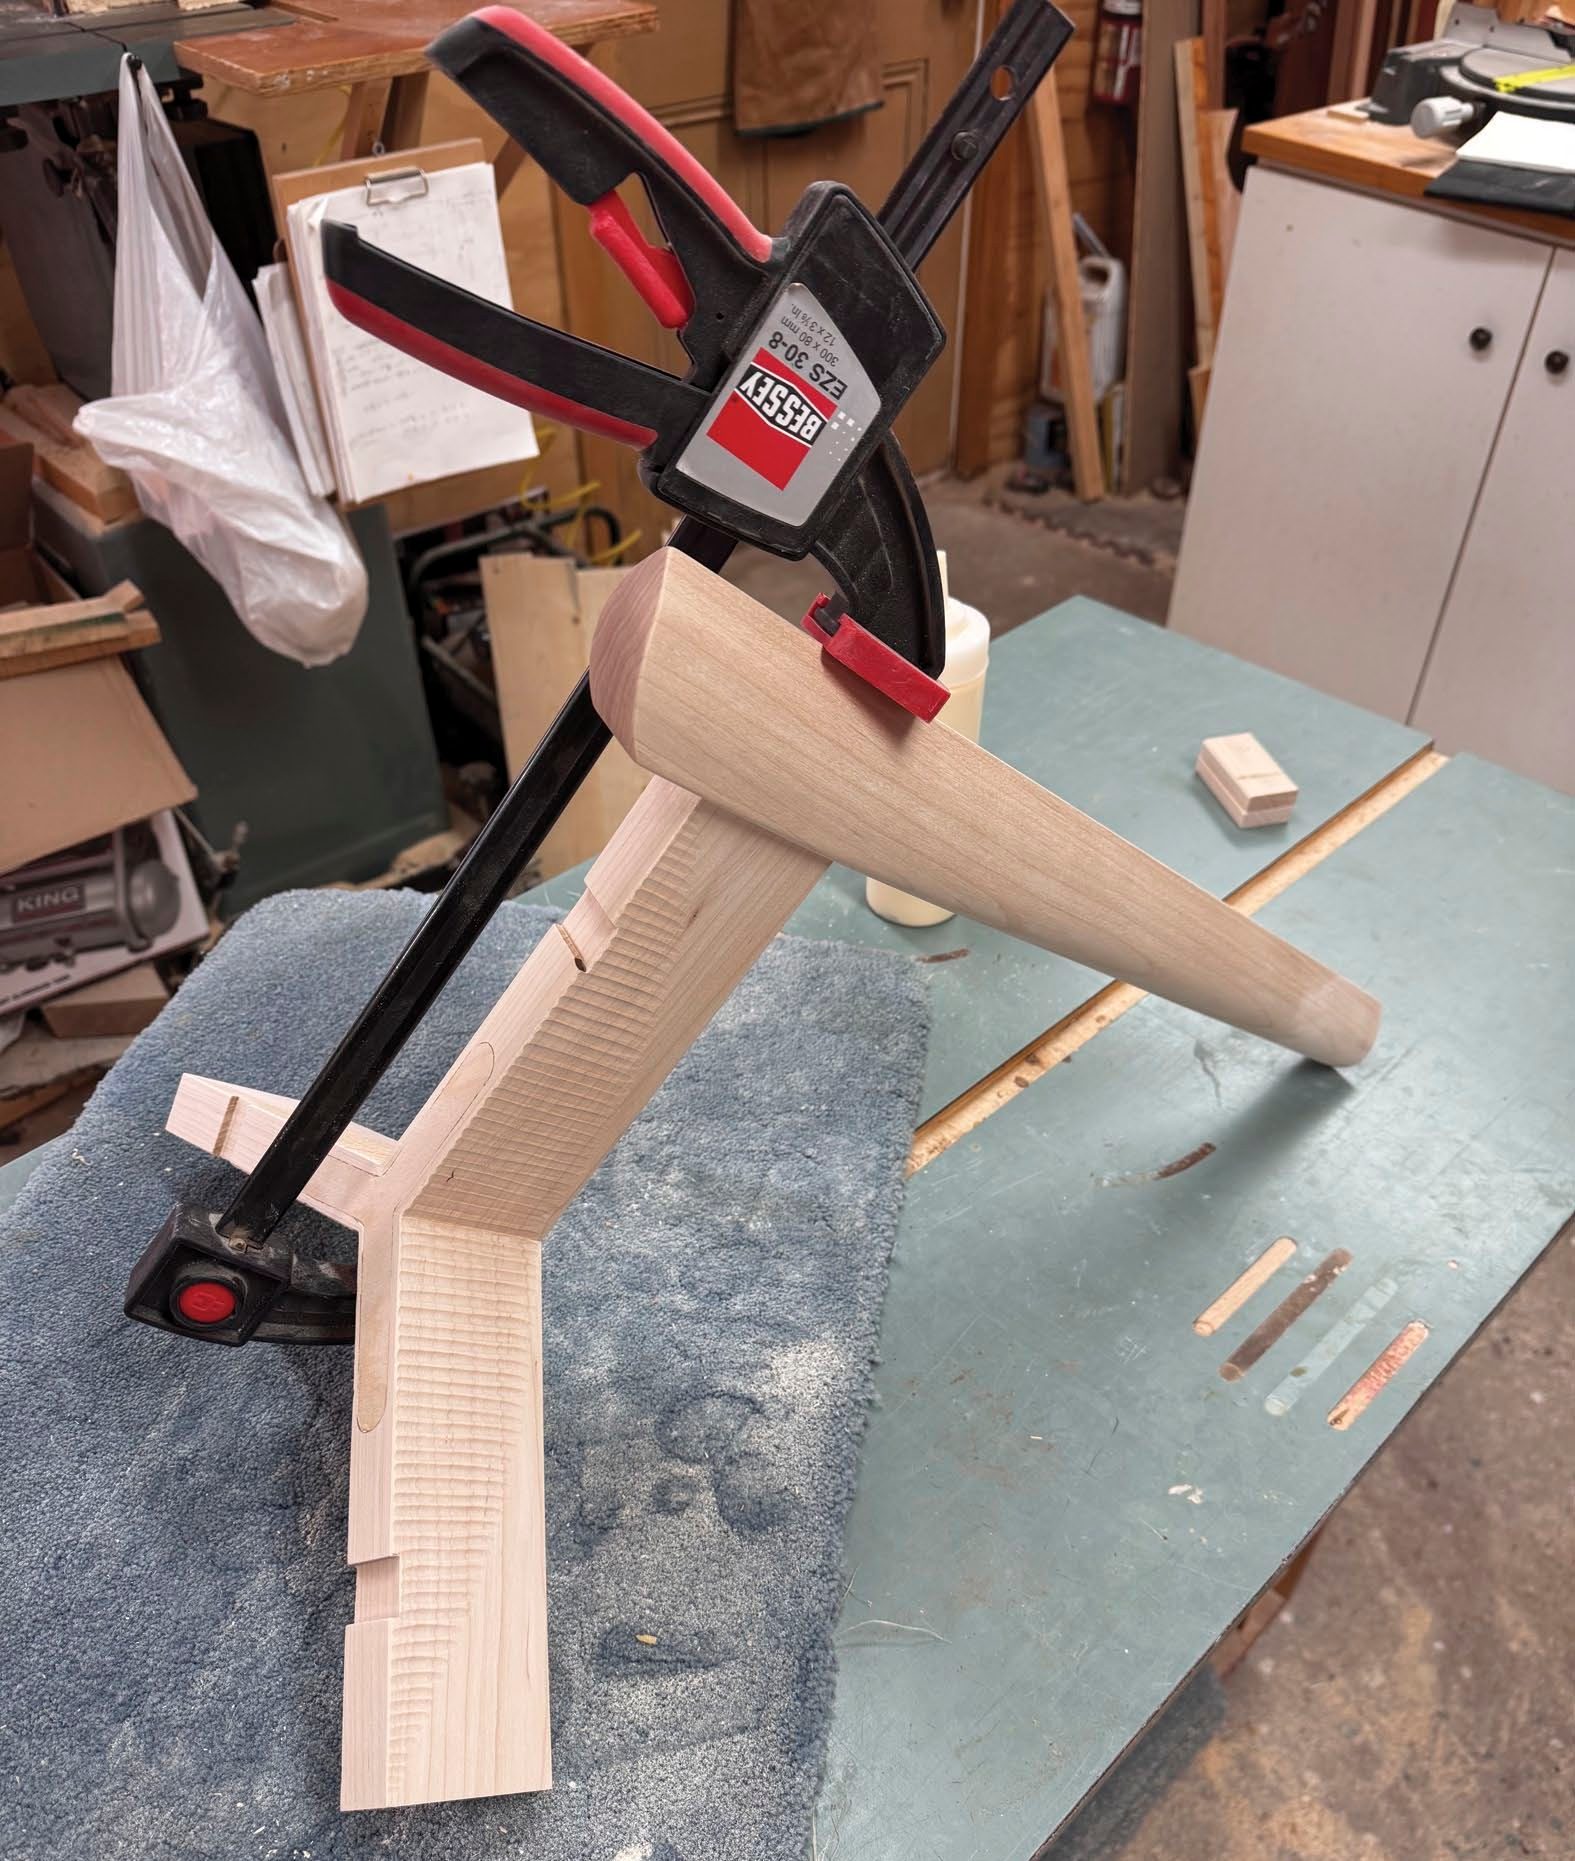
Make a Clamping Jig
Free-handing this glue-up isn’t a good idea. Brown made a form, which consists of a plywood base, a long, angled support rail with a total of four screws in its end, and two smaller blocks with a screw in their face, to keep the parts at the correct angle during the glue-up. He also made two clamping hooks to help apply pressure directly in line and perpendicular to the glue joint between two of the aprons.
In Action
The clamping jig keeps the parts aligned so they mate nicely in the centre of the table. Notice how Brown used a piece of scrap as a caul on one apron end (top of photo) so it wouldn’t get damaged.
Three-Winged Strengtheners
Brown added two thin plywood pieces across both the bottom and top of the three-way apron joint. After tracing the shape of the strengthener on the apron assembly, he created the shallow mortices using a router freehand. Perfection isn’t the goal here.
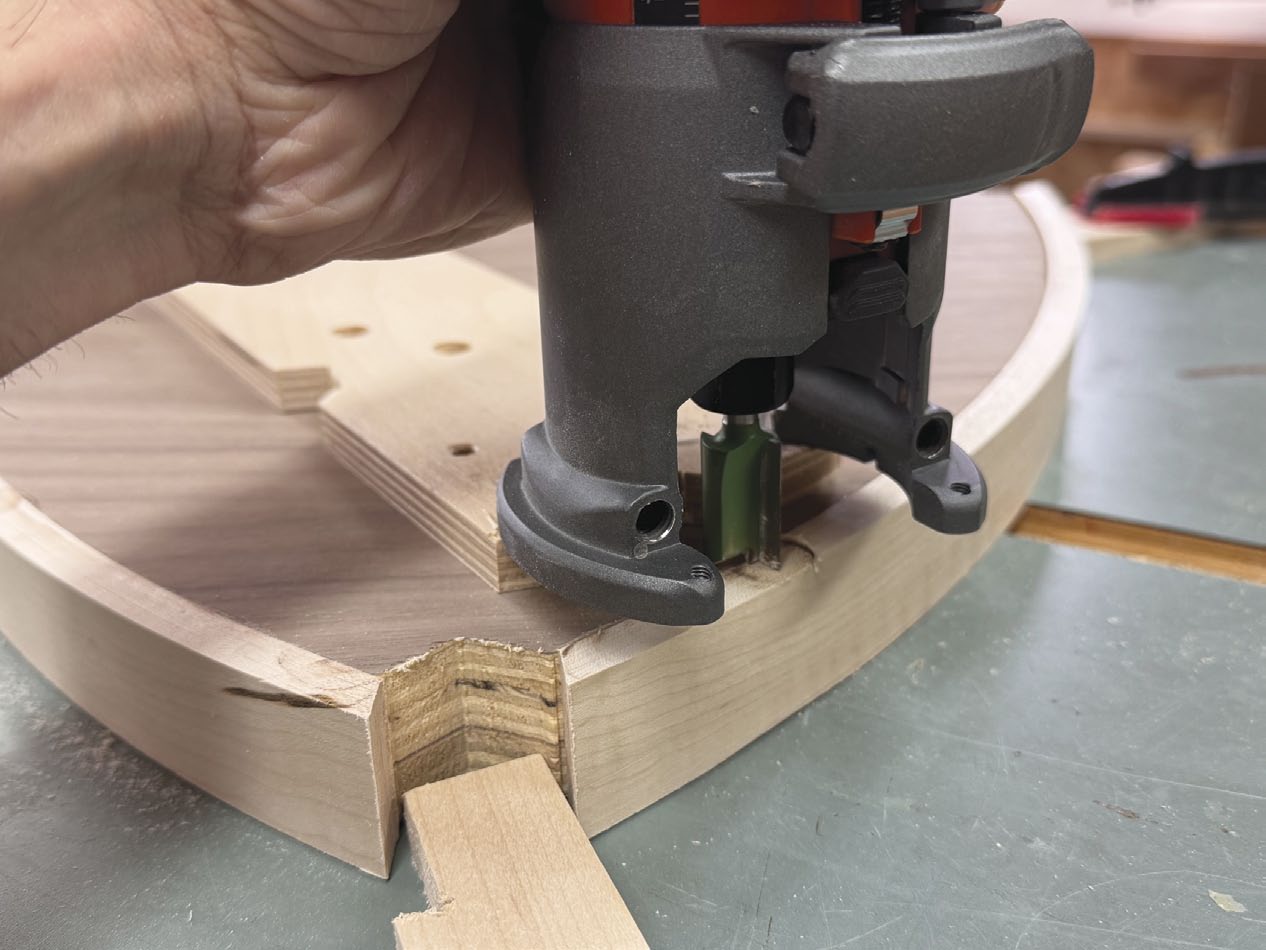
Hardware Notches
Brown clamped a straightedge to the apron assembly so he could use a router to machine a notch in each apron that accepted the metal hardware to attach the top to the base. Before machining, he added a piece of scrap to support the aprons where the router would exit the cut.
Full-Sized Drawing
A full-sized drawing simplifies the shape needed for the core. The bent laminated headers need to extend all the way to the legs.
Cut the Core Out
Brown used his router and circle-cutting jig to create the three arcs that make up the core. You’ll notice the screw marks where the circle-cutting jig was attached to the material around where each opposing leg will be positioned. This piece will act as the top 1/2" of the core, while another 3/4" piece of plywood will be adhered to the underside of this piece and flush trimmed to produce the 1-1/4" thick core.
Textured Aprons
Although they turned out to be less visible than Brown anticipated, he carved a series of grooves into the aprons. You’ll notice perpendicular pencil lines on the far apron to help keep the grooves somewhat straight.
Bent Lamination Form
Brown glued up the bent laminations on a form. He also made a bent laminated caul to help glue these laminations up. That curved caul can also be used to help glue the bent laminations to the core.
Dedicated Clamping Caul
A caul that will fit over the distant end of the core while gluing on each bent lamination is needed. It will need to be adjusted slightly after each glue-up, as the geometry changes slightly once each bent lamination is adhered to the core.
Flush It Up
The headers can be flushed up with a router, straight bit and a simple jig.
Attach the Legs
Attach the legs one at a time to the apron assembly. Only a small amount of pressure is needed. After gluing the legs in place, and once the top was ready to be fit to the legs and base, it was obvious Brown should have waited until after the top was shaped to glue the legs in place.
Time for a Template
Brown found it easiest to create a thin template to place on the top and help him find the exact location of the legs, so the three notches in the top could be machined. Brown considered temporarily fixing the template to the top and using a template router bit to shape the three notches, but the shape of the notches in the template wasn’t quite precise enough. He ended up using a bandsaw to get very close and rasps and files to fine tune the fit.
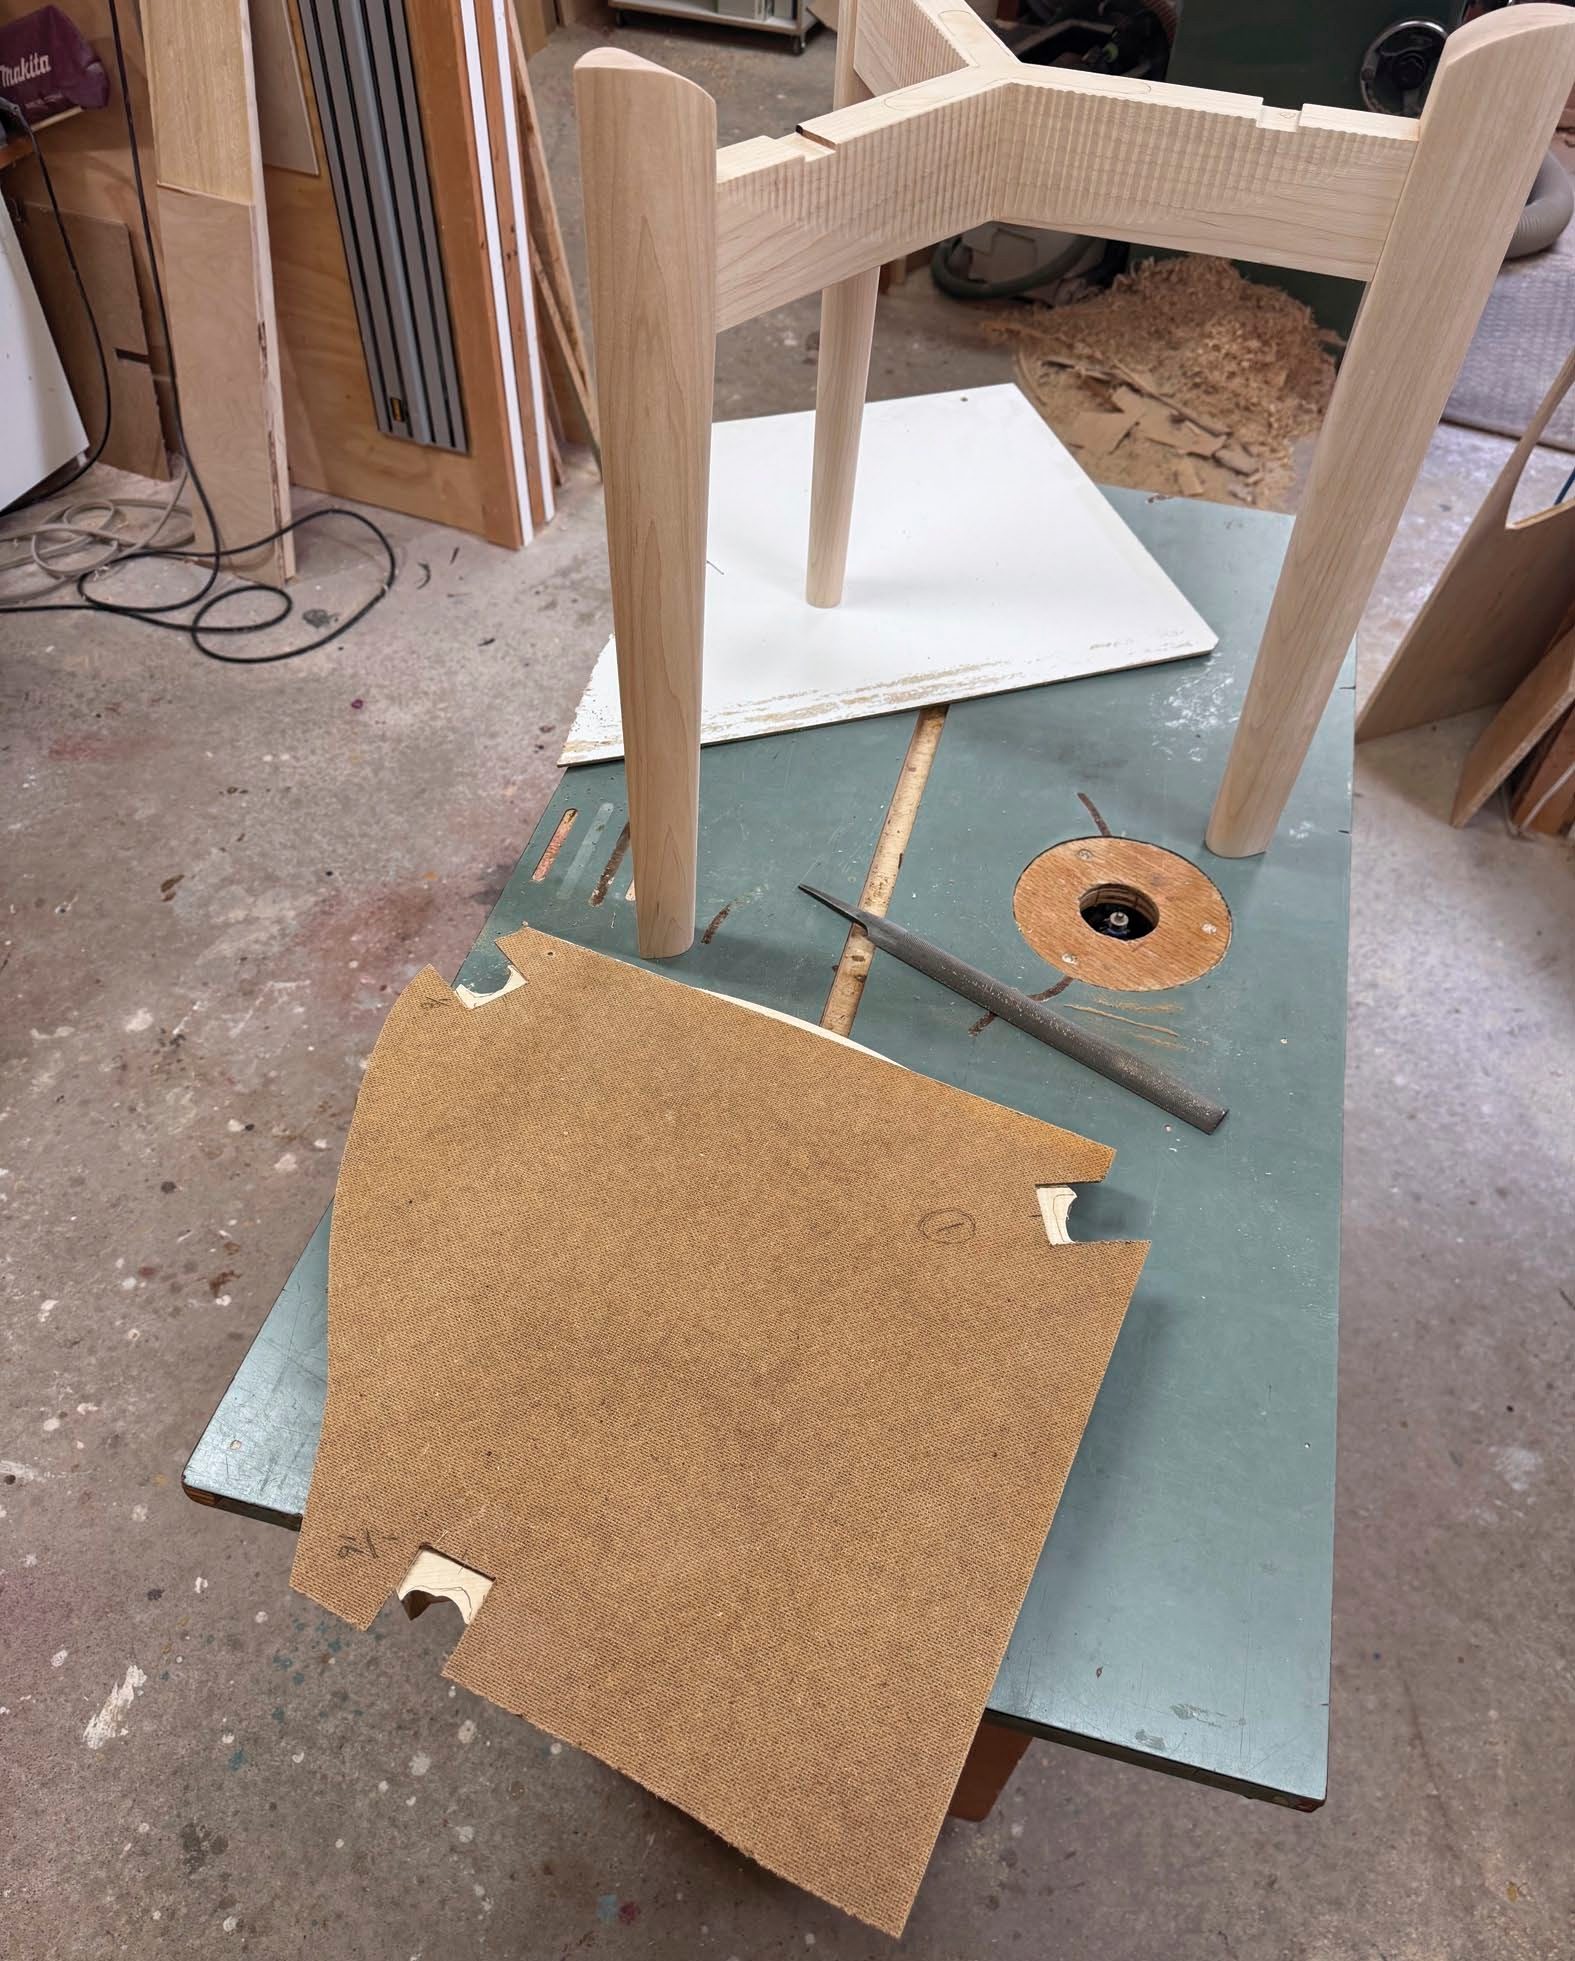
No Chipping
Working downward, so the face veneer wouldn’t chip, Brown slowly snuck up on a good fit.
An Even Gap
The exact width of the gap between the legs and the top isn’t as important as making sure it’s even.
Keep Them Straight
When screwing the threaded inserts into the pre-drilled holes in the underside of the top, Brown used a simple jig to keep the inserts straight. A hole the exact same diameter as the inserts was drilled into a piece of scrap, and with the hole in the scrap directly above the pre-drilled hole in the top, the inserts were screwed into place.

[illustrations_gallery]